Google Analytics 4 (GA4) was built with ecommerce in mind.
Using website analytics data, you can better understand user behavior—and make more strategic decisions to increase sales.
GA4 ecommerce analytics can help answer questions like:
- Which products do users view most?
- Which pages drive the most conversions?
- What percentage of users complete a purchase from the check-out page?
Let’s take a look at why you should be using GA4 and how you can successfully use it to track, analyze, and improve your ecommerce performance.
What is Ecommerce Tracking in Google Analytics 4?
GA4 is an analytics platform that allows business owners and marketers to measure, monitor, and analyze traffic and performance on websites and within mobile apps.
Ecommerce tracking is a specific implementation of GA4 for online stores.
GA4 uses event-based tracking. This means that each user interaction—from a page view to a button click—is logged in GA as an “event.”
GA4 ecommerce tracking relies on “ecommerce events.” When you define an ecommerce event, you enter event-level parameters and item-level parameters (though these are optional).
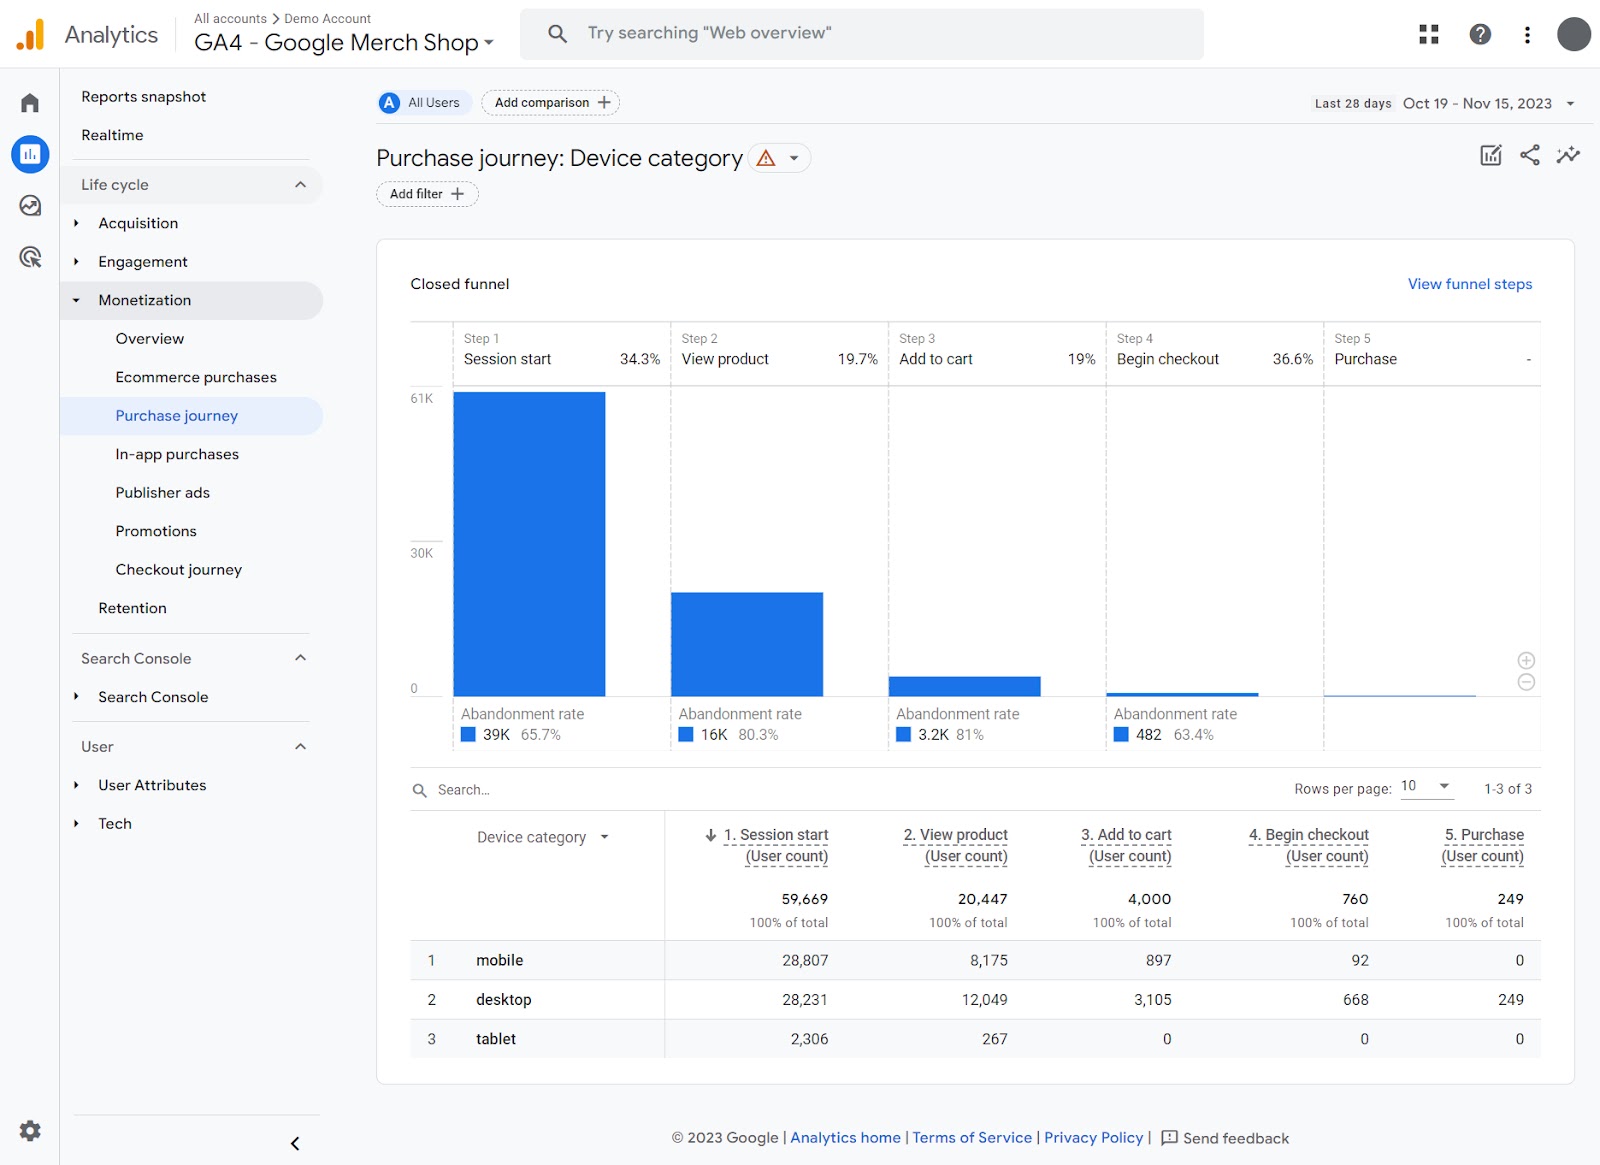
Here’s an example of a purchase journey report from the Google Merch Shop demo account:

With GA4 ecommerce events, you can track when users:
- Add payment info
- Add shipping info
- Add to cart
- Add to wishlist
- Begin checkout
- Purchase
- Refund
- Remove from cart
- Select item
- Select promotion
- View cart
- View item
- View item list
- View promotion
This will allow you to monitor and analyze a specific range of interactions that occur before, during, and after the transactions made on your ecommerce platform.
For example, you can find out which products your users view, whether they add them to their shopping cart, and if they proceed to make a purchase.
Alternatively, you may want to know information about your customers’ average transaction value or the average number of items purchased per transaction.
With so many different metrics to track and analyze, ecommerce tracking in GA4 is a vital tool for any ecommerce business looking to grow.
Why Should You Use GA4 Ecommerce Tracking?
By measuring and analyzing your ecommerce website performance, you can make data-driven decisions that will positively influence your sales, revenue, and profit.
With data, you can identify elements of your online shopping experience that need improvement.
Let’s say your data shows that 30% of your potential customers begin the checkout process but never complete a purchase.
In this case, you may discover that people tend to drop off at a certain place, like the payment page. Based on that information, you could then test ways to reduce drop-offs and improve conversions on that specific page.
For example, you may try adding a new payment method. Or you might try offering free shipping.
Then measure the results by monitoring performance after the change has been implemented.
Did the conversion rate improve?
If so, that’s great. On to the next improvement opportunity. Or you might try additional tweaks to improve performance even more.
If the test wasn’t successful (it didn’t improve conversions or made them worse), then you’d want to try testing another change.
Repeat the process with the insights you uncovered in your ecommerce analytics to create a system for testing and improving store performance and revenue.
GA4 vs. Universal Analytics: Understanding Changes to Ecommerce Tracking
Compared to the previous version of Google Analytics (Universal Analytics), GA4 offers more advanced tracking capabilities for ecommerce businesses.
Starting July 2023, GA4 completely replaced Universal Analytics (UA) as Google’s analytics product offering. All customers using UA will lose access to the web interface and API on July 1, 2024.
According to data collected by Datanyze, Google’s Analytics products (including Global Site Tag, GA, and UA) are used on about 70% of websites.
GA4 uses a more advanced and user-centric approach to website and app analytics.
UA focused on tracking sessions and pageviews. GA4 tracks individual users across devices and platforms and provides greater insights into the customer journey.
In addition, GA4’s event-based tracking allows businesses to define and track custom events that are important to their unique goals. Events can include clicks, form submissions, video views, and more.

The enhanced ecommerce tracking features provide detailed insights into shopping behavior, product performance, and checkout funnel analysis.
UA can no longer be implemented for website analytics tracking, but it is still possible to view historic data until the cut-off **** (July 1, 2024).
How to Set Up Google Analytics 4 with Ecommerce Tracking
Before you can track any ecommerce events, you need to set up GA4.
To complete the steps below, you will need access to your Google Analytics account and your website source code.
The following steps are detailed in Google’s instructions to set up Analytics for a website and/or app.
Go to Google Analytics and click “Get started today.” If you don’t already have an account, you’ll need to take a few minutes to set one up.
If you already have an account, you’ll be redirected to Google Analytics or prompted to sign in.
Once you reach the Google Analytics homepage, click the gear icon in the lower left corner.

When you see the following screen, click on “Create.” Then, select “Property” to create a new GA4 property.

Starting with the following screen, fill in your business and website details until you get to “Data Collection.”

You should see the following options to start collecting data. Choose the platform that you wish to start collecting data from. (e.g., if you’re tracking a website, choose “Web.”)

This will bring you to setting up a new data stream. Input your website URL in the box. Then assign a “Stream name.” This is just an internal name used to identify the data and reports. It’s fine to just put the name of your business or website.
Finally, click “Create stream.”

You will then be taken to the “Stream details” page, which includes your “Measurement ID.” Measurement ID is your unique code that’s used to connect your website to the GA account. Click “View tag instructions.”

Click the “Copy” button and follow the instructions to manually install the tracking code on your website.

Setting Up Ecommerce Tracking
With GA4 installed on your site, you’ll need to add code to send data to GA about the ecommerce events that take place on your website.
This involves two steps:
- Adding the event script
- Adding the event listener to trigger the script
Let’s go step by step through the process.
Step 1: Add the Event Script
The first step is to pass information to gtag (the Google tag used for GA4) about the event that took place or might take place on a given page.
To do this, you’ll add the event tag and items array (code that includes details about the items involved) as a script on the page.
It looks like this:

This code communicates that an event happened.
Let’s break down how it works:

In this case, the event name is “purchase.”
Then it includes details about the event, also known as the event parameters. Things like the value of the purchase (“value”) and the transaction id (“transaction_id”).
Finally, it also includes what’s known as the items array. This bit of code contains details about each item or product involved in the event. Such as the item’s name (“item_name”) and the item’s brand (“item_brand”).
The event configuration tag will need to be added to your website or template code. The variables like product names and prices will need to be dynamically generated.
Dynamically generating the event configuration tag means that the details will automatically be filled in when the page loads or the event is triggered. It will fill in the specific details like the value of the order based on the order that the user placed.
Implementing these tags will likely require a developer. But refer to the GA4 ecommerce documentation for details on where and how to add this code to your website.
Adding the code as shown would automatically fire the event each time this page loads. This works when adding code specifically to a page that indicates an action is completed (for example, on the order confirmation page).
But if you want to trigger the event when the user takes a specific action like clicking a button, then you’ll need to wrap this code in a listener.
Step 2: Add the Listener
Add an event listener to the page to fire an ecommerce event only when a user takes a specific action. For example, if you want to fire an “add to cart” event when a user clicks a button to add an item to their cart.
Event listeners are pieces of code that “listen” for an action to take place on your website. When that action happens, it can then run specific code in response, such as sending an event tracking code to GA4.
Here’s an example of the above code modified with an event listener:

Now, instead of firing whenever the page is loaded, this code would only be executed when someone clicks on the “Purchase” button.
Once you’ve added these two pieces of code, you can now test the implementation. Visit your website and perform the action associated with the event (e.g., clicking “Add to cart”). Monitor your GA4 real-time report to see if the event appears in your analytics data.
From there, you’ll need to add similar code to handle each of the events that you want to track in GA4.
Google Analytics documentation provides extensive examples and code snippets for this can be implemented to track different actions across your site.
But first, you should decide which actions you want to track.
Key Ecommerce Events to Track in GA4
Product Impressions
By measuring product impressions, you can understand how many people are viewing a specific product. This can indicate how popular an item is—and how visible it is compared to other products.
Product impressions refer to the total number of times that a product listing is displayed to a user via your website or mobile app.
For example, each time that a product appears in the viewport of the device they are using, it will count as an impression. Looking at Amazon, this screen would generate four separate Product Impressions (one for each product shown):

It is typical for a user to generate impressions on multiple products in a single visit.
Product Clicks
Measuring Product Clicks indicates how interested a user is in learning more about a product after their initial view.
Product Clicks refer to the total number of times that a product listing is clicked on by a user.
A user must first view the product—a Product Impression—before clicking on the listing to view the individual product page.
Combined with impression data, it is possible to calculate the click-through rate (CTR) and gauge which products attract the most attention from website visitors.
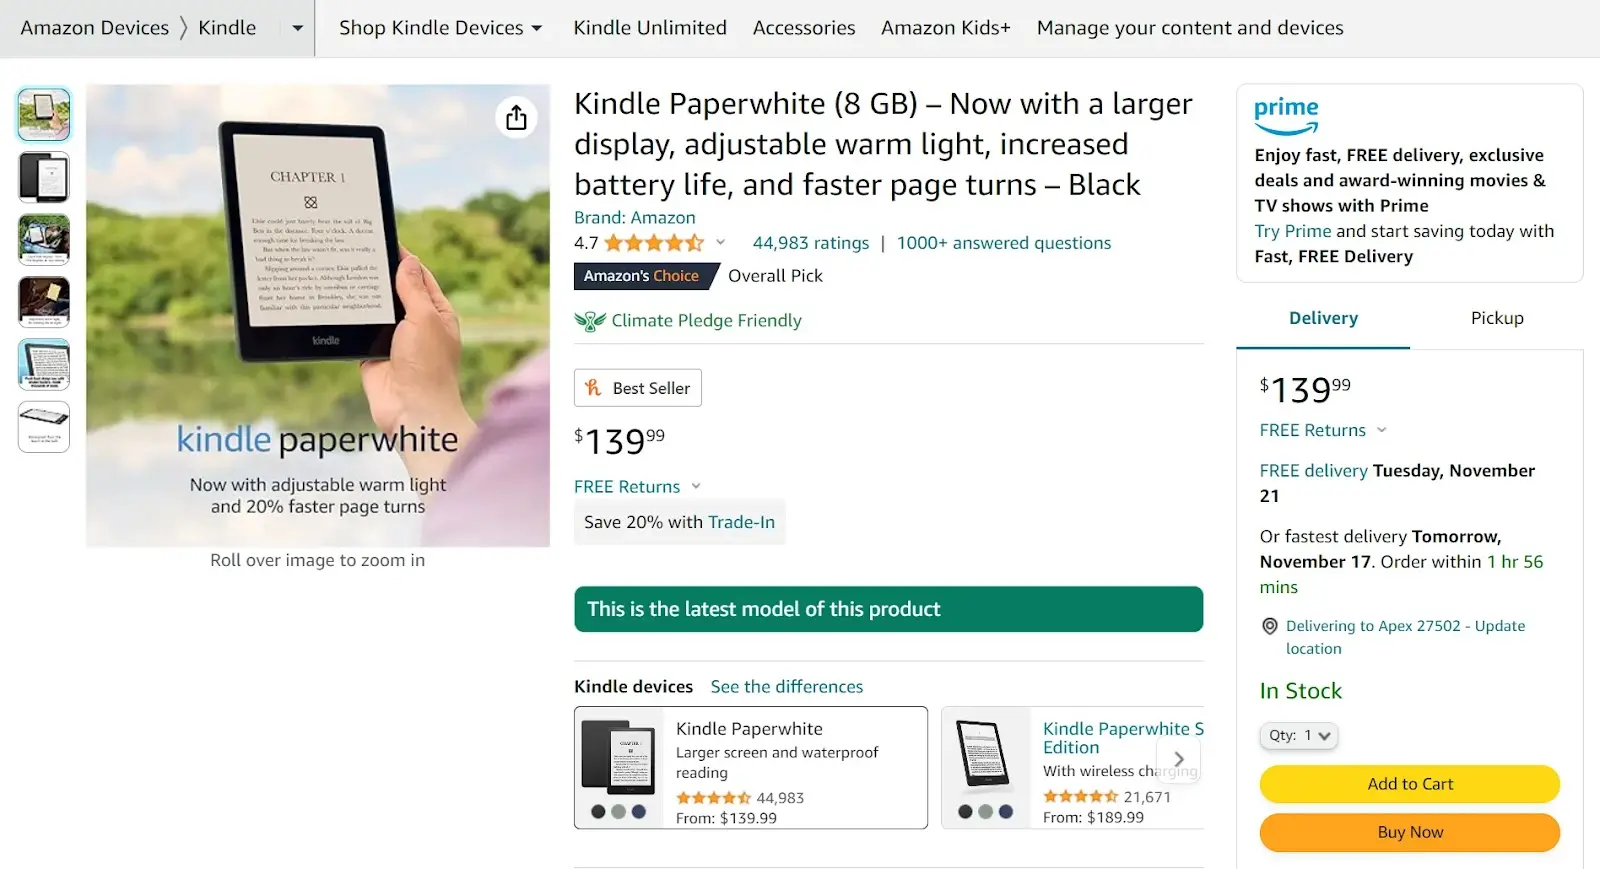
Product Page Views
Tracking Product Page Views (or product views) tells you how many visitors landed on a page dedicated to a specific product. These pages are also known as the product detail page (PDP).
Like this page for the Amazon Kindle Paperwhite:
Although a Product Click will result in a Product Page View under normal circumstances, this isn’t always the case.
A user may click on a product, but not end up on the product page. This could be due to loading errors, a drop in internet connection, or they exit the page before it loads.
You can use Product Page View and Product Click data to identify potential issues with site navigation or usability.
Add to Cart
Track which products are being added to user carts. This data will help you capture the purchase journey and identify steps where users drop off before completing a purchase.
Add to cart refers to each time a user progresses from a product page view to adding the product to their shopping bag.

This action reflects a positive intention towards a user completing a purchase.
However, it doesn’t guarantee that a transaction will be made.
Research from Baymard shows that the average cart abandonment rate is 70.19%.
Understanding which factors influence users to complete—or abandon—their purchase is extremely useful for optimizing the checkout process.
Remove From Cart
“Remove from cart” is when a user decides to remove an item that they have previously added to their shopping cart or basket.
By monitoring this ecommerce event, you can identify products that are frequently removed from carts. From there, you can explore reasons that users may change their mind about making those purchases.
This action is often initiated by clicking a “Remove” or “Delete” button or icon associated with the specific item within the shopping cart interface.

Reasons users remove an item could include friction associated with usability, limited payment methods, shipping costs, or delivery options.
Promotion Impressions
By analyzing promotion impressions, you can determine how many views a promotion gets. And by pairing it with Promotion Clicks data, you can calculate the click-through rate. This is an indicator of how successful that particular promotion might be.
Promotion Impressions are the number of times a specific promotion was viewed.

Promotions can include any type of promotional message or offer. Discount codes, coupons, email sign-up forms, and product banners could all be promotions.
Promotion Clicks
A Promotion Click refers to the number of times that a specific promotion was clicked by users.
By using the number of clicks combined with impressions, you can calculate CTR: (Clicks / Impressions) * 100.
This tells you which promotions trigger the highest rate of engagement.
Then you can use this data to create new promotions designed to boost user interaction.

For example, say you discover that a promotion offer for a 25% discount seems to generate more clicks than one offering “Buy One, Get One 50% Off.” You may use that data to shape your future promotions and overall marketing strategy.
Checkout Page Views
Using GA4 ecommerce tracking, it’s possible to understand how many users initiate the checkout process and how far into the checkout process they make it. Use this information to identify barriers or friction points in the checkout process that lead to cart abandonment.
One key event to track is the number of Checkout Page Views.
Checkout Page Views refer to each time a user views the checkout page.

This page is typically where customers review their items, enter shipping and payment information, and complete the final steps of the purchase process.
Purchases Completed
Tracking the number of Purchases Completed is a fundamental metric. It represents the number of customers who have successfully bought products or services from the website.

Image Source: ReferralRock
You can use the total number of purchase events as a standalone metric. Or use it to calculate additional metrics such as checkout conversion rate and cart abandonment.
Refunds Processed
Measuring the number of Refunds Processed can be useful to understand customer satisfaction with the shipping and post-sales support.
Refunds processed refers to the completion of a refund transaction.
This occurs when a customer returns a product or requests a refund for a purchase they previously made.
This information can be used to understand issues such as product quality, shipping issues, or discrepancies versus a product description.
Additionally, measuring refunds processed can also assist with financial tracking and inventory management.
Examples of GA4 Ecommerce Tracking Reports
Once your GA4 ecommerce events are in place, then you can open your GA4 property and begin tracking ecommerce purchases and other website performance metrics.
Using your ecommerce data, GA4 provides a broad range of analytics.
For example, you can track the path to purchase and how many shoppers complete each step in the purchase journey.

Access this report from within GA4 by clicking “Reports” > “Monetization” > “Purchase journey.”
You can also track first-time purchases versus returning customers.

This report lives under “Reports” > “Monetization” > “Overview.”
You can track which items were viewed versus how many times they were purchased. This can help you quickly spot outliers like products that are converting at a higher or lower rate than other products.

Access this report: “Reports” > “Monetization” > “Ecommerce purchases.”
Zoom in on each step of your checkout process to see where customers abandon their purchases. Then identify ways you can optimize that specific step to improve overall conversion rates.

Find it: “Reports” > “Monetization” > “Checkout journey.”
Compare which devices people use to browse your ecommerce store and the conversion rate for each step in the checkout process.

Access this report: “Reports” > “Monetization” > “Purchase journey.”
Ecommerce KPIs and Metrics to Track
Using the events mentioned above, you can use the data to better measure and understand key ecommerce KPIs and metrics.
Purchases
By analyzing purchase data, your business can make data-driven decisions to improve the overall user experience that leads to increased conversions and revenue.

Purchases refer to completed transactions.
Tracking purchases provides insights into sales performance, revenue generation, and customer behavior.
Revenue
Revenue is a crucial financial metric for ecommerce businesses and is central to understanding the financial health and performance of an online store.

Revenue refers to the total income generated by your ecommerce store, calculated by the sale of products during a specific period.
To calculate revenue, you sum up the individual purchase amounts from all completed transactions within a defined time frame.
Consistent revenue growth is often a primary goal for ecommerce businesses. Analyzing trends and declines in revenue can prove essential for strategic decision-making.
It can be used to calculate additional metrics.
Where revenue represents the total income generated, it is used to calculate profit.
Profit is the income left after subtracting all expenses, including the cost of goods sold (COGS), labor, marketing costs, and other operating expenses.
Average Order Value
Measuring average order value (AOV) provides valuable insights into customer purchasing behavior and the performance of an online store. It can be useful in optimizing pricing, marketing, and sales strategies to maximize revenue and profitability.
It’s the average amount of money spent by a customer during a single transaction or order.
It is calculated by dividing the total revenue generated from all orders by the number of purchases within a specific time period.
AOV = Total revenue / Total purchases
If you have a high volume of orders, even marginal differences in AOV can have a significant impact on your total revenue.
Conversion Rate
This metric measures the percentage of website visitors who take a desired action—or “convert”—out of the total number of visitors. It’s also useful for understanding the percentage of people who go from one step in a process to the next step.
The total conversion rate (or site-wide conversion rate) is the number of conversions divided by the total number of visitors, multiplied by 100.
This tells you, on average, what percentage of your total website visitors convert or make a purchase.
But you can also analyze the conversion rate between any two steps within your customer journey.

Understanding the conversion rate between each step of the journey allows you to identify areas that are doing well and others that need improvement.
For instance, in the above example, the conversion rate between viewing a product and adding the item to a cart is about 24%. That means approximately one in four people who view an item will end up adding something to their cart.
When determining what is a “good” or “bad” conversion rate, you can compare your ecommerce business to industry benchmarks.
For example, the graph below shows drastic differences in ecommerce sales conversion rates between Germany and Italy.

Image Source: Nosto
In addition to country, conversion rates also vary widely per industry.
The graph below shows the vast differences between “Baby & Child” and “Arts & Crafts,” for example.

Image Source: Smart Insights
For more ecommerce industry-specific stats, request a copy of our “State of Ecommerce”report.
Shopping Cart Abandonment
Track this metric to understand how many would-be customers leave after adding items to their cart but before completing a purchase.
Understanding the reasons behind cart abandonment and taking proactive steps to address them is crucial for optimizing the checkout process and improving conversion rates.
To calculate your shopping cart abandonment rate:
- First, calculate your rate of successful sales. Divide the total number of completed transactions by the number of shopping carts created. This gives you the success rate.
- Then, subtract that number from 1 to calculate the abandonment rate.
- Finally, multiply by 100 to create a percentage.
Cart Abandonment Rate = (1 – (Total Transactions / Shopping Carts Created) * 100
There are many reasons for cart abandonment:
- Price concerns may cause users to reconsider their purchase
- Problems with payment methods or concerns about payment security
- High shipping fees or added taxes
Sometimes, external distractions like receiving a phone call or navigating away from the site can interrupt the checkout process.
While shopping cart abandonment is a common challenge in ecommerce, addressing it presents an opportunity for businesses to potentially recover lost sales.
FAQ
What is the Data Layer? Why is it important for ecommerce tracking in GA4?
The Data Layer is a JavaScript code that stores structured information about a website’s user interactions and events.
In GA4, the data layer provides the ability to structure, customize, and transmit data from your website to GA4 in a way that allows for detailed analysis of user interactions. This includes details like the product name, price, and size. Advanced users can also configure custom dimensions to further segment and customize shopping behavior.
Which events should I track with GA4 ecommerce tracking?
The events you should track with GA4 ecommerce tracking depend on your business objectives and the user interactions that are most critical to your success.
Most commonly, you’ll want to track Product Page Views, Add to Cart events, Checkout Page Views, and Purchases Completed. These metrics will give you a general idea of the shopper journey and data to analyze and improve site performance.
But be careful to strike a balance between tracking enough events to gain meaningful insights without overwhelming your analytics with irrelevant data. The tracking data you generate should be used to optimize the user experience for better performance and revenue growth.
How do I improve ecommerce metrics?
To improve your ecommerce metrics, you first need data to act as a baseline. Pick the metrics that matter to you, and ensure that you are correctly measuring them via ecommerce tracking in GA4.
Once you have this data, you should understand how your metrics compare to others in your industry. This generally involves using industry benchmark reports. These numbers help you evaluate your site’s performance relative to competitors and other sites.
With that data in hand, you can prioritize the metrics where your performance is lower than industry standards. Then, create a plan to test and optimize different parts of your website targeting those specific metrics.
Read our guide on Ecommerce Website Optimization for specific tactics and strategies to help you improve sales, revenue, and profitability.
Source link : Semrush.com