Does Changing Domain Names Affect Your SEO?
Changing domain names can affect your SEO in many ways. It can affect the authority, rankings, and traffic of your website.
If you don’t implement the correct practices, it can lead to essentially having to “start over” from an SEO perspective. One of the main reasons is that the backlinks pointing to your old website won’t automatically point to your new site.
The number and quality of the links pointing to your pages are important factors search engines like Google take into account when ranking your content.
Changing your domain name changes the URL of every page on your website. This means all the backlinks you had pointing to your old domain no longer point to your website.
This can affect how Google ranks your website in search results.

But there are other implications too. You could lose brand awareness if people are confused about your new domain or a change to your business name.
You could also create duplicate content issues. These can lead to problems with Google indexing and ranking your pages.
In short: It’s extremely important that you follow best practices any time you change your domain name.
This guide shares the steps you should take to minimize the effect of your domain name change on your SEO.
Step 1: Choose a New Domain Name
Your site’s domain name is not a direct ranking factor itself. But it can still impact your site’s traffic and conversions.
For example, if many people find your website by searching directly for it by name, you may see less traffic after changing it. But that’s more of a brand awareness issue than a ranking issue.
Beyond SEO, your domain name can also play a major role in your broader business strategy, naming strategy, and any branding or rebranding campaigns.
So it’s important to choose your new domain name wisely.
Domain names that are short and simple tend to be more memorable. But there are more specific parts of the domain that can affect memorability too.
Your domain name is actually made up of two parts:
- Second-level domain: The unique identifier of your website (e.g., the “semrush” in “semrush.com”)
- Top-level domain: The “extension” or what comes after second-level domain, including the period (“.com”)
Your top-level domain (or TLD) can also affect your website’s performance and how your visitors perceive it. According to research from GrowthBadger, domains with a .com TLD are the most memorable and trustworthy.

So, if possible, it’s usually (but not always) best to opt for a domain name that ends in “.com.”
If you can’t get a .com domain name, consider choosing a new second-level domain. Or, opt for .co, .org, or .biz. These are the next-most memorable options.
It’s worth noting that .org is often associated with nonprofit organizations, and .biz is typically associated with businesses (rather than personal blogs, for example).
However, you may wish to consider alternative TLDs that are more relevant to your business.
For example, “.mx” would be suitable for companies operating in Mexico. And “.blog” would be suitable for a blog.
In a perfect scenario, your domain name change will take into account both the potential SEO impacts and the effect on your brand strategy.
Step 2: Export Your Backlinks
Before changing domains, it’s critical to take stock of your website’s backlinks.
Backlinks from other sites pointing to your website are an important ranking factor.
You can think of backlinks like votes of confidence for your website. Having high-quality backlinks can indicate to search engines that your site is an authority on the topics it covers, and that other websites trust you as a source.
Each high-quality backlink can increase your site’s authority. Higher website authority can help your website rank higher in search results.
But what happens when you move to a new domain?
You lose the earned value of your backlinks.
Those links point to your old domain. Not your new one.
However, you may be able to preserve the positive SEO impact of previously earned backlinks. To do this, you’ll need to implement redirects. We’ll cover exactly how to do this in the Set Up 301 Redirects section.
For now, let’s just find the links that point to your current domain.
Using Semrush’s Backlink Analytics tool, you can easily see all of the links pointing to your site.
Input your current (old) domain and click “Analyze.”

The “Backlinks” report will show you a range of information about the backlinks pointing to your website.
Click on the “Backlinks” tab. Then, click “Export” and save the list as either an Excel spreadsheet or CSV file.

Save this list. You’ll use it later to reach out to these websites and ask them to update their links. The list will help you prioritize your outreach efforts.
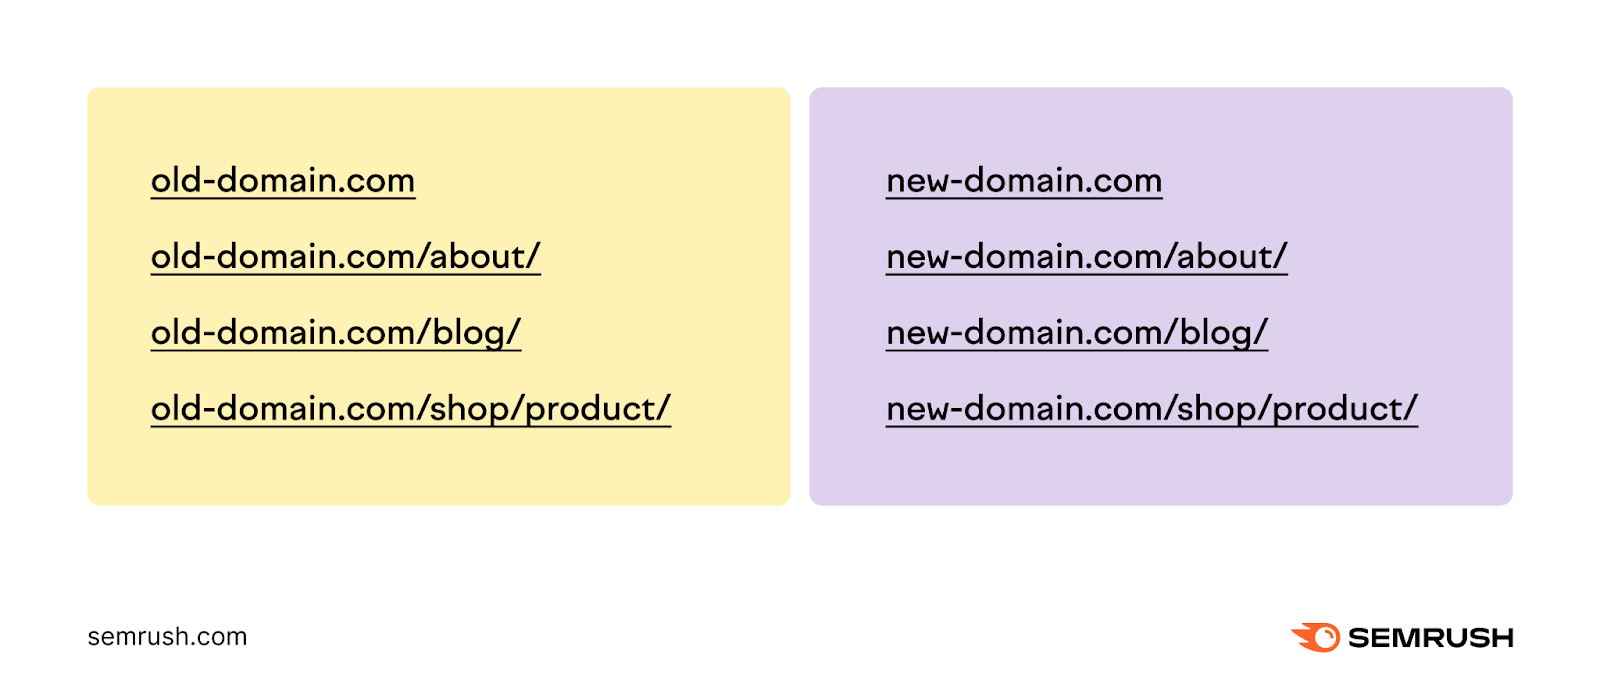
Step 3: Map Your Old URLs to New URLs
Next, build a list of your current website’s pages.
After the migration takes place, you’ll need to implement redirects from all of the old pages to their new location on the new domain.
To do this, crawl your website using Semrush’s Site Audit tool.
Click “Site Audit” from the left-hand navigation. It’s under “On Page & Tech SEO.” Enter your domain and click “Start Audit.”

Once the crawl is complete, click the “Crawled Pages” tab to see a full list of your domain’s URLs. In the top right corner, click “Export” and choose either “Export to XLSX” for Excel or “Export to CSV.”

Once you have a file with your data, you’re almost ready to migrate your content to the new domain.
At this stage, you’ll need to map each of your previous URLs to the new URL where the same content now lives.
For example:

If the URLs of your content are staying the same besides the domain name, then things will be pretty easy. Your new URL will simply be the same as the old url, but with the domain switched out.
If you’re also changing the subfolders or URL slugs of pages on your site, then you’ll need to be careful when mapping old URLs to the new ones.
For example, if you’re changing from “old-domain.com/about-us/” to “new-domain.com/about/.”
The next stage involves actually setting up the redirects.
Step 4: Set Up 301 Redirects
Once your new domain is live with all of your content, you need to implement 301 redirects.
301 redirects are permanent redirects that tell search engines and browsers that your original URLs have been permanently replaced with new ones.
This has two important effects:
- It automatically redirects any visitors to the old URL to the new URL
- Links pointing to the old URL will also be redirected to the new URL
Without implementing 301 redirects, any user or search engine that visits a URL with your old domain name will encounter a 404 page or “Not Found” error. Or they’ll see your old website if the content is still live.
Allowing pages to return a 404 error can indirectly affect SEO performance. You could lose the backlinks pointing to those old pages, which could hurt your website’s rankings. And it can frustrate your website visitors if they can’t find the page on your website.
There are a few ways to implement these redirects.
If you have a WordPress site, you can use plugins like Yoast, RankMath, or Redirection.
Just make sure that the plugin you use allows you to redirect using an absolute URL, not just relative URLs.
Absolute URLs contain the full address of the page, such as https://old-domain.com/books/.
A relative URL only includes the part after the domain. Sticking with that example, the relative URL would be /books/.

If the plugin only supports relative URL redirects, you won’t be able to redirect your old domain’s URLs to the new one. The tool would only allow you to implement redirects to new pages on the same domain.
For example, new-domain.com/page-1 to new-domain.com/page-2. But not old-domain.com/page-1 to new-domain.com/page-2.
The process for implementing 301 redirects is usually pretty simple.
Using Yoast as an example, you click “SEO” > “Redirects” from the WordPress sidebar.

From the “Redirects” page, you’ll configure each redirect that you want to add. Select “301 Moved Permanently” from the “Type” drop-down menu.
Then type or paste the full (i.e. absolute) address of the “Old URL” in the respective text box. Put the address of the new URL in the “URL” text box.

If you’re not using WordPress or you have many pages on your site, you may need to use a more advanced method for implementing redirects in bulk. For example, editing your site’s .htaccess file and rewriting the URLs with regular expressions (RegEx).
Once you have redirected all the relevant URLs, you now need to verify your new website.
Step 5: Verify Your New Website with Google Search Console
Verifying your new domain with Google Search Console (GSC) informs Google about the domain name change.
You will need to do two things here:
- Create a property for your new domain
- Use Google Search Console’s Change of Address tool
To get started, navigate to your existing Google Search Console account.
Click on the top-left property drop down. And choose “Add property.”

This will take you through the process of setting up GSC for your new domain.

If you need help with the process, refer to our full guide on setting up Google Search Console.
Once you set up the property for your new domain, go back to the property for your old domain. If you don’t have a GSC property for your old domain, you can skip this step.
From inside your old domain property in GSC, click “Settings.” Then, click “Change of address.”

Next, under “Update Google,” you’ll have an option to indicate the address of the new website. Click the “Select new site” drop down and choose the domain property that you just set up for your new website.

When you’re done, click “Validate & Update.”
Google will then attempt to validate that you’ve implemented the necessary redirects before indicating a change of address. This is important. Using the Change of Address tool is not a substitute for implementing redirects.

To complete the change of domain address, click “Confirm Move.”
Once successful, a notification in Google Search Console will appear on both the old and new domain properties.
Search Console will begin populating data for your new domain (this could take a few days), and notify you of any related errors.
Step 6: Update All Internal Links
After verifying your new domain, you should begin the process of updating all internal links on your website. You want to replace the ones going to your old domain with links going to your new one.
These old links will still work because of the redirects that you implemented in Step 4. But it’s still best practice to update them.
Why is this important?
If you don’t update your internal links, you are relying on the redirect to get the user to where they need to be. This can slow down your website, especially if you end up with redirect chains.
A redirect chain is when multiple redirects occur between an initial URL that’s requested and the final destination URL. Each redirect can make your site load slower for the user.

Not only can this be confusing for a user, but it can also impact how search engines crawl your website.
You can use Semrush’s Backlink Analytics tool to identify internal links that are redirecting to your old domain.
Enter your new domain and press “Analyze.”

From the “Backlinks” page, click the “Outbound Domains” tab.

In the “Outbound Domains” report, you’ll see a list of the domains that your new site links to. Find your old domain on the list and click the arrow next to the number of outbound links to expand the list.

This report will show you each of the pages on your new domain that contain a link to your old domain. Once you have this list of URLs, you will then need to edit the links on each page through your CMS.
Go through each page and change the links so they point to your new domain.
Optional Step: Ask Other Sites to Update Their Links to Your Site
With proper redirects in place, links from other sites pointing to your old domain should still be able to provide SEO value and send traffic to your new domain.
But, just like with internal links, it’s still preferable for all links to point directly to the new URLs rather than relying on redirects.
Remember the backlinks you identified in Step 2?
Use that list to identify any relevant, high-authority websites that link to your old domain. Then, contact them to ask them to update their links to the new URL.
Outreach involves contacting the website owners and asking them to make updates to existing links on your behalf.
For each link:
- Identify the right contact: Research the website to determine the best person to contact who can help you by updating the link to your website
- Craft an outreach message: Write an email (or contact form message) explaining that you changed domains and request that they update the link in question
- Be specific: In the message, be sure to indicate exactly where the link is on their website, which page it links to, and the new URL you want them to use
Be aware that outreach campaigns are time consuming to do at scale. And they are not always 100% successful.
So focus on prioritizing important links to avoid wasting time and resources.
Step 7: Monitor the Results
To determine whether your domain migration has been successful, periodically monitor the data in your Google Search Console and Google Analytics accounts.
When you first change your domain, your organic search traffic will almost certainly drop. It may even go to zero.
But you should see your traffic start to increase within one to two weeks. In worst case scenarios, this could take up to a few months after the migration.
The impact of a domain name change on website performance varies on a case-by-case basis. Continue to compare data from your old domain’s accounts to understand how the change has affected your rankings and traffic.
If after a few weeks you still don’t see any traffic, consider using the Semrush Site Audit tool to check for broken links or other deeper issues.
FAQs
How Do Website Migrations Affect Subdomains and Subfolders?
If you copied your website from your old domain to your new one and put redirects in place, your subfolders will automatically update. But your subdomains might not.
Your subdomain will also not be updated in Google Search Console’s Change of Address tool. You need to do that separately.
If you want to migrate subdomains from your old domain, you may have to repeat the steps outlined above for each subdomain.
How Many 301 Redirects Can You Have?
There is no limit to the number of 301 redirects you can have.
However, it’s still best practice to minimize the number of redirects on your site, as having lots of them can affect your website’s performance.
How Long Should Redirects Stay in Place?
301 redirects are classed as permanent redirects and should stay in place for as long as you use your new domain name.
If you need a temporary redirect for whatever reason, use 302 redirects. But remember to eventually remove or replace them with 301 redirects.
How Long Will It Take for Google to Index Your New Domain?
Google doesn’t provide a set time frame for how long it takes to index your new URLs. This process can take several weeks in some cases.
You can track your new domain’s search rankings and visibility using the SEO Dashboard.
You can configure a number of reports to track your site’s overall performance, rankings for specific keywords, your site’s backlink profile, and more.
This way you can see when Google has started to rank your new site in search results. You can access the SEO Dashboard and many more useful digital marketing tools with a Semrush free trial.
Source link : Semrush.com