
What is Data warehouse?
A Data warehouse is a concept that aggregates data from different sources into a single, central, consistent data store to provide meaningful business insights. It is typically used to connect and analyze heterogeneous sources of business data. For moving data from one or more sources to the data warehouse, ETL is used (Extract, Transform, Load). The challenge in ETL is dealing with changes in data with time, such as when customer changes their address, or a product changes its price. This is where SCD (Slowly Changing Dimension) comes into play.
How SCD works?
An SCD is a technique that tracks changes to dimension tables over time. Dimension tables contains descriptive information about business entities, such as customers, products etc. SCD keeps track of changes to these entities over time, so that historical data can be analyzed correctly. The three broadly used SCD types are SCD1, SCD2 and SCD3.
The Slowly Changing Dimension Type 2 (SCD Type 2) is one of the most used dimensions in a data warehouse. SCD type 2 stores a record’s history in the dimension table. Now, in any ETL application, effective dates (such as start and end dates) and the flag approach are the dominant ways for SCD type 2. The concepts of SCD type 2 is — Identify the new records and insert them into the dimension table with surrogate key and Current Flag as “Y” (stands for active indicator). — Identify the changed records meaning those records already exist in the dimension table with changed values, re-insert them into the table and Current Flag as “Y” too. — Update the existing records in the table and Current Flag as “N” for those records that consists of old values.
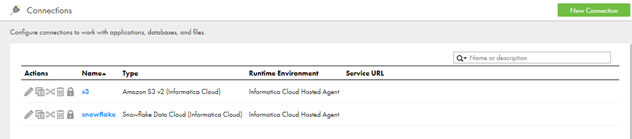
Connections:- In IICS, go to the Administrator service, click on the connections to create connectors for s3 and snowflake. Get the add-on connections if not available.
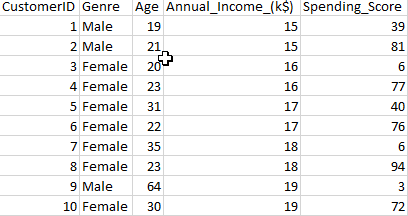
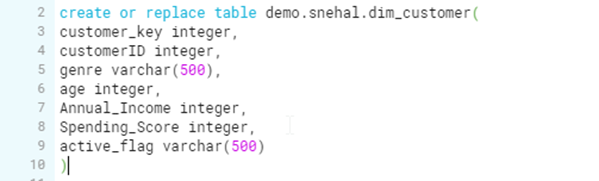
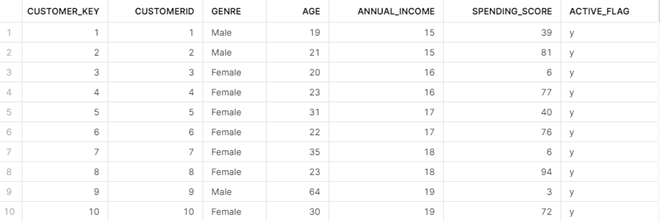
Metadata Structures: Source and target table structures are shown below: –
Source file structure:
Target table structure:
Steps for Data Pipeline
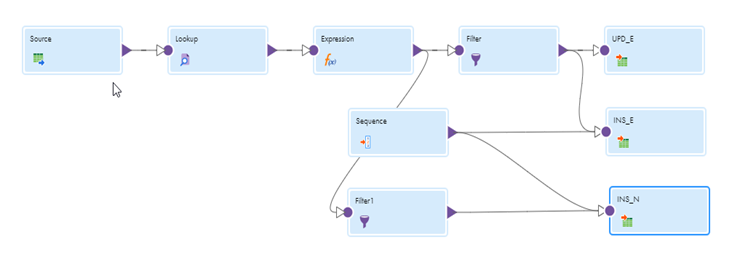
Enter IICS and choose Data Integration services. Go to New Asset-> Mappings-> Mappings
1: Drag source and configure it with source file.
2: Drag a lookup. Configure it with the target table and add the conditions as below:

3: Create a new expression and connect both the source and the lookup to it as described above. If there are name conflicts, it may ask you to resolve them by using prefixes or suffixes. I used SQ_ as a prefix and LKP as a suffix. Add an output port o_new_record as type string and configure it as IIF(ISNULL(CUSTOMER_KEY),true,false). Add another output port as o_update_record as type string and configure it as IIF(not ISNULL(CUSTOMER_KEY), true, false). Also, two output ports of type string should be added, with old_flag as ‘n’ and new_flag as ‘y’.
4: Add a filter and connect the expression to the filter as mentioned. Set the condition to o_update_record in order to filter out the records that need to be updated.
5: Drag target (UPD_E) and connect the filter to it as mentioned. Select the operation as update from the dropdown. Also select the Surrogate key (CUSTOMER_KEY) as the update column.
go the field mapping tab, map CUSTOMER_KEY with the CUSTOMER_KEY and ACTIVE_FLAG with the old flag.
6: Drag target (INS_E) and connect the filter to it as mentioned. Select the operation as insert from the dropdown. Map the ACTIVE_FLAG with the new_flag and other target fields using field mapping tab.
7: Create a sequence generator and connect with the target instances as mentioned, it helps to generate the surrogate key in the dimension table.
8: Add another filter and connect the expression to the filter as mentioned. Set the condition to o_new_record to identify the new records and insert them into the dimension table.
9: Drag target(INS_N) and connect the filter with o_new_record condition to it as mentioned. Select the operation as insert from the dropdown. Map the ACTIVE_FLAG with the new_flag and other target fields using field mapping tab.
Execution step: –
Save and close the mapping after you have completed the steps. Click on New Asset -> Tasks-> Mapping Task.
Enter your Task Name, choose the Runtime Environment, and select the Mapping you created. Click Next (Sequence) and Finish. Mapping Task will be saved, then run.
- In the first run, target table i.e., DIM_CUSTOMER will look as follows: –
- Pick the same file and make some changes in the records. Insert it in s3.
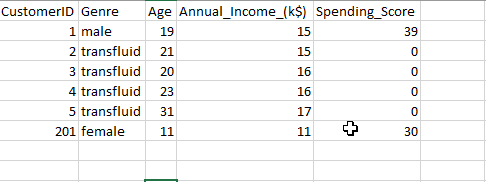
- Add the changed source file in the source, then re-run the job to see the history records are being captured in the target table as per SCD2 logic we have defined.
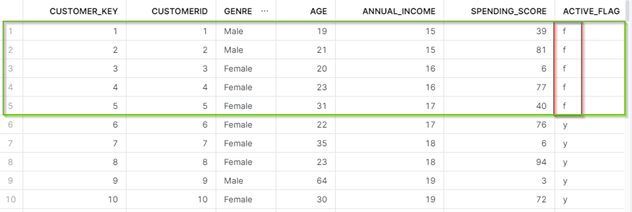

- As you can see in the figures above, a new record was inserted with the CUSTOMER_ID value of 201. Also, all old records with changed values i.e (1-5 customer_id records) are added with ACTIVE_FLAG as ‘y’ and earlier records are flagged as ’f’.
Conclusion — Thank you for reading, I hope this blog will help you in implementing SCD2 logic in your project using IICS. Good luck!