How to set up feed rules in Google Merchant Center and ensure quality product data

The product feed is the single most essential element when it comes to listing shopping inventory on Google. However, feeds can be notoriously low-quality and heavily neglected.
Shopping feeds work on multiple levels to help promote retail businesses, with paid and free listings. This, coupled with the emergence of more AI within Google Ads, propels the importance of the feeds to even higher levels.
Providing Google’s algorithms with high-quality and accurate product data is crucial. You can enhance your product data in various ways, including back-end website changes, plugins and feed optimization tools. However, each of these comes with a cost.
This is where Google’s feed rules, supplementary feeds and product edits directly within Merchant Center come in. These valuable tools can optimize your product data and enhance your product listings at no cost.
This guide tackles how to use feed rules to overcome a low-quality feed.
What are feed rules?
Feed rules in Google Merchant Center allow you to adjust and manipulate your base feed. You can use feed rules to help you resolve errors so that your feed adheres to Google’s policies and improves the overall quality.
You can use the rules to adjust any of your feed attributes and create new attributes not yet submitted. With the rules, you can set an attribute to a specific value, extract values from other attributes in the feed or modify the data.
Understanding what attributes to optimize
The title is the most important element of a product feed. When deciding whether your product is relevant to a search, Google uses this as its first reference point. The more complete and comprehensive your feed, the better your **** of success in the ad auction.
To understand the state of your feed in the first instance, you can review product data in Merchant Center or download available data from the products tab. If you are using an XML feed, you can also use tools like XML converters to extract your feed into a readable Excel spreadsheet.
Once you have your products in a format you can analyze, you can identify gaps in your feed where attributes are missing. You can also analyze title length, aiming for at least 30 characters but ideally 75-100.
How to create a feed rule
The first thing to know about feed rules is that they are added at an individual feed level. So if you have multiple product feeds or feed labels, you must apply the rules to each one.
To add a new feed rule, you must first ensure your product feed has been submitted. Once submitted, you are ready to start modifying your product data.
To create your first rule:
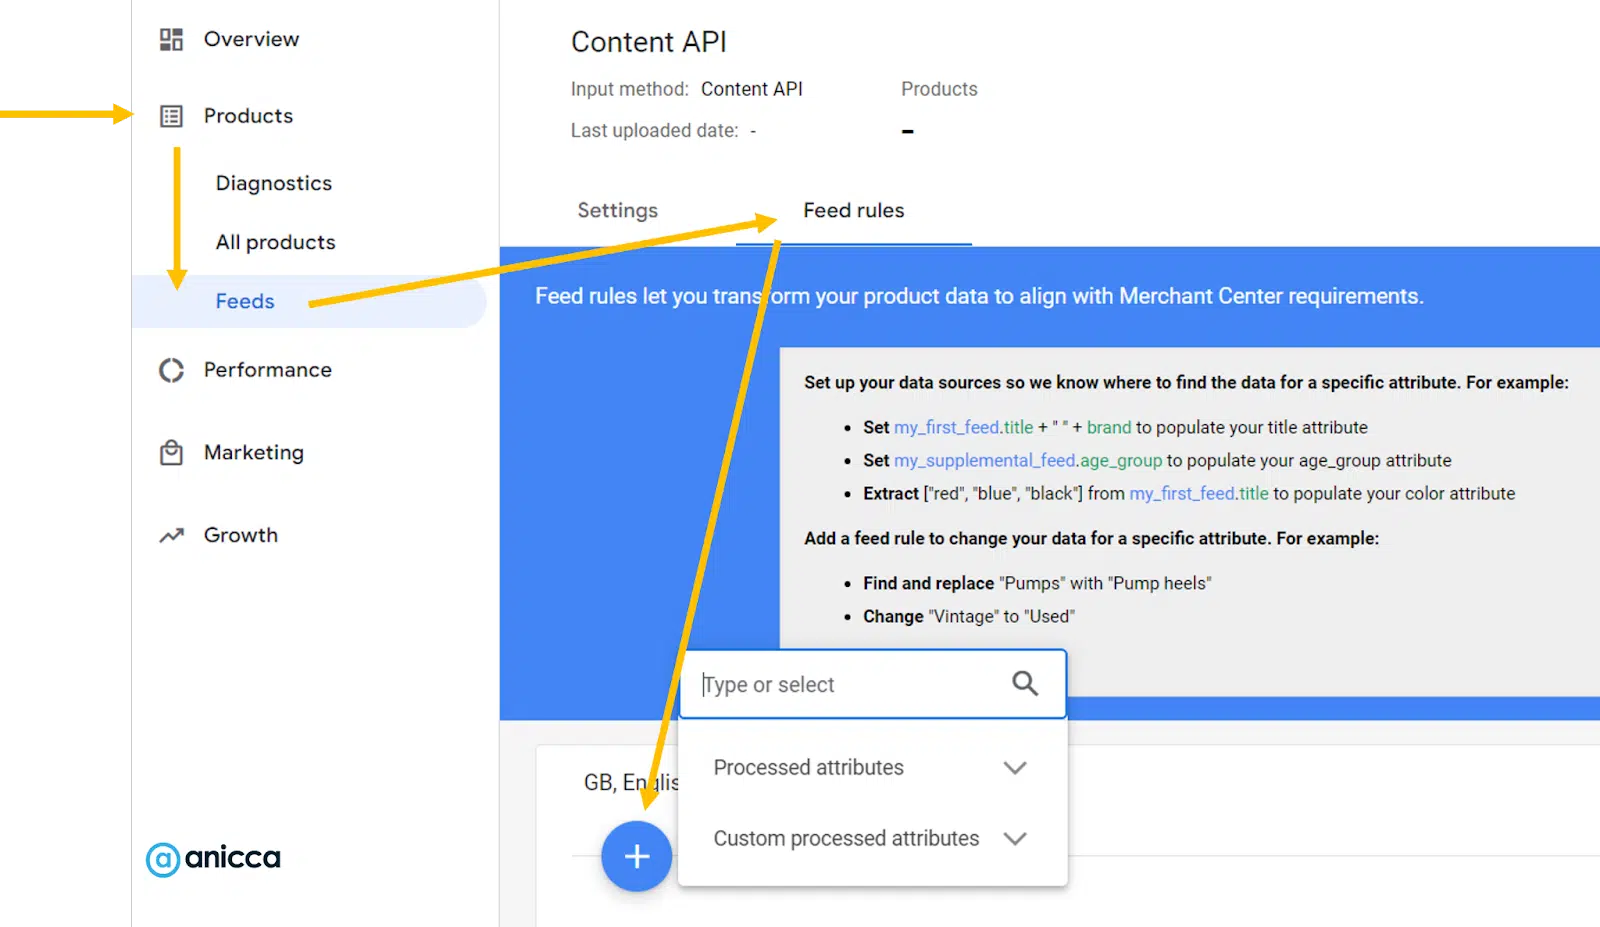
- Log in to your Merchant Center account.
- On the left-hand navigation, select Products and then Feeds.
- Under primary feeds, select the feed you would like to create a rule by clicking on the feed name underlined and in blue.
- Select the rules tab in the top navigation.
- Click on the blue plus button to create a new rule and select the attribute you want to edit.
- Configure your data source.
- Apply any modifications.
- Review the preview on the right-hand panel.
- Select Save as Draft.
- You will now see an option to test the changes of your draft rule before they are applied to your live product data.
- Once satisfied with the changes, click Apply to save them and push live. If you are not happy, you can discard and remove the draft.
Important considerations for feed rules
When creating feed rules, always consider these points to ensure your rules work as expected.
- Each attribute within a feed can only have one rule associated with it, so any amends have to be contained with that one rule.
- Feed rules work in a cascading nature, meaning the rules layer on top of one another. Google will apply the first line of the rule, followed by the second and so on.
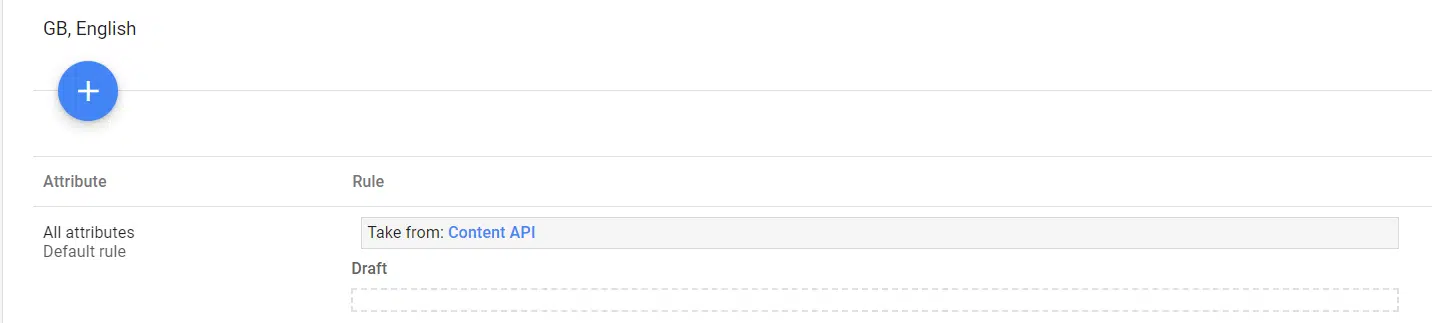
- When you first access feed rules, you will see a default rule in place. Google applies this automatically to each account. It is instructions to take the value for each attribute from either a supplementary or a primary feed.
- When appending text, the text will appear exactly as entered. This includes spaces and periods. So if you want to append a brand name, for example, rather than just entering “Nike,” I recommend entering “ – Nike” or similar.
- Feed rules are not designed for individual product optimizations and are there to make changes in bulk.
Get the daily newsletter search marketers rely on.
Your data source options
When configuring your feed rules, you need to select your data source. This configuration identifies where the base data for the chosen attribute should come from.
You are given options on retrieving your data source through filters to apply conditions and operations that need to be met.
The operations allow you to “Set to,” “Extract” or “Take latest.”
- “Set to” allows you to give a simple command to populate your chosen attribute with incoming data from your primary or supplementary feed or assign it a custom static value.
- “Extract” allows you to search for specific terms within your base data and use these within the chosen attribute.
- “Take latest” allows you to command Google to take the latest value submitted through a specific source.
You can use simple data source selections to carry out universal feed tweaks across your feed. For example, you could use the “Set to” function to combine your existing product title attribute with your brand attribute.
Your feed modification options
The options available to modify your feed attributes will depend on the attribute you are trying to change.
For example, numeric-based attributes will have different options to text-based ones. There are basic options, such as append, or more advanced options, such as calculate.
Depending on what you want to achieve, you must select the modification that will allow you to achieve this.
- Append: Add new values to the end of the attribute.
- Prepend: Add new values to the start of the attribute.
- Find and replace: Search within the selected attribute for a specific value and replace it with another.
- Calculate: Available for numerical attributes only. You can add, subtract, multiply or divide with other attributes or custom values.
- Split and choose: Select one or more values from an attribute with a common period separating them (such as commas, arrows, etc.). You can then select the element to break out and use it as part of your attribute.
- Clear: Remove all of the values submitted for an attribute field.
- Add repeated field: Applicable only when multiple values can be submitted for an attribute. This allows you to add an additional value to fields such as additional image links.
- Optimize URL: This function allows you to edit or remove URL aspects. This can be used to add parameters to your URLs.
- Standardize: This can be used when an attribute accepts set values. For example, where there are errors in the original data in fields such as condition.
Using feed rules to overcome low-quality feeds
You can use feed rules for many alterations and modifications, but below are some of my top rules. They aim to reduce errors within the feed and improve its relevance and performance.
Remove errors in product titles
With product titles, there are certain policies they must adhere to. For example, your titles should not be used to promote free delivery or promotional codes.
In some instances, however, such elements can pull in automatically from your website. You can use feed rules to remove or replace such elements to ensure your titles are error-free.
To use feed rules, set the data source you wish to edit. In most instances, this will be your primary feed. If you have a supplementary feed containing titles, you should select the supplementary feed.
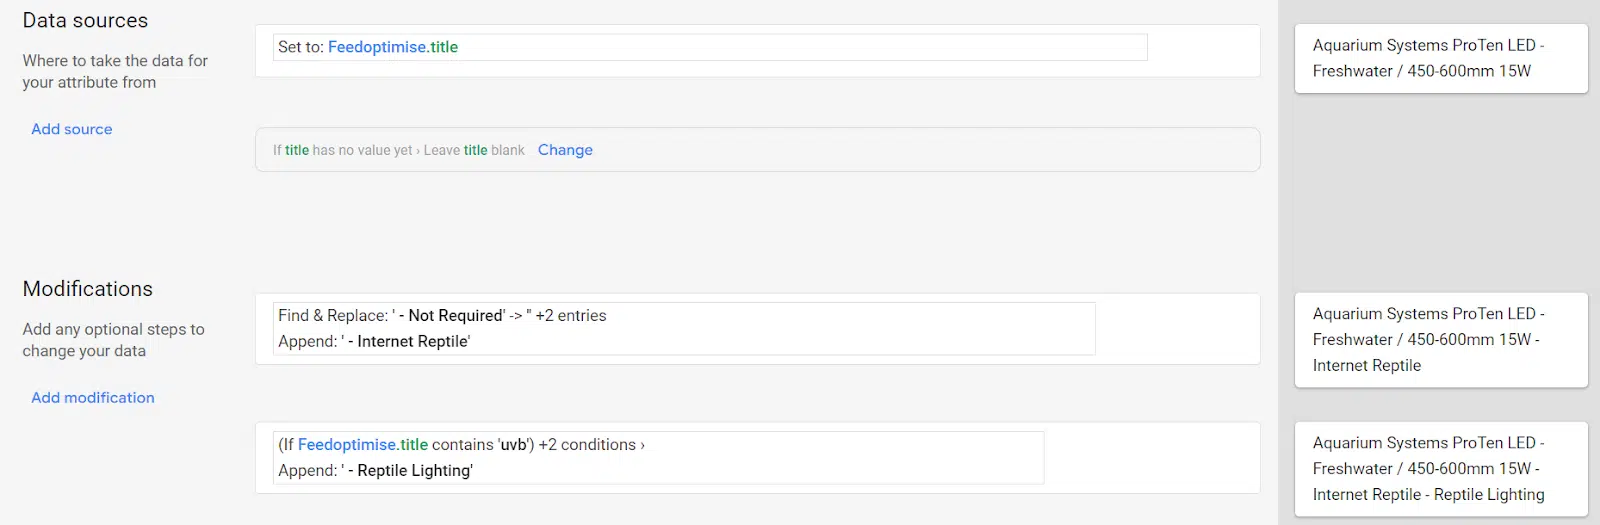
Once you have selected your data source, add a modification specifically to find and replace, then add a rule. When selected, a command box will pop up, allowing you to select an attribute or type in an entry. You will want to type in an entry manually.
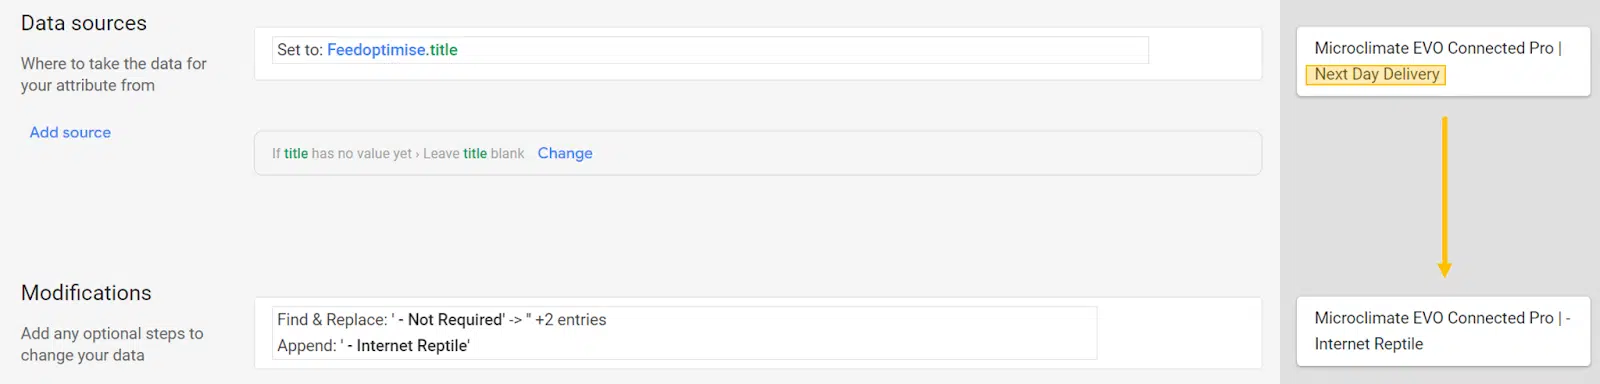
You should type in the text you wish to remove from your product titles. You can see in the image example we are removing two elements. In the Replace with field, you should leave this blank if you just want to remove the element.
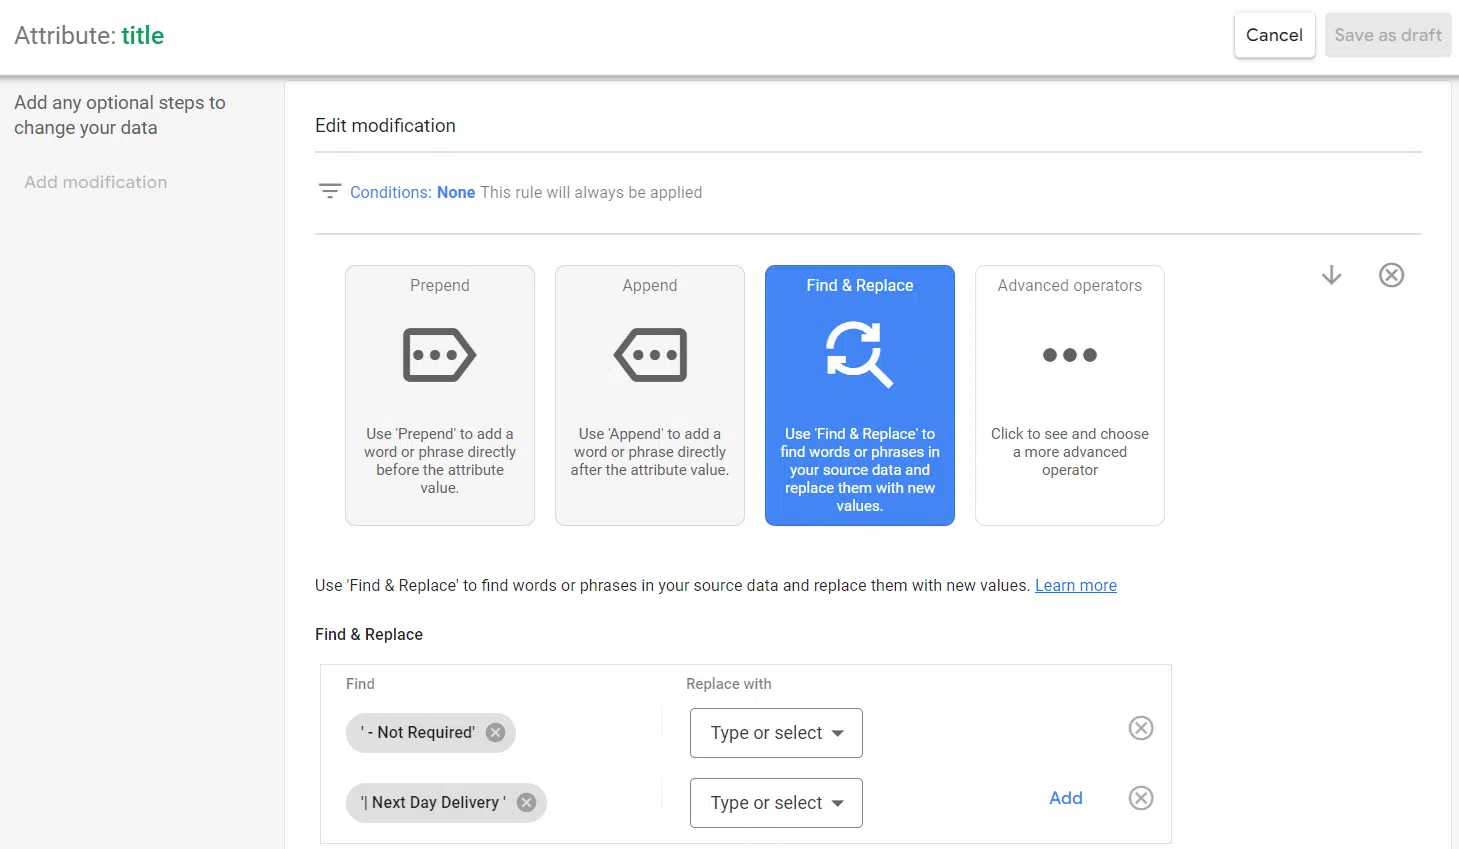
When happy with your rule, click OK at the bottom. You should see previews populate on the right-hand panel. The panel will show how the rules build on top of each other.
You can also use the advanced section to shore up your rule, to specify case sensitivity or matching regular expression, amongst other commands.
Append text in product titles
Another great way to use feed rules for titles is to append text based on set criteria. This is a simple way to add relevancy based on core keywords.
This rule allows you to improve the feed quality to increase the match rate to more relevant searches for your products. This approach could also be applied to product descriptions.
If you are using more than one rule for titles, remember to layer them in the correct order. You can use the preview to accomplish this.
Build titles with product attributes
If your product titles lack key attributes such as color or size, but these are submitted attributes in your feed, you can draw on these.
You can also use this approach for attributes such as brand to help incorporate these details into your product titles.
Apply custom labels
A quick and easy way to group products based on set criteria is through custom labels. An example of this would be if you wanted to identify all products that were currently on sale.
In this example, I use other submitted attributes to build the criteria. We know that a sale price should be submitted with the primary feed for sale items. We can call on this element and tag all products with a sale price with a custom label.
Using a rule based on this criteria, the value becomes dynamic as products come in and out of sale. You can then use this label to build your campaign structure, optimize, or report on.
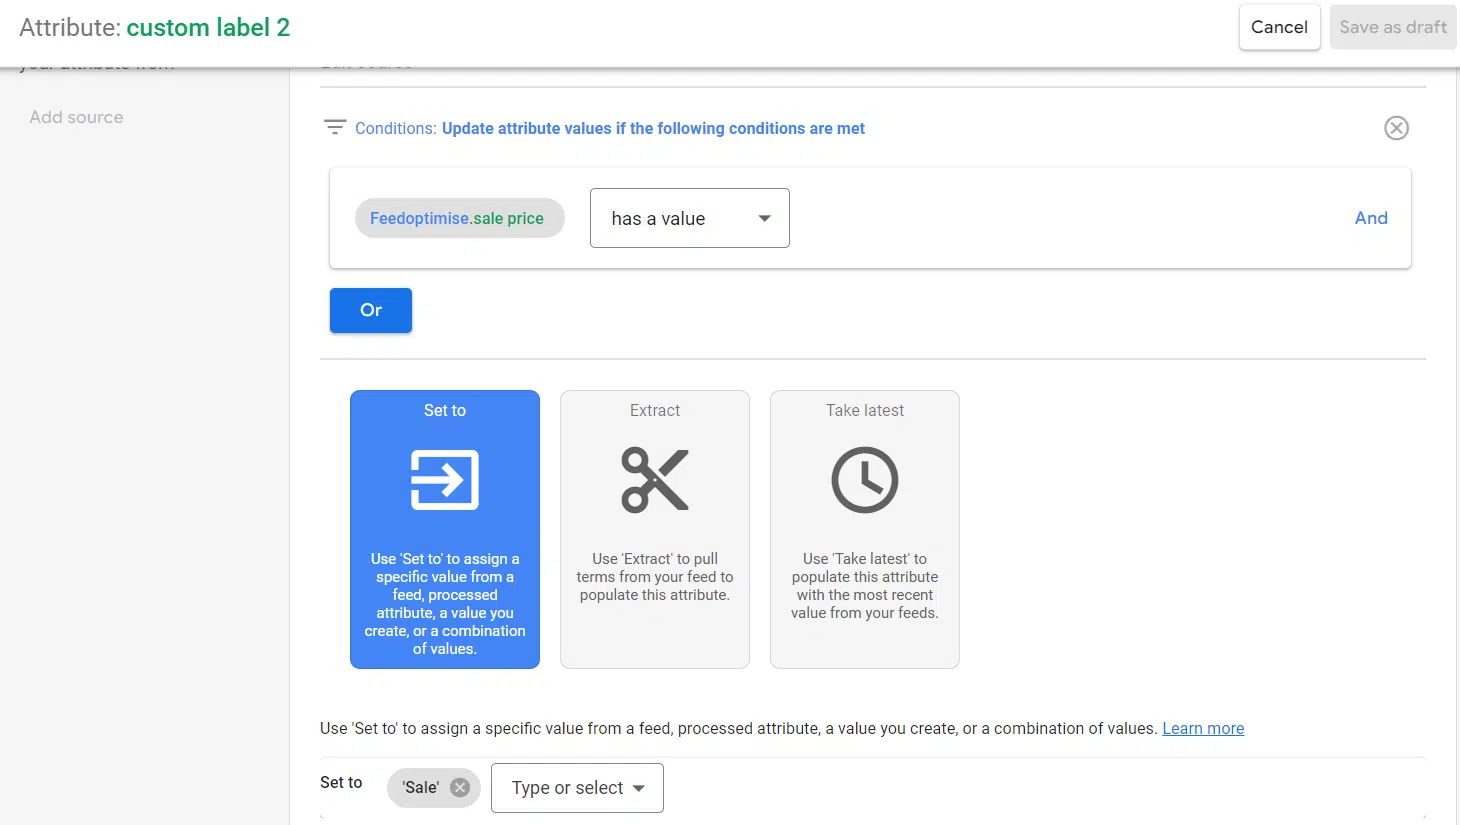
Because we aren’t amending a value but creating one, there are no modifications to add underneath this.
Add promotion IDs
If you are running promotions but need to narrow down to specific products only, you can use feed rules to apply a promotion ID. For example, if the offer was only available for specific brands.
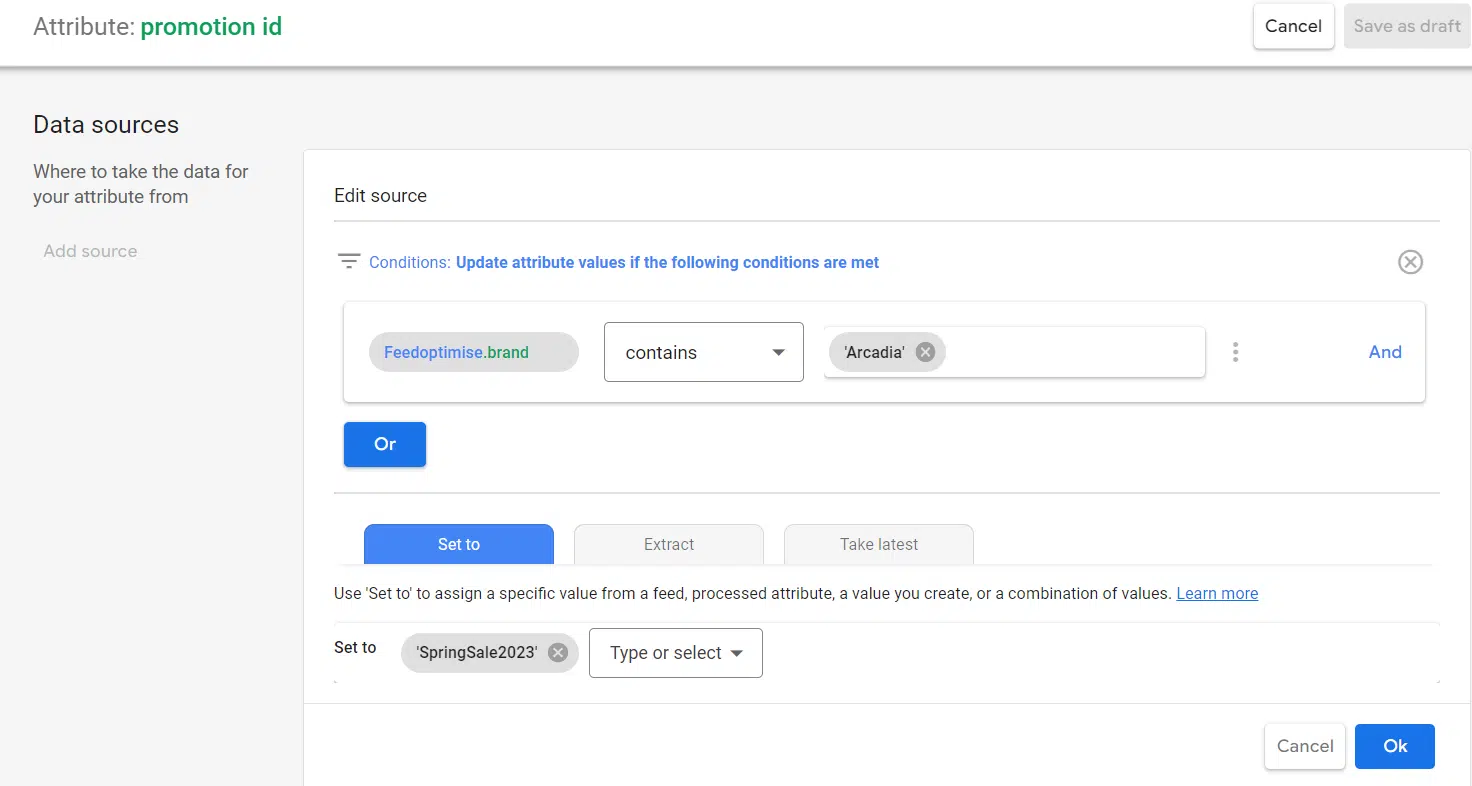
As with the other rules, you can only have one rule per attribute. So for each new promotion, you must replace the rule conditions.
Populate missing attributes
In some instances, your feed may underperform due to missing attributes. While these attributes may only be recommended, they can help increase feed quality or support in campaign structure.
Attributes you could build out with feed rules include product types and colors. To build these attributes out, the data needs to be available elsewhere in your feed, for example, within a title or description.
This way, your feed rule becomes “If title contains black set color to black.”
Remove errors in standardized fields
Within your shopping feed, there are several attributes that have standardized values you can submit, for example:
Building product types from URLs
The product types attribute is often among the messiest and hardest attributes to amend successfully.
While product type is only a recommended attribute and does not factor directly into ad delivery, it is a vital attribute for account structuring. Ultimately your account structure can make or break your performance, so it becomes an important attribute.
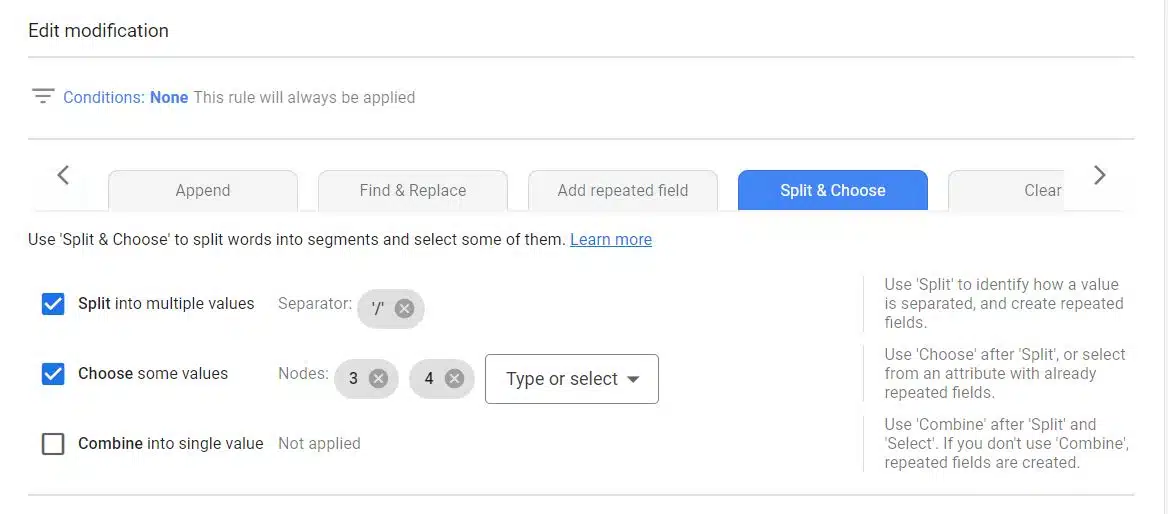
Depending on your site structure, feed rules can help to navigate this. With the use of split and choose, you can use the breadcrumb structure of your URLs to build out product types.
To build out your product types, you can follow the steps below:
- First, add your data source as your primary feed and select “Set to.”
- You will want to set the value to “Link.”
- You will then want to add your modification and select “Split and choose.”
- You will want to split your attribute by a slash (“/”).
- Finally, you need to select the split attributes you want to use. For example, https:// will be 1 and your domain will be 2, so the best practice would be to start your selection at 3. You will also want to consider how deep into your URL path to go as not to include the product string itself

Overcoming low-quality feeds with feed rules
Many edits and improvements can be made to your product feed using feed rules. They are a great place to start if you have edits that span across all or a high volume of products.
Opinions expressed in this article are those of the guest author and not necessarily Search Engine Land. Staff authors are listed here.
Source link : Searchengineland.com