Learn why you should integrate Google Analytics with your WordPress site and get step-by-step instructions on implementation.
Why Add Google Analytics to WordPress?
Google Analytics is a powerful web analytics tool that measures how users interact with your content and offers valuable insights into your audience’s behavior. This data can help you optimize your website, improve user experience, and increase conversion rates.
Connecting WordPress to Google Analytics enables:
- Visitor Tracking: Get crucial data about your site visitors, including geographic location, device used, browser type, and more. Understand your audience and tailor your content or marketing efforts accordingly.
- User Behavior Analysis: Google Analytics tracks user behavior on your website. Learn which pages are popular, how users navigate your site, and where you lose them. Use this data to optimize your user experience.
- Content Performance Tracking: Gain insight into your website content’s performance. Identify the most popular content and how long users stay on specific pages. Use this information to create more engaging content.
- Conversion Tracking: Whether your goal is to drive sales, generate leads, or encourage specific user interactions, tracking conversions helps you measure your site’s performance
- Ecommerce Analytics: Does your WordPress site include an ecommerce component? Track ecommerce transactions, monitor product performance, and gain insights into your online store’s effectiveness.
- Custom Reports and Dashboards: Set up custom reporting and track the key performance indicators (KPIs) that matter to your business (e.g., bounce rate, new users, session conversion rate, etc.)
- Data-Driven Decision Making: Use comprehensive analytics data to make informed decisions about your website, content strategy, and marketing efforts. Learn what works well and what to improve.
How to Add Google Analytics to WordPress
There are a few different ways to configure Google Analytics for WordPress. You can use WordPress’s Integrations tool, utilize a plugin like Site Kit, or manually insert the Google Analytics tracking code into your WordPress theme file.
Which method is the best will largely depend on your WordPress plan. Below, we’ll outline which plan allows you to use each process.
Don’t be intimidated by the thought of editing your website’s code. It’s pretty straightforward. You won’t break anything as long as you follow the instructions.
Step 1: Create a Google Analytics 4 Account
Before connecting your WordPress to Google Analytics, you need a Google Analytics 4 account.
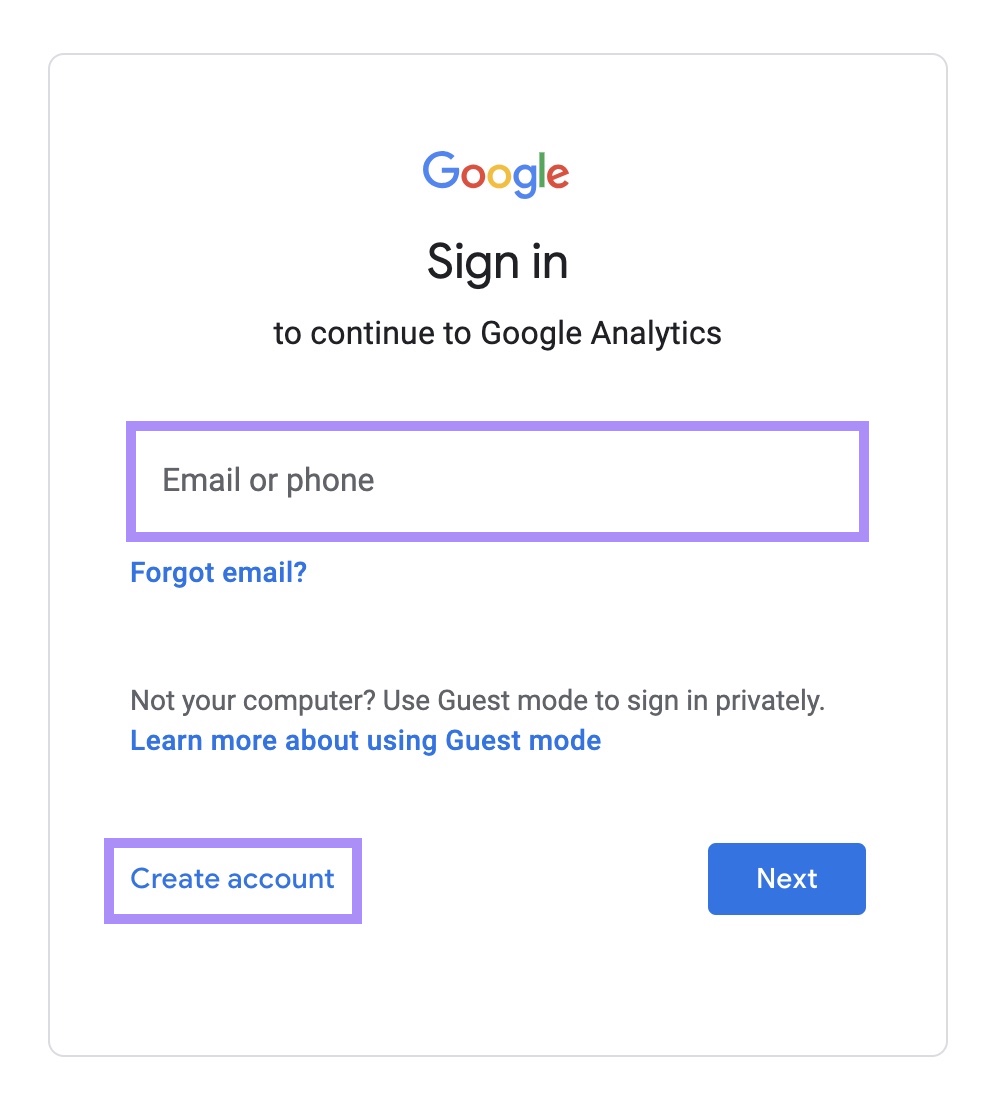
Head over to the Google Analytics website. Next, sign in using your Google account.
If you don’t already have one, click “Create account” and follow the prompts. Then, sign in using your new account details.
You’ll find yourself in the account creation workflow. (Go to the “Creating Your Account” section).
If you have previously used Google Analytics for other sites, navigate to the homepage to create a new account. Hover your cursor over the widgets on the left to open the side panel. Click on “Admin” to open the admin panel.
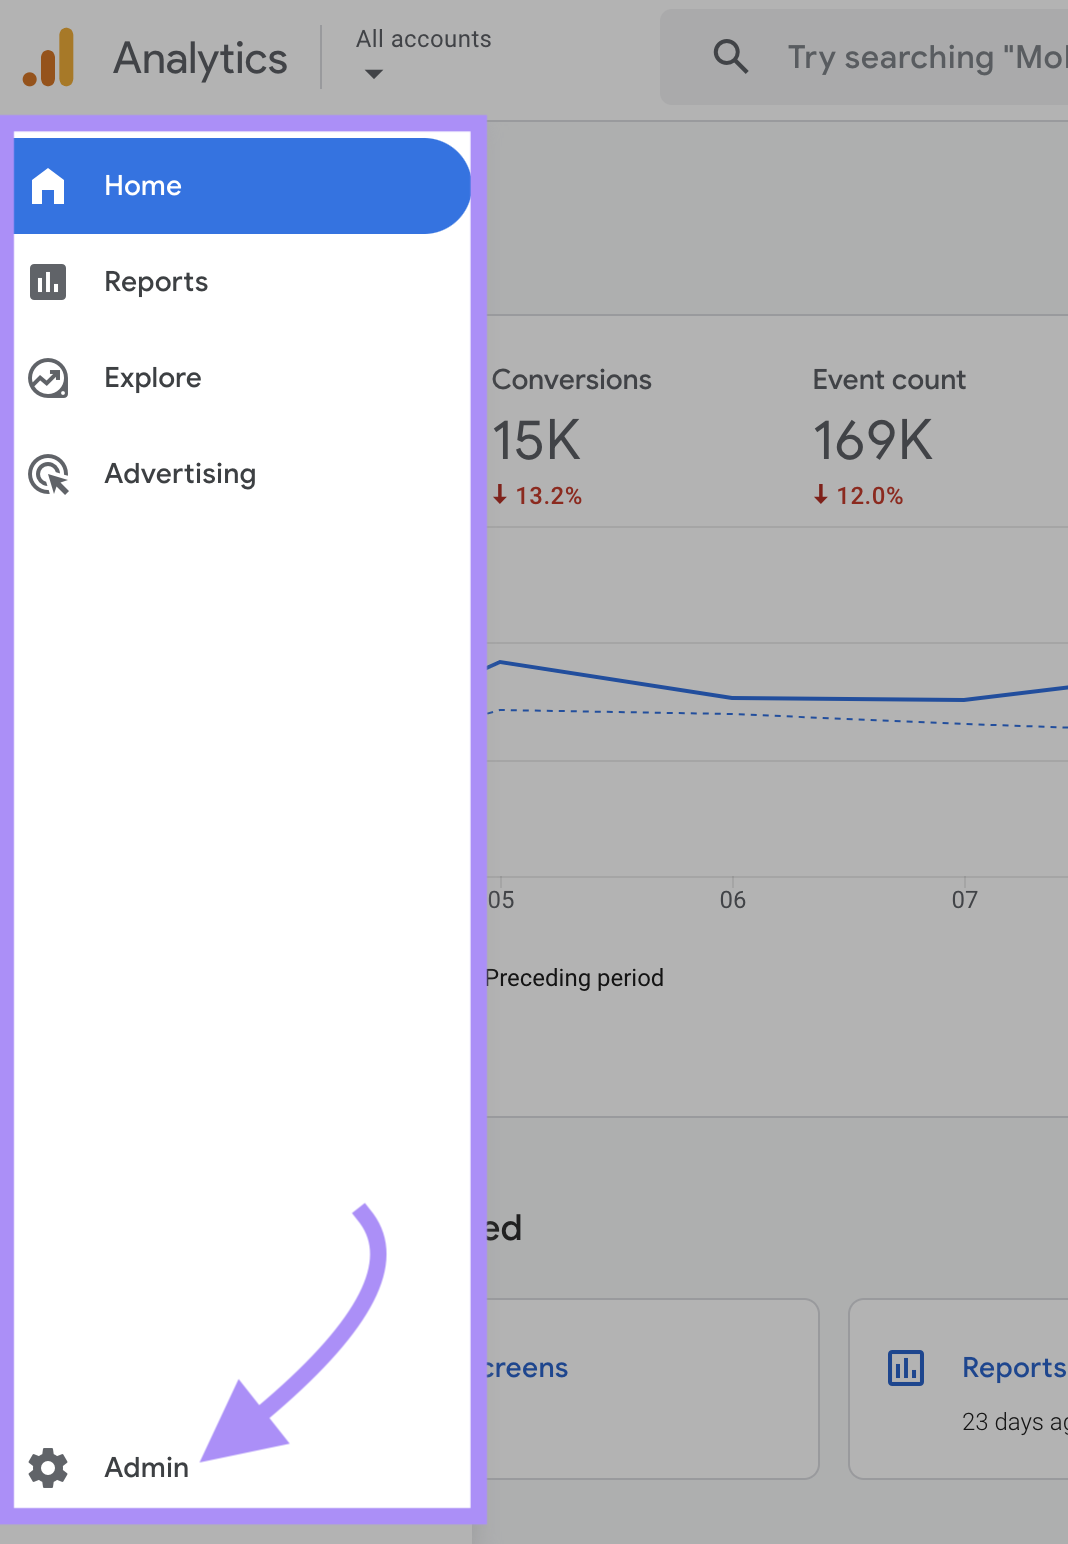
Next, click “Create” and select “Account.”
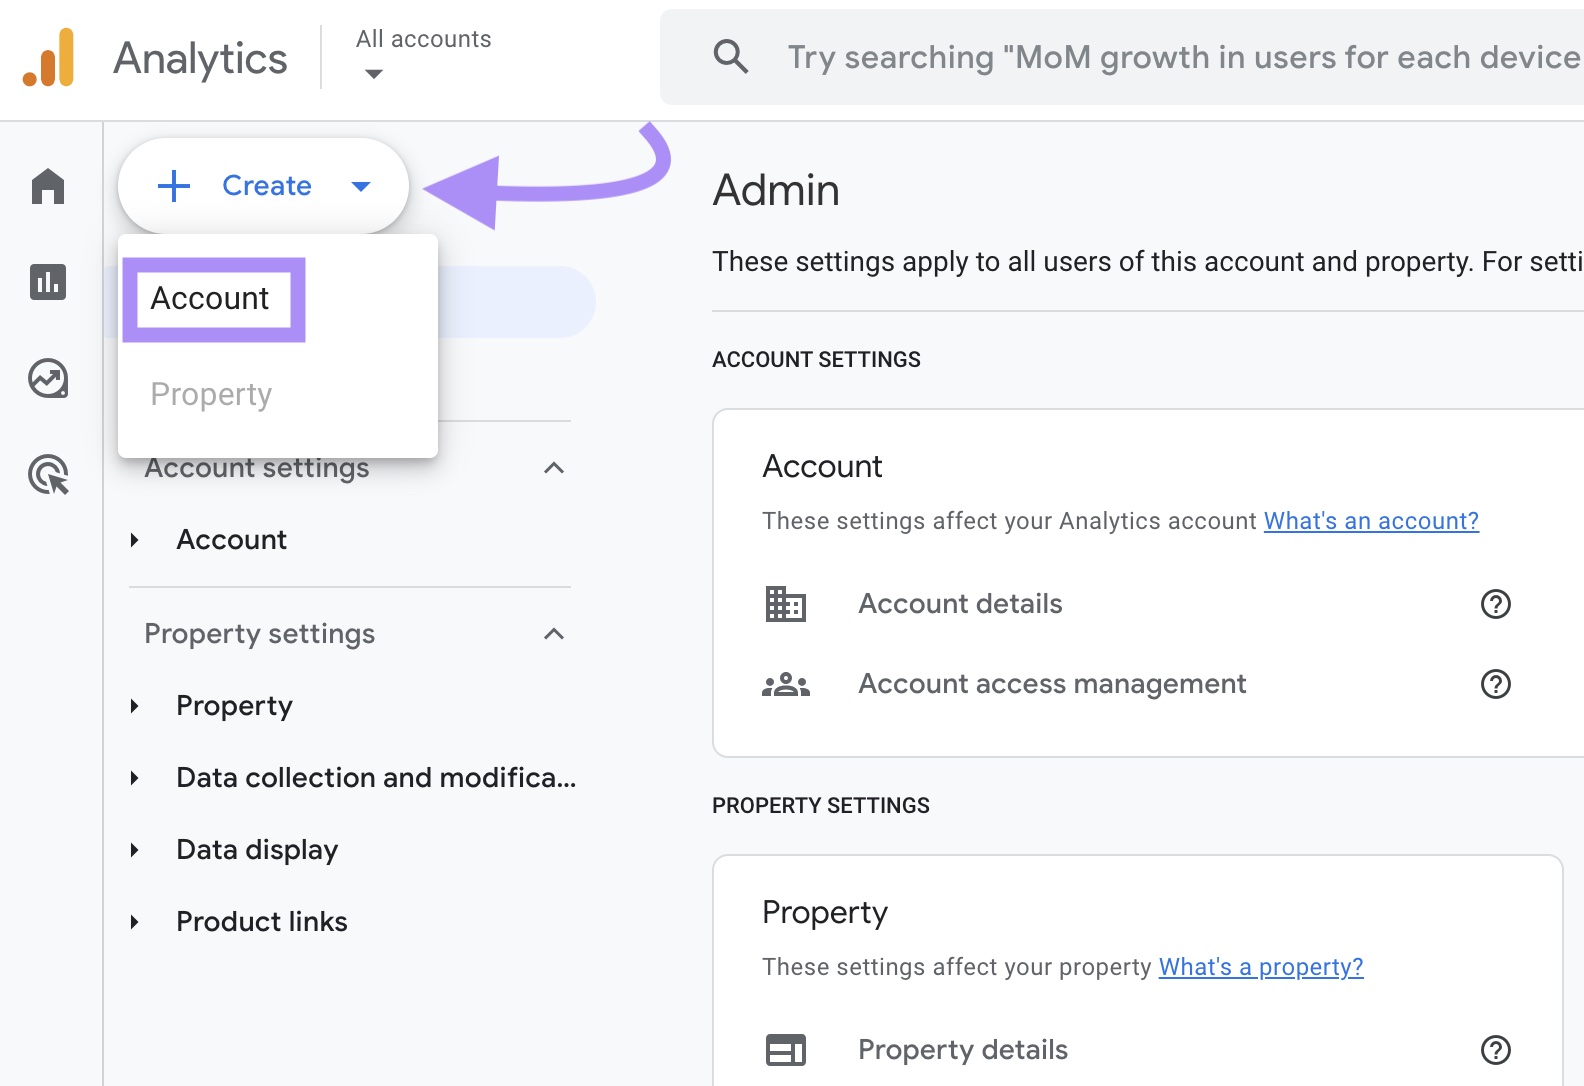
You’ll find yourself in the account creation workflow.
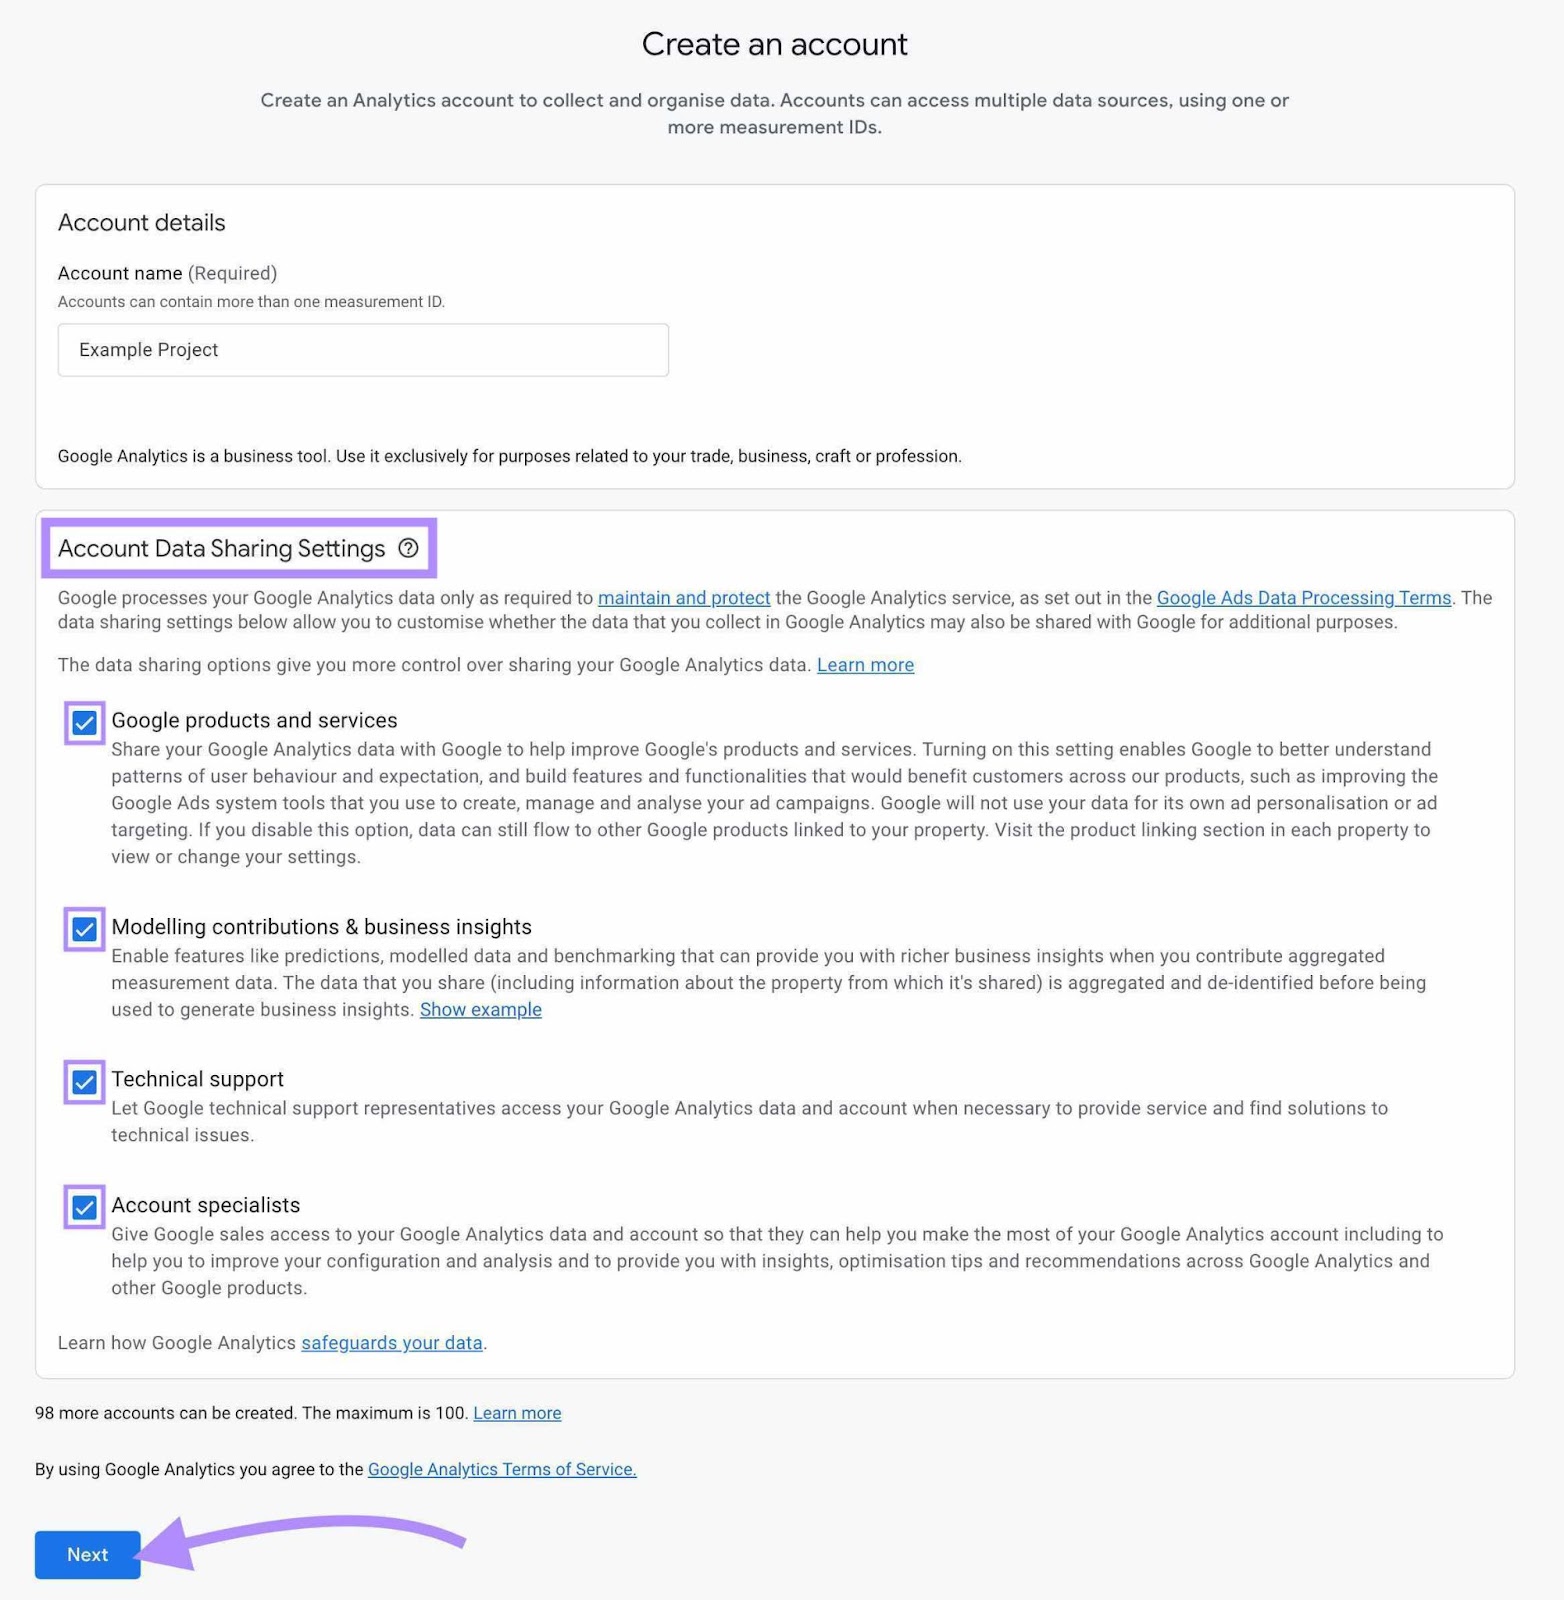
Creating Your Account
Start by naming your account. Use your business name or something like “Amy’s GA4 Account.”
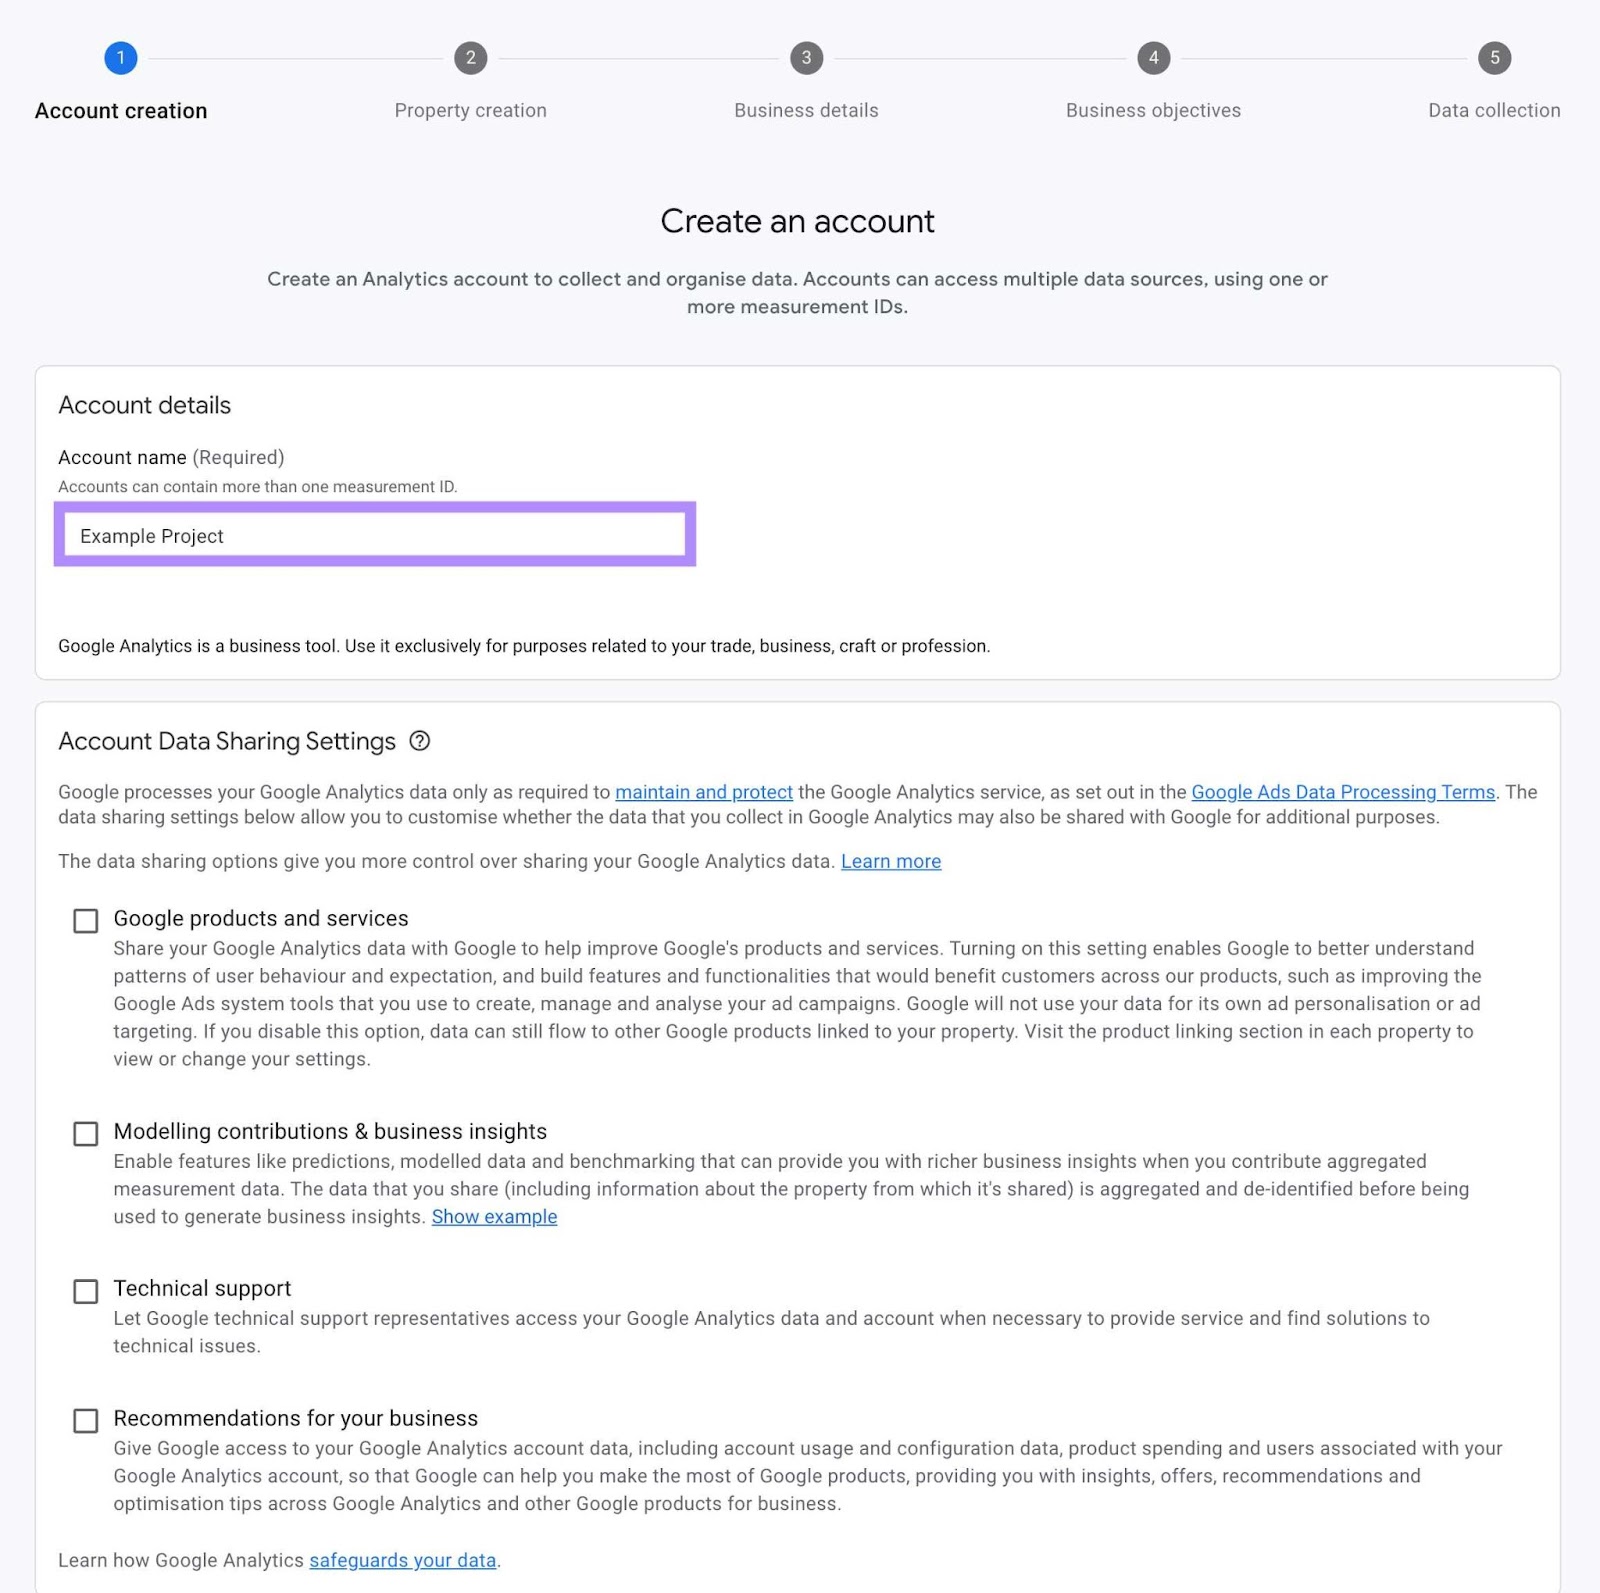
Next, review the “Account Data Sharing Settings” and select or deselect the checkboxes based on how much data you feel comfortable sharing with Google.
Then click “Next” to proceed.
Setting up Your Property
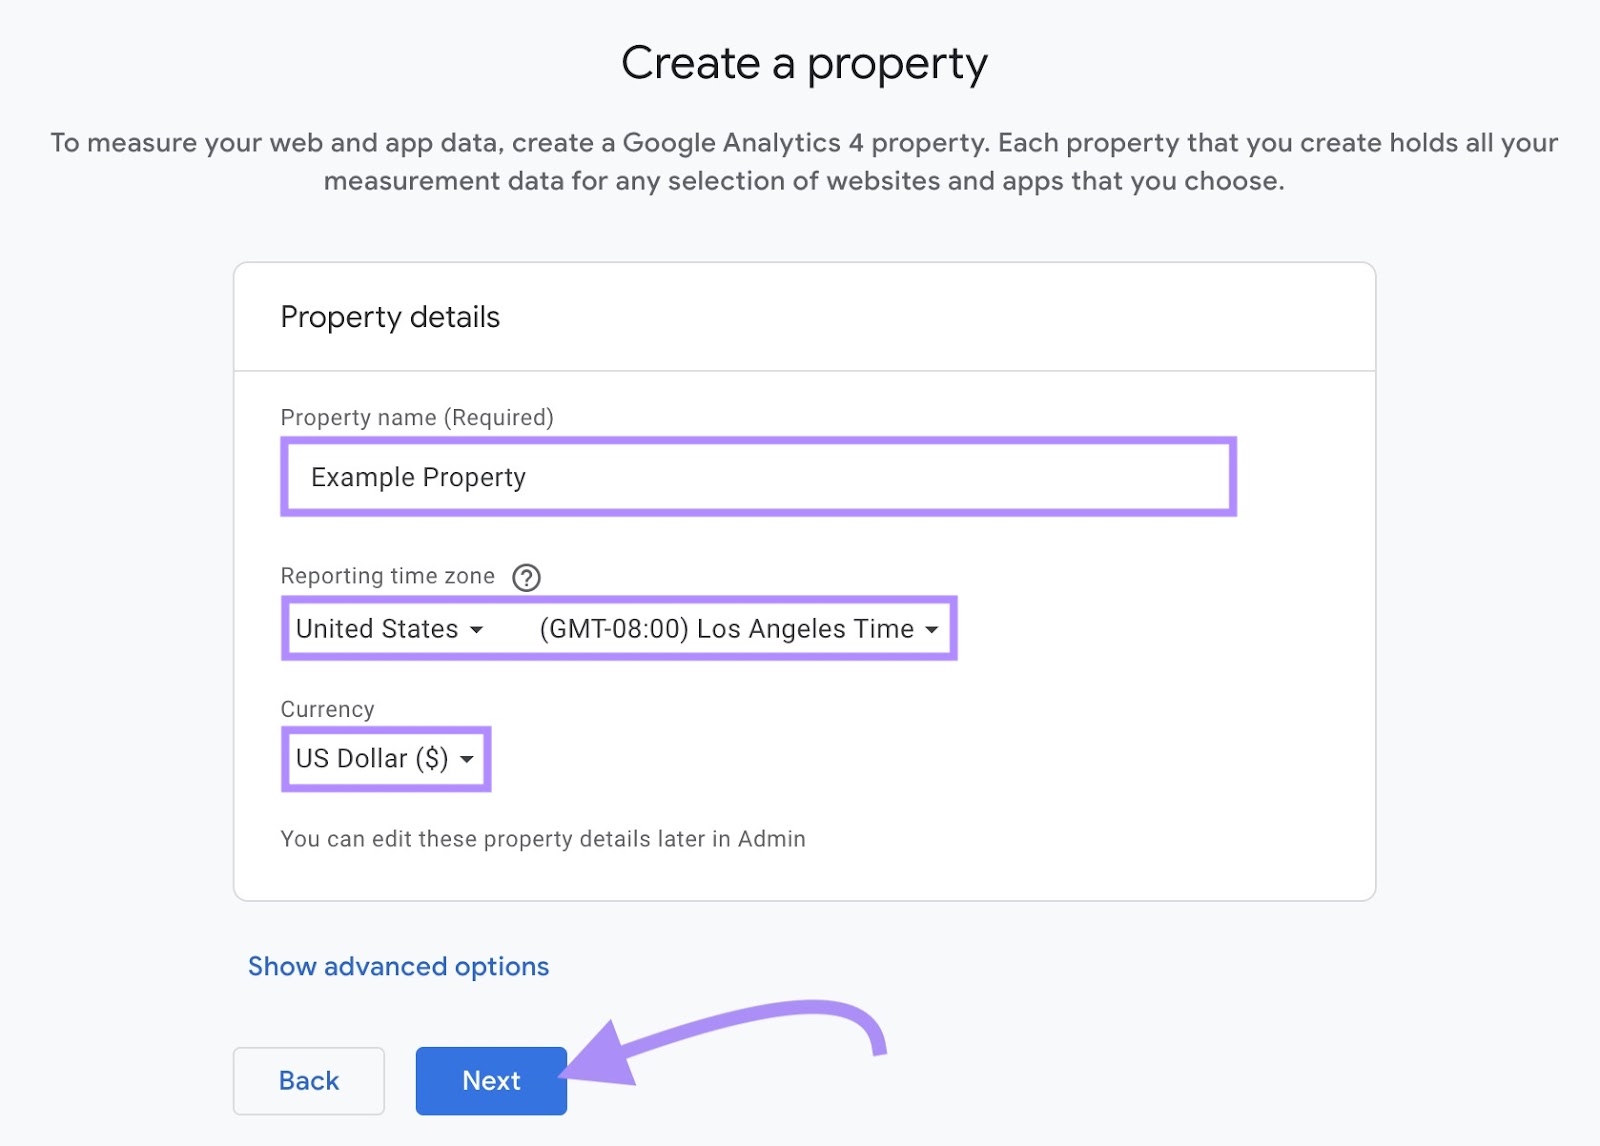
Next, you’ll be asked to create a property. A property is like a bucket that can have multiple websites and apps connected to it. So if your business has a related app or secondary website, you can manage all your measurement data in one place.
Keep this in mind when assigning your property name—it doesn’t have to be your domain name/URL.
Provide the following property details:
- Property name: Give your property a name (e.g., your business name)
- Reporting time zone: Select your time zone from the drop-down menu
- Currency: Choose which currency costs to display
Click “Next” to continue to the next step.
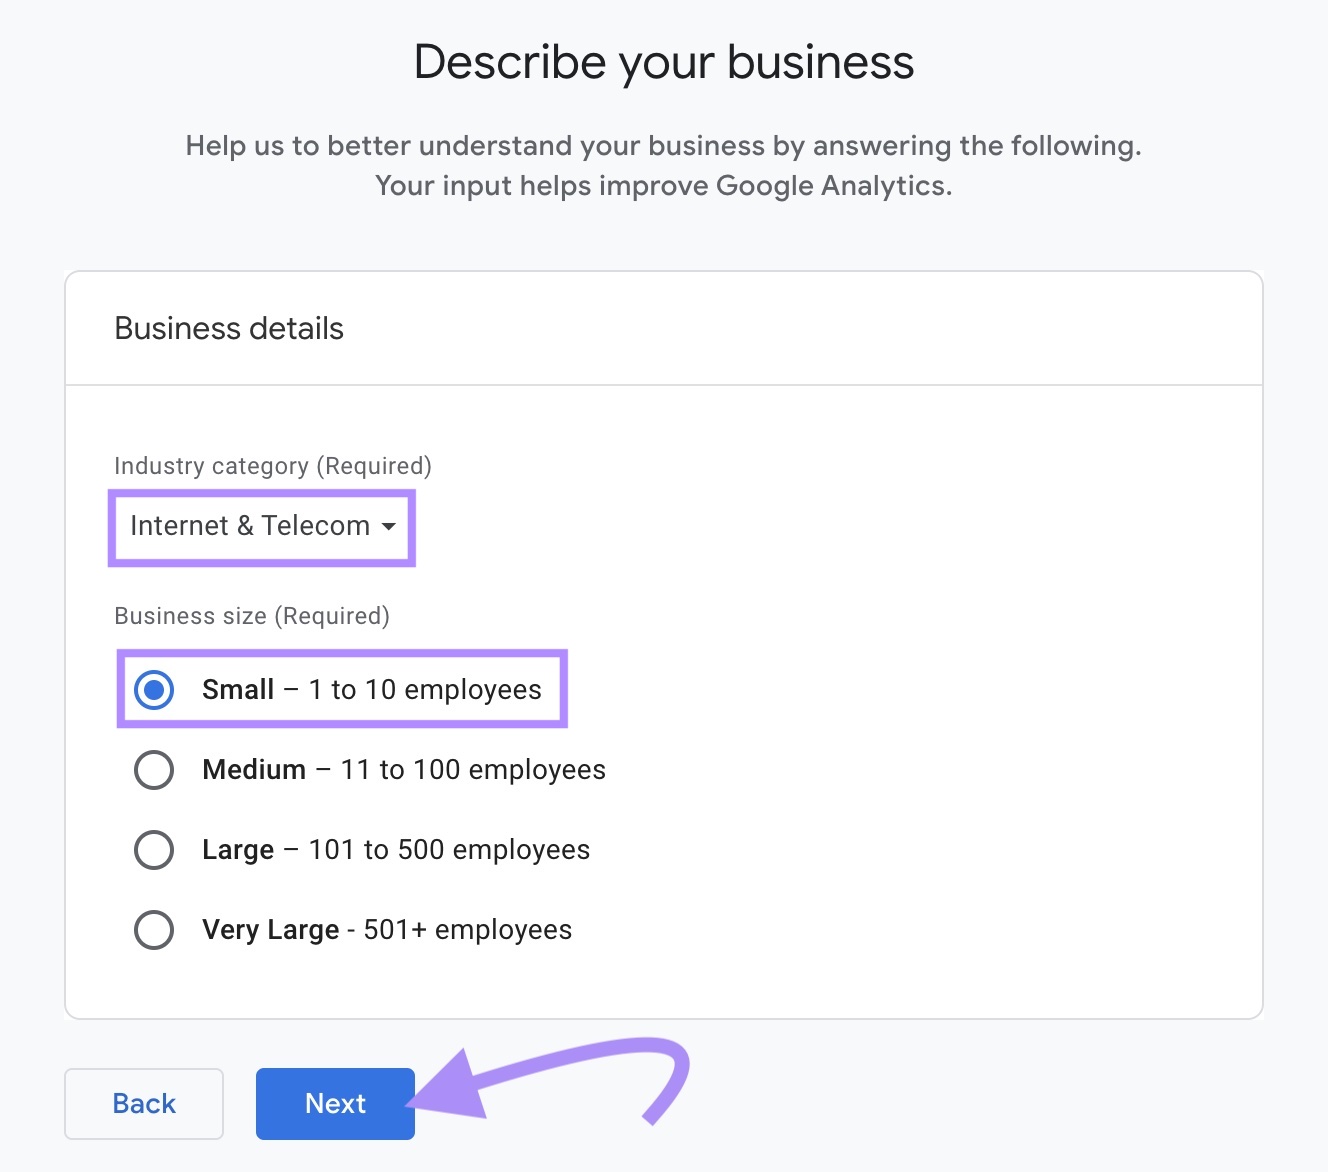
GA will now ask you to provide additional details about your business.
Select your industry category from the drop-down menu. Choose whichever category is closest if you can’t find your exact industry.
Select your business size, then click “Next.”
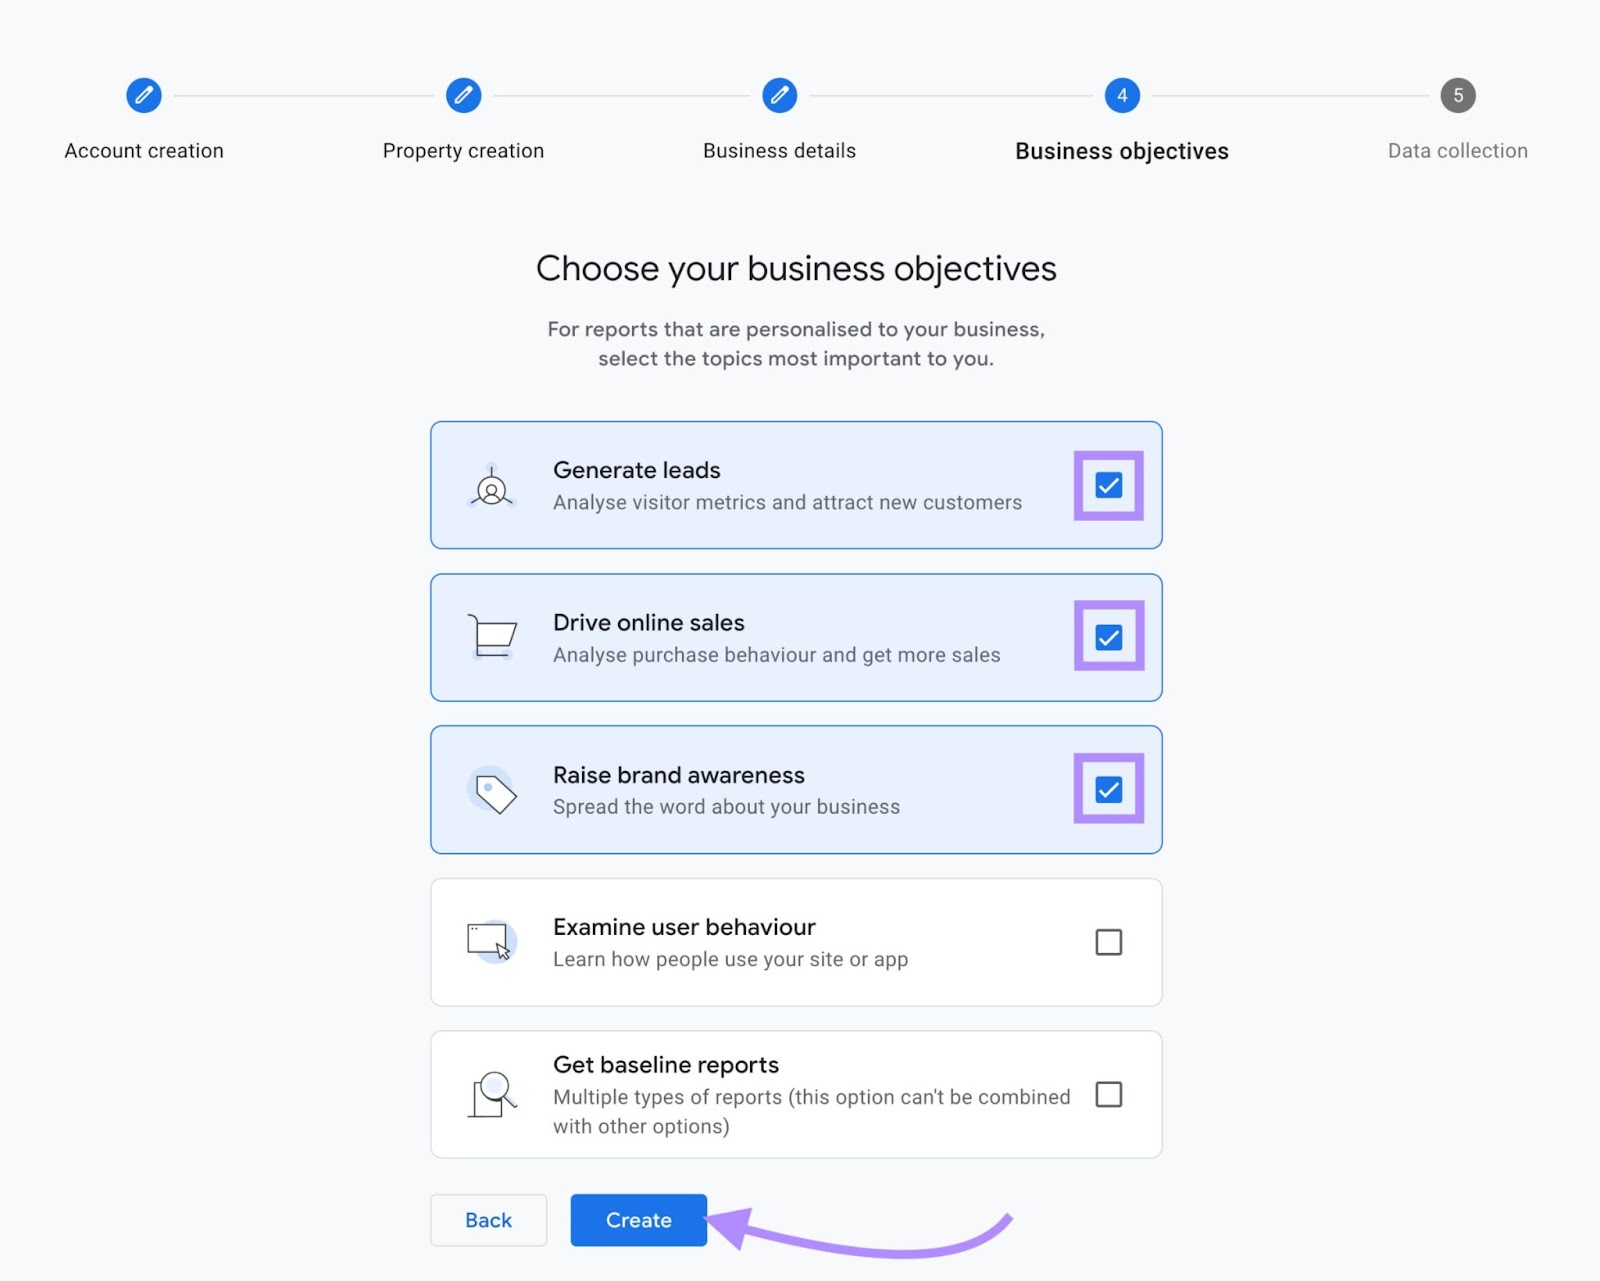
You’ll then be asked to select the listed business objectives that best represent your goals. You can select multiple options—unless you select the last option.
When you’re ready, click “Create.”
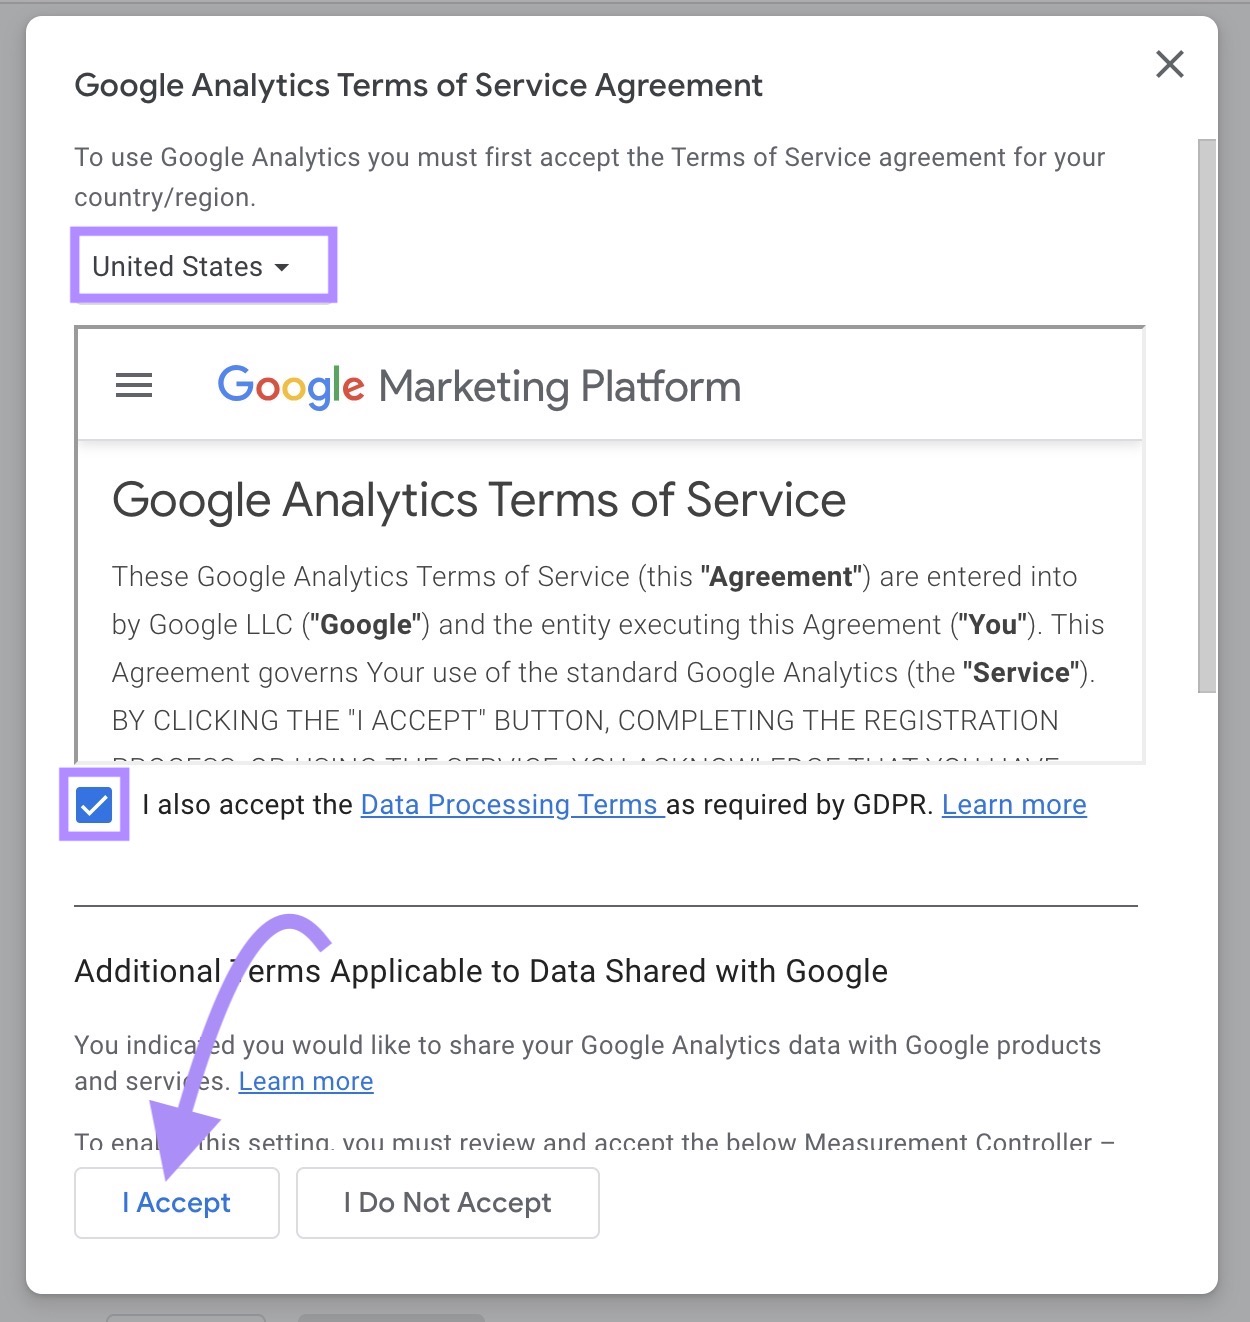
A pop-up containing Google Analytics’ terms of service will appear. Select your country or region from the drop-down menu, Accept all terms by clicking the checkbox below each list of terms, and click “I Accept” once you’ve read the terms and conditions.
Your account and property have now been created!
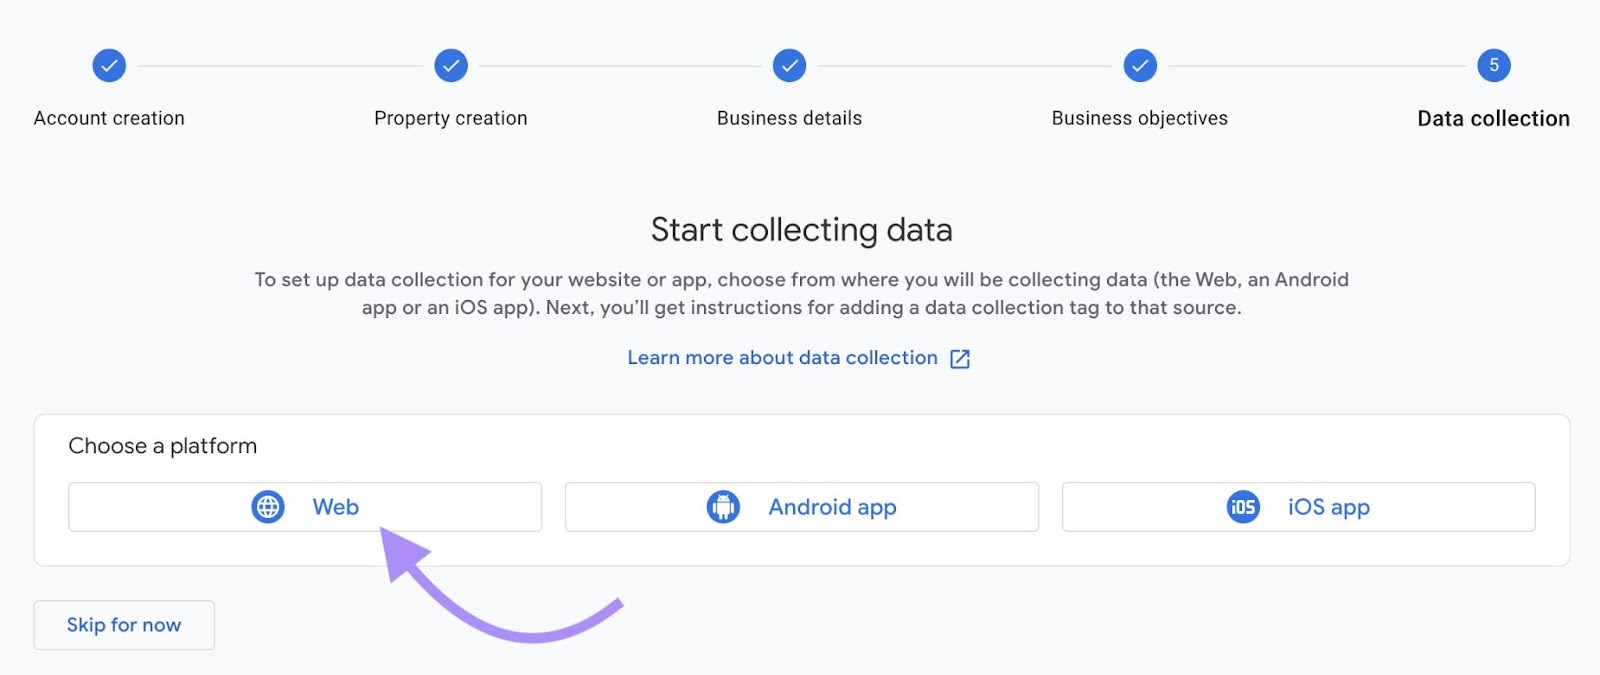
Configuring Your Data Stream
On the next screen, select the relevant platform type for the data you’ll be analyzing.
For a WordPress site, select “Web.”
If you have multiple websites or apps, add those to your property later.
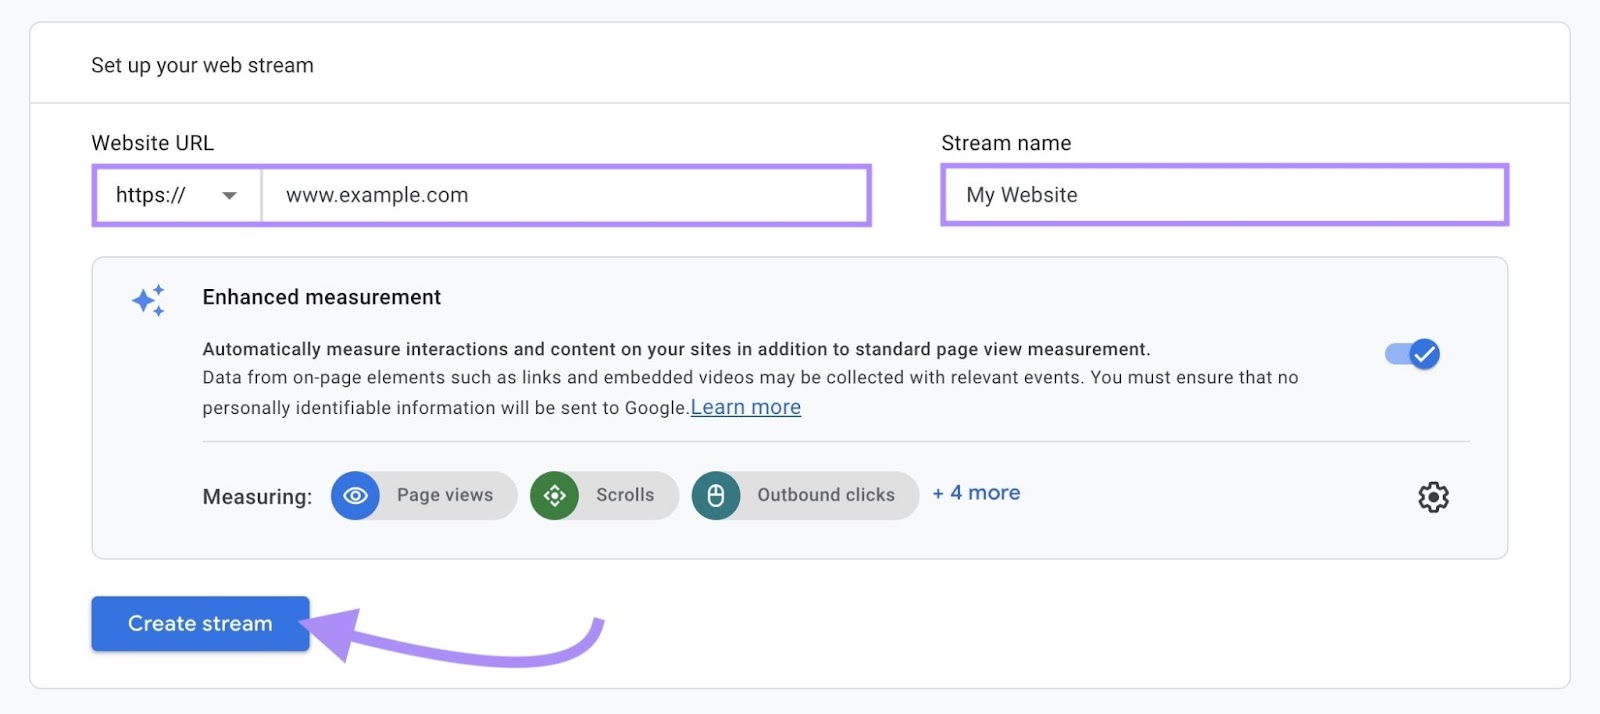
Next, you’ll set up your data stream. In this case, “data stream” or “web stream” simply means your website.
Note that “https://” is selected by default. If your site doesn’t have a valid SSL certificate, use the drop-down to select the “http://” option.
Enter your website’s domain and name your data stream. Your stream name can simply be your domain name without the “.com” or something like “Business Name Website.”
If you have multiple websites or apps under the same property, make your stream names different enough not to be confusing.
“Enhanced measurement” is enabled by default, so toggle that off if you prefer not to have it enabled. It allows GA4 to report on additional user interactions or “events” in addition to the actions tracked by default.
This includes tracking scrolling behavior, file downloads, video engagement, in-site searches, outbound clicks, form interactions, and more detailed page view information.
When you’re ready, click “Create stream.”
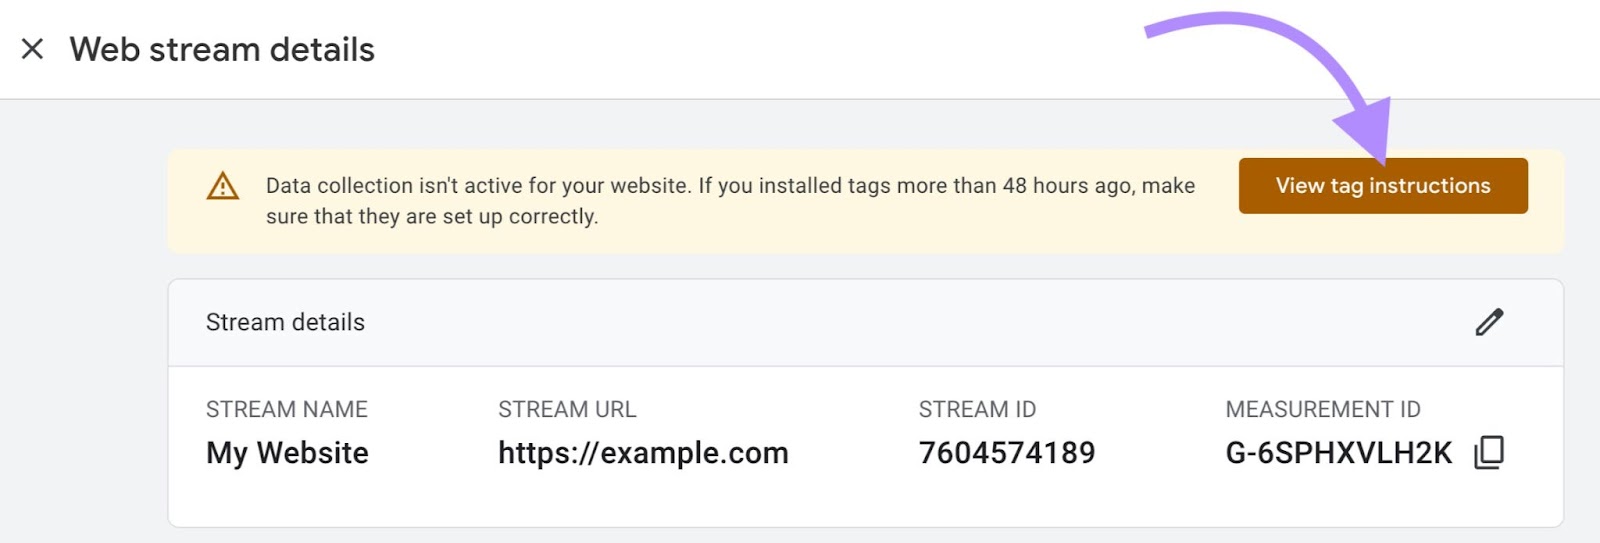
Finding Your Google Analytics 4 Measurement ID
The next step is to grab the unique measurement ID provided by Google Analytics to integrate it into your website and start collecting data.
Your “Measurement ID” (or Google Tag) is a code that identifies your website or other data source.
After creating your data stream, you’ll land on the “Web stream details” page.
You’ll notice an alert at the top saying that data collection isn’t yet active for your site. That’s because you haven’t installed the Google tag on your WordPress Site.
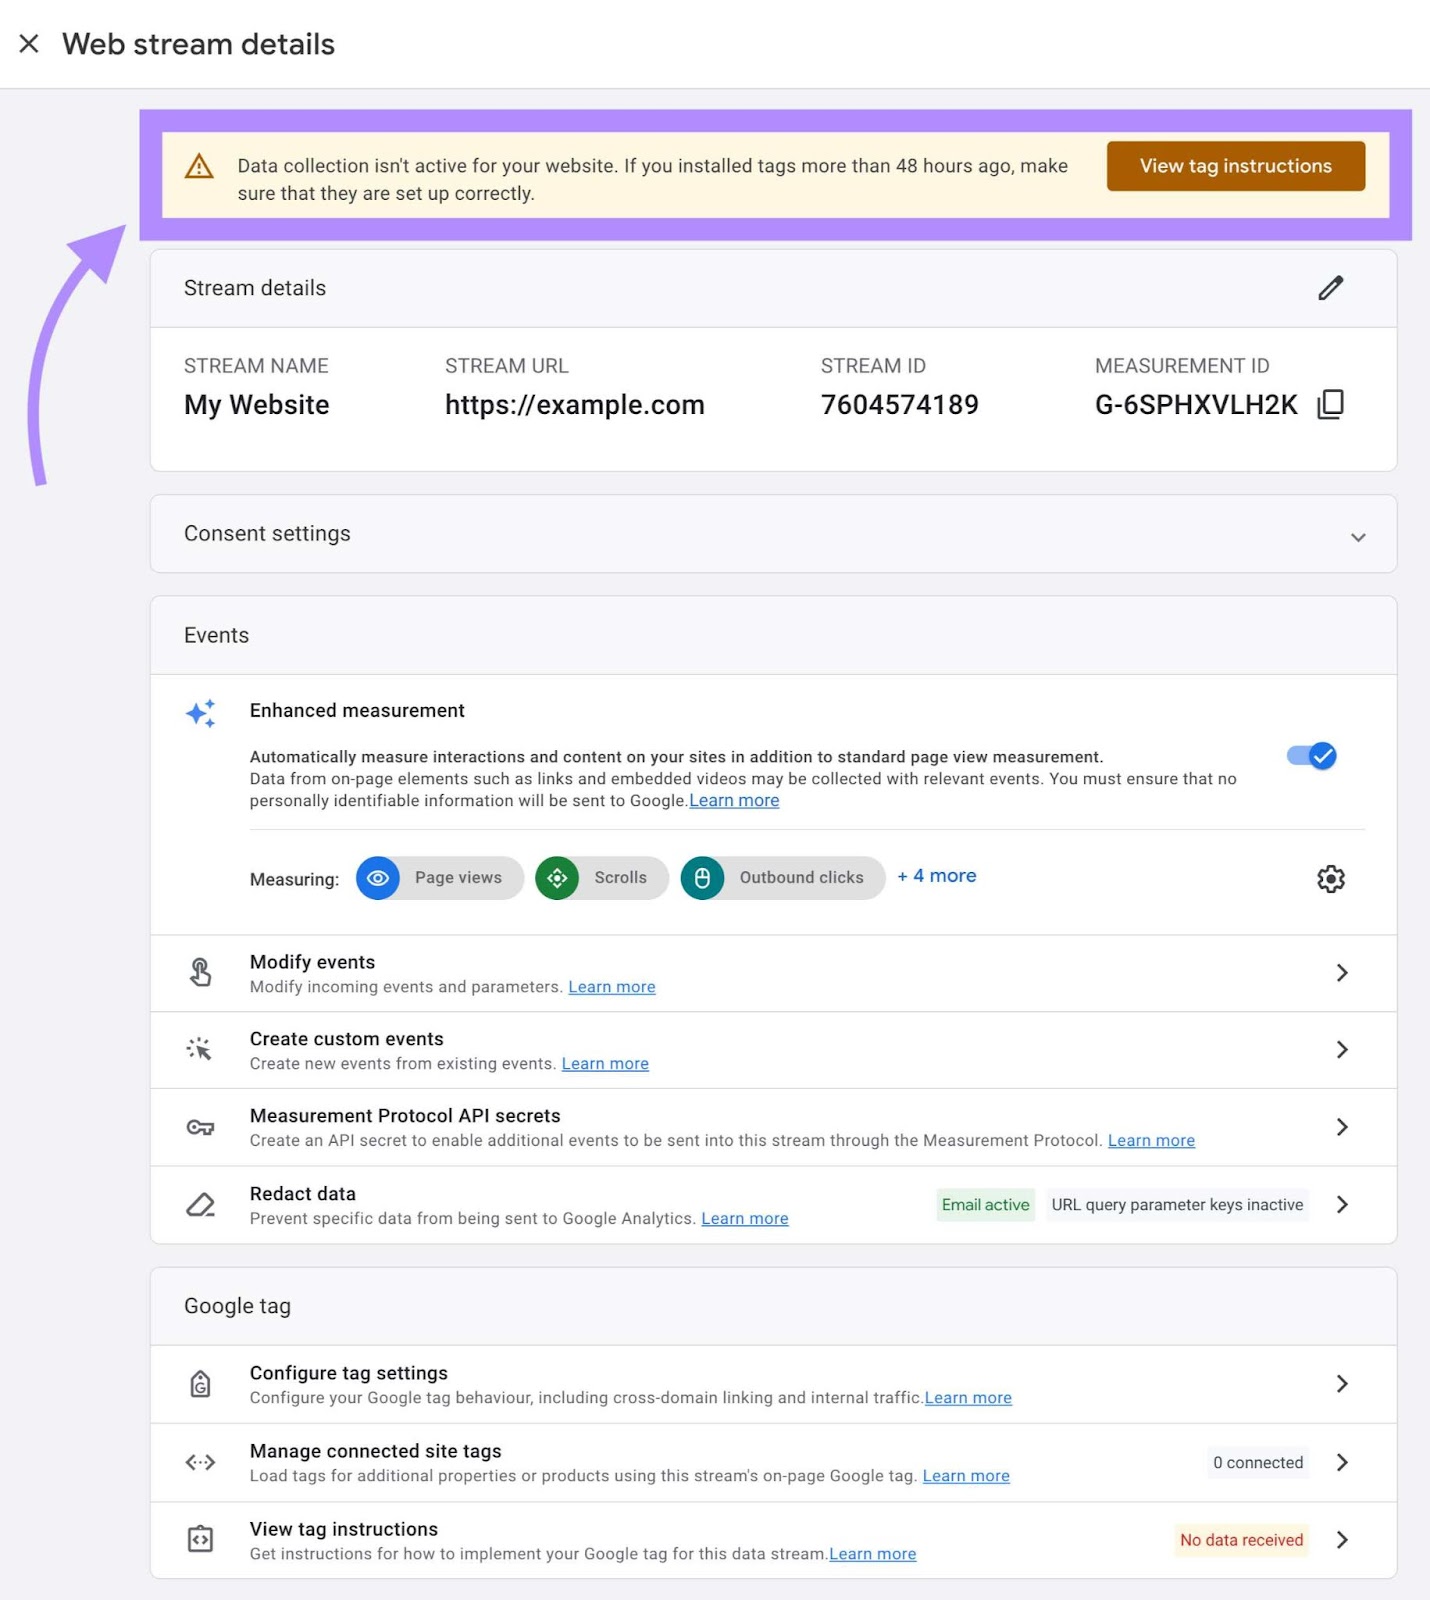
So, let’s do that.
Copy your “Measurement ID” to your clipboard.

Now that you have your Google Analytics tracking code, let’s add it to your WordPress site.
Step 2: Install Google Analytics 4 in WordPress
There are a few different ways to add Google Analytics to WordPress.
Let’s start with the simplest way.
Option 1: Paste Your Measurement ID in WordPress’s Integrations Tool
WordPress requires you to have the Explorer plan or higher to paste your measurement ID directly into the tool.
If you have a lower WordPress plan, you’ll add your measurement ID by manually adding the code. We will discuss how in a later section.
Start by opening your site’s WordPress dashboard.
In the navigation menu on the left, click on “Tools” and select “Marketing” to open the “Marketing and Integrations” menu.
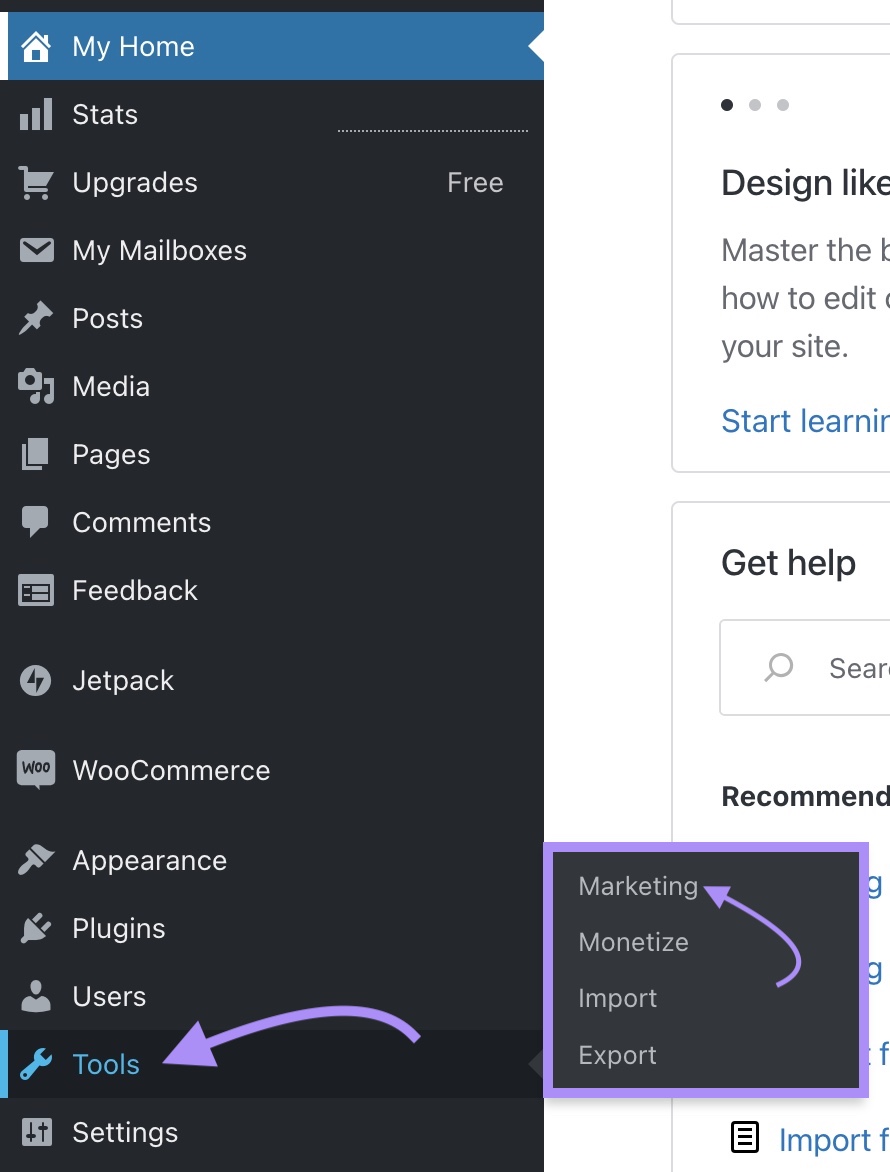
Select the “Traffic” tab.

Next, scroll down until you see the Google Analytics section. You’ll find a field labeled “Google Analytics Measurement ID.”
Simply paste the code you copied to your clipboard into this field and hit the “Save settings” button.
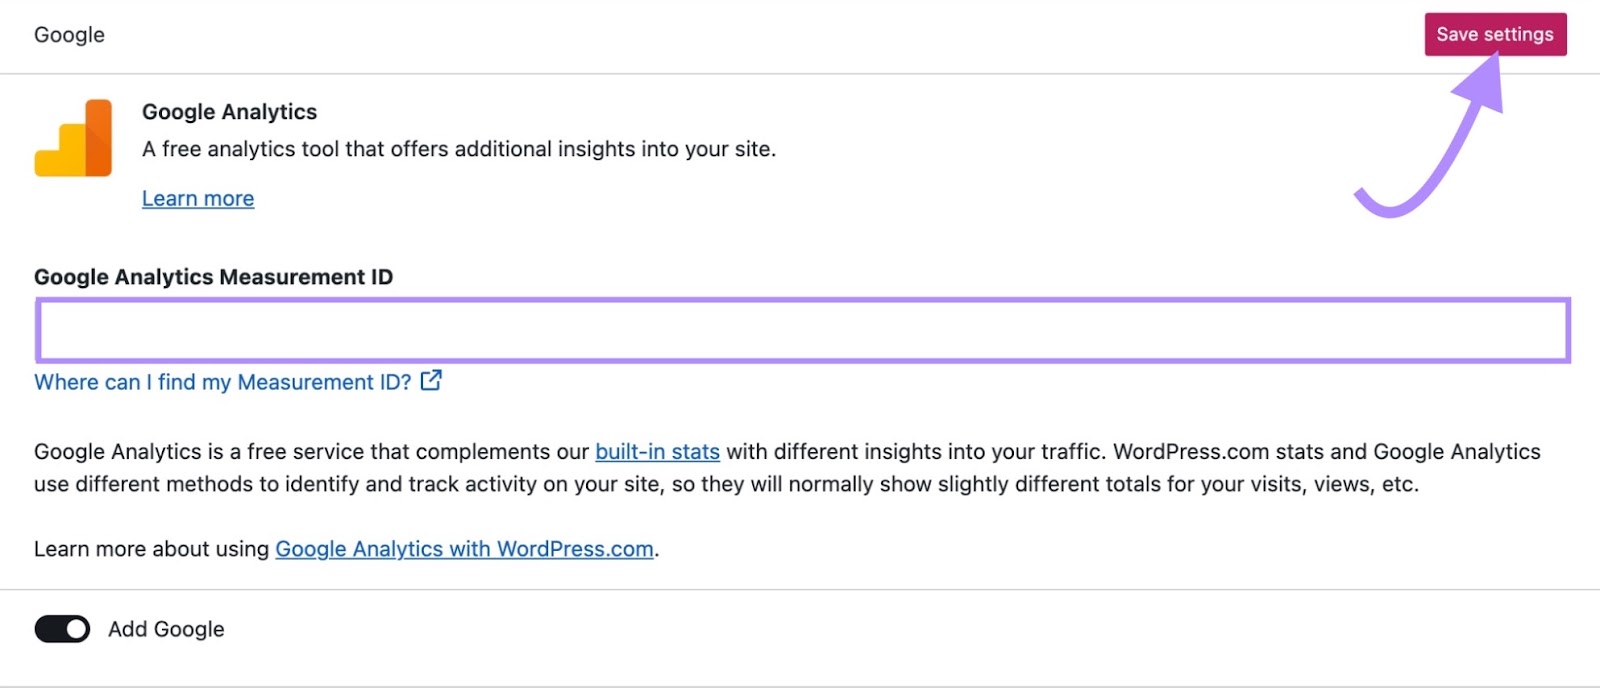
Voilà! It’s that simple. It takes up to 48 hours to establish an active connection and gather data.
Option 2: Install Google Analytics Using a Plugin
If your website is plugin-enabled (Creator plan and up), follow Google’s instructions to configure GA4 using a WordPress plugin.
From the “Web Stream details” page, click “View tag instructions” to open the installation instructions menu.
On this page, you’ll be given two options to choose from: “Install with a website builder or CMS” or “Install manually.” Click “Install with a website builder or CMS.” Then, click “Select your platform.”
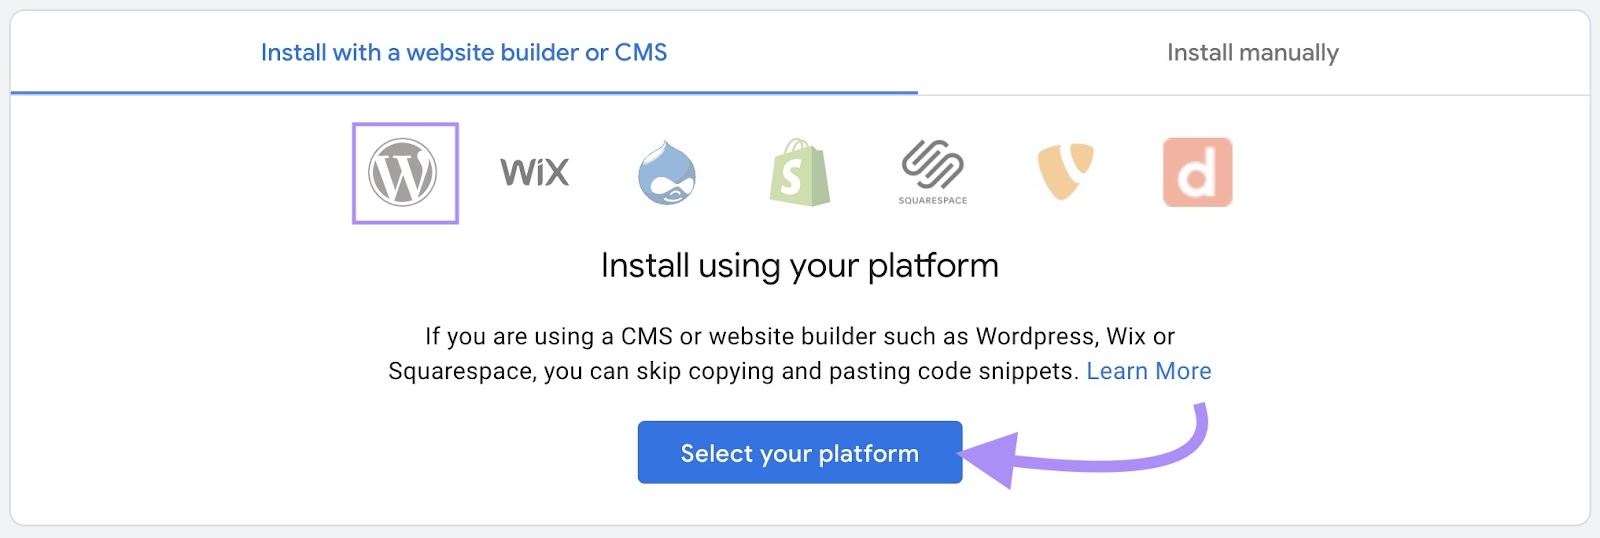
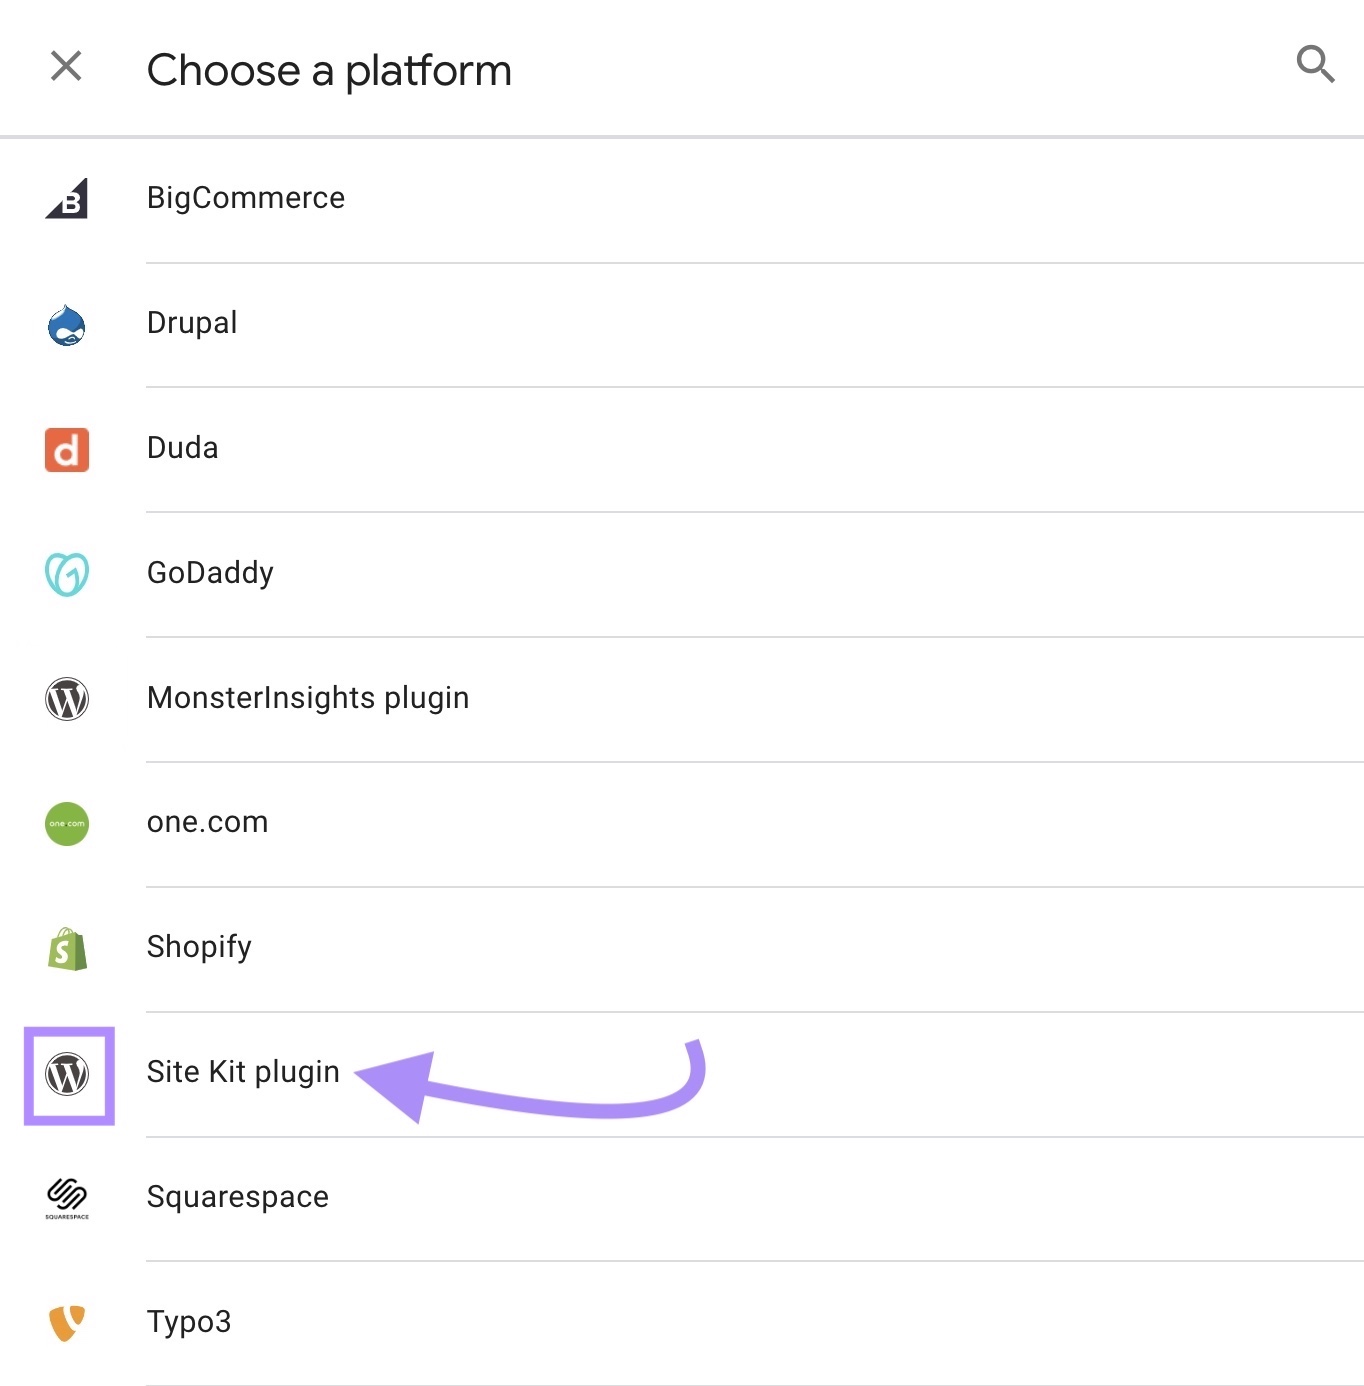
A drop-down menu will open. Notice the WordPress logo beside some of the options? That means we can take a shortcut.
Site Kit is the official WordPress Google Analytics plugin from Google. You’ll be able to see your traffic analytics data directly in your WordPress dashboard.
Select “Site Kit Plugin” from the drop-down menu.
Next, log in to WordPress and navigate to “Plugins” using the left-hand menu and click “Add New Plugin.”
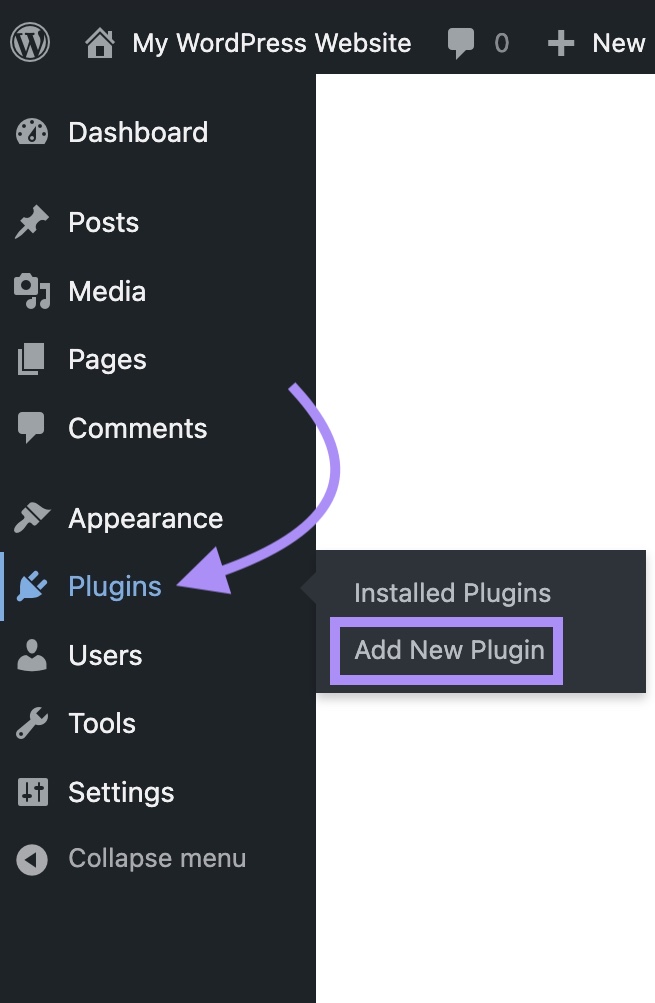
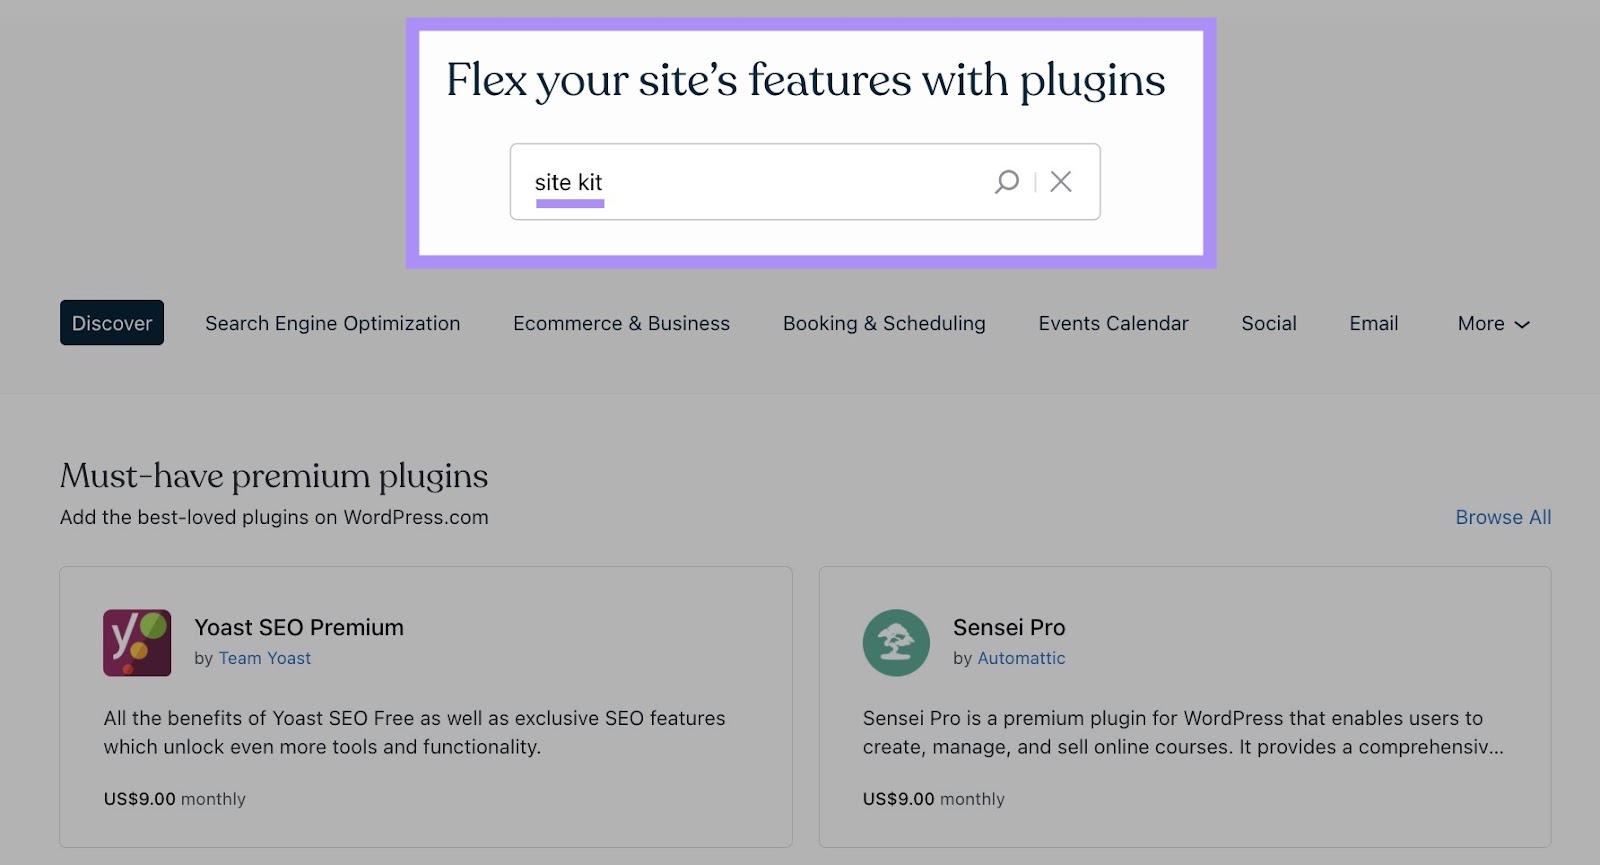
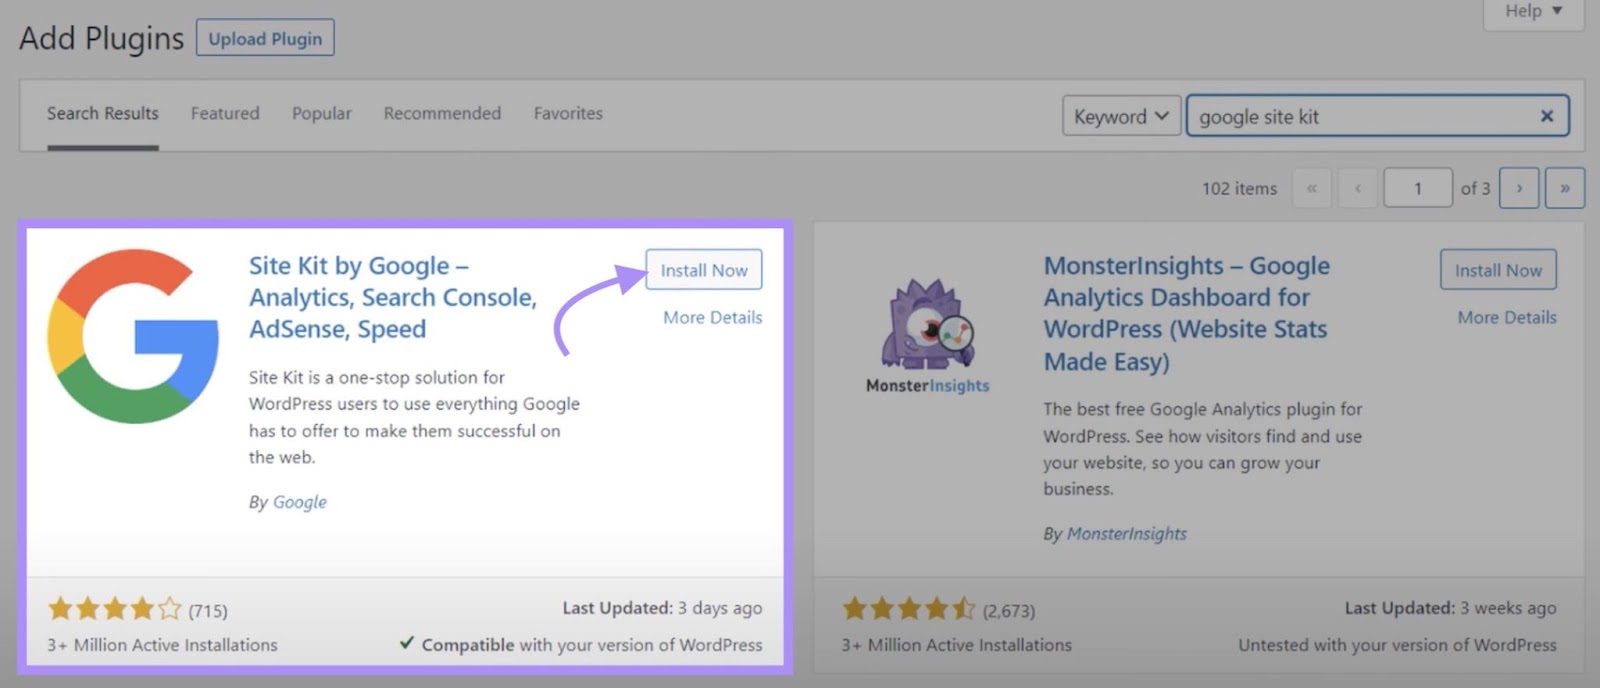
Then, search for “Site Kit.”
Click “Install Now.”
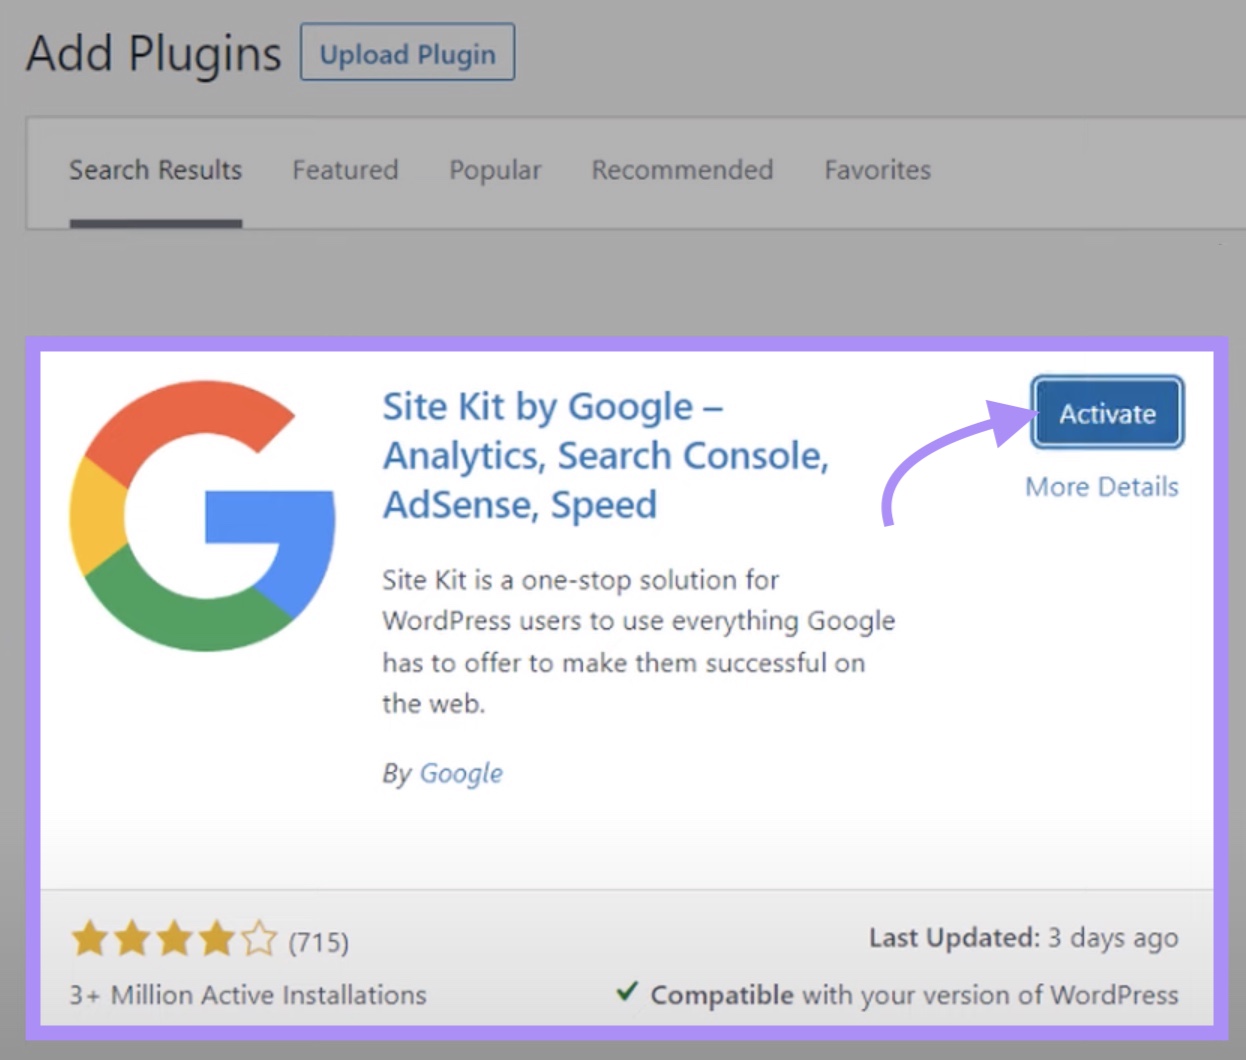
Once installed, open the Site Kit plugin from the Plugins menu and click “Activate.”
The plugin will now appear in your main menu. Click on “Site Kit” to open it.

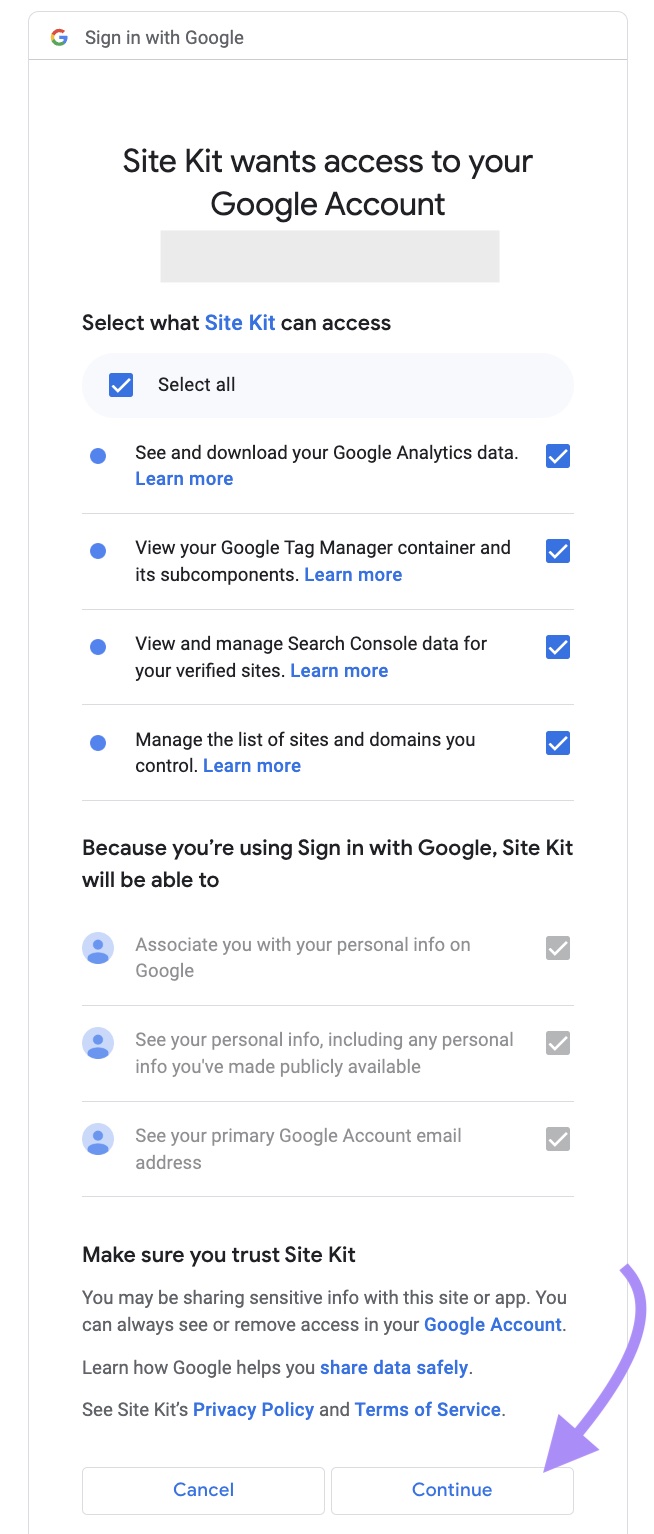
On the setup page, check the box next to “Connect Google Analytics as part of your setup” and sign in using the same Google credentials you used to create your Google Analytics account.

Next, choose what data Site Kit can access. Choose all that apply and click “Continue.”
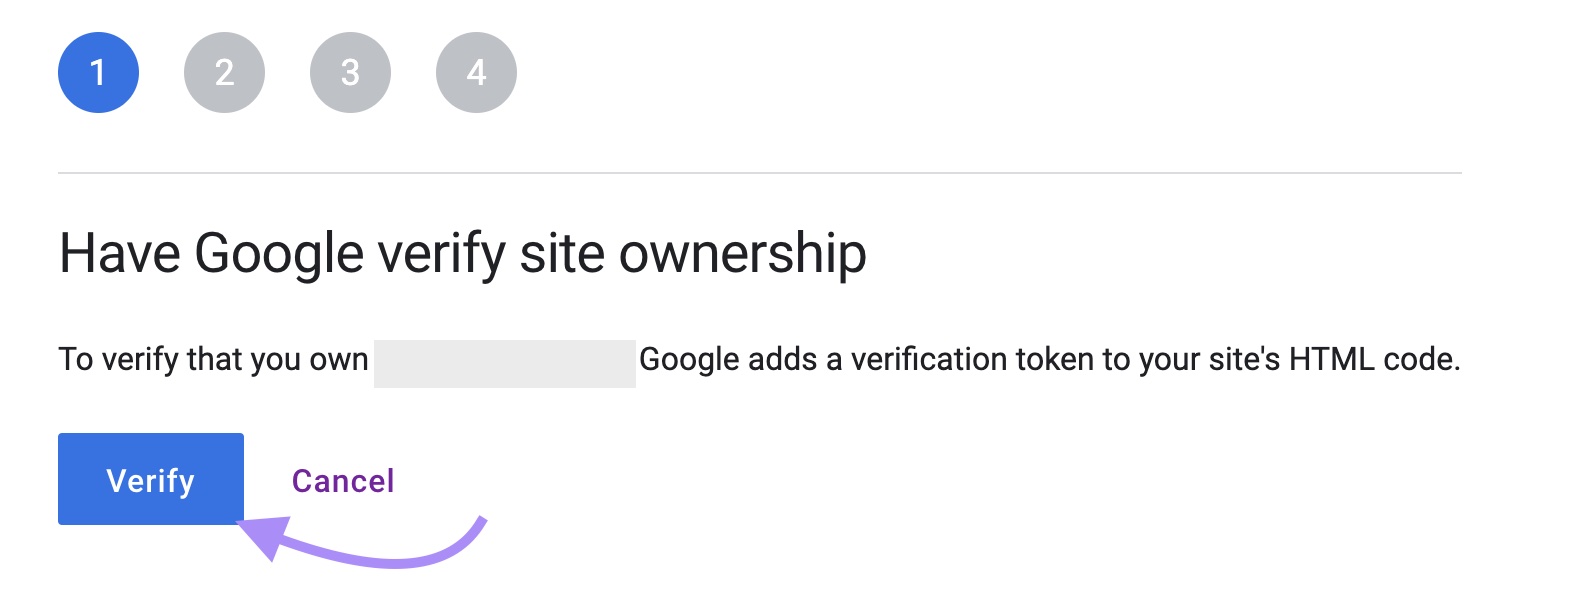
You’ll need to verify site ownership. Click “Verify.”
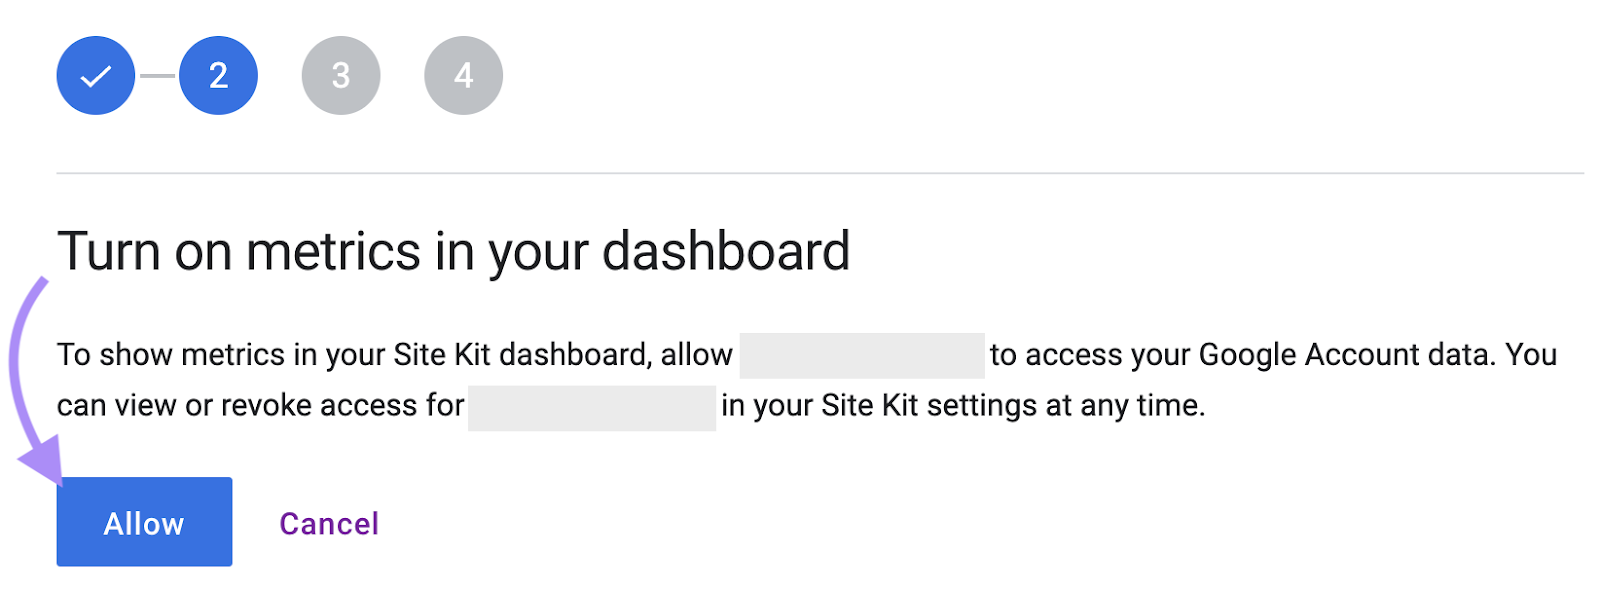
Next, turn on metrics in your dashboard by clicking “Allow.”
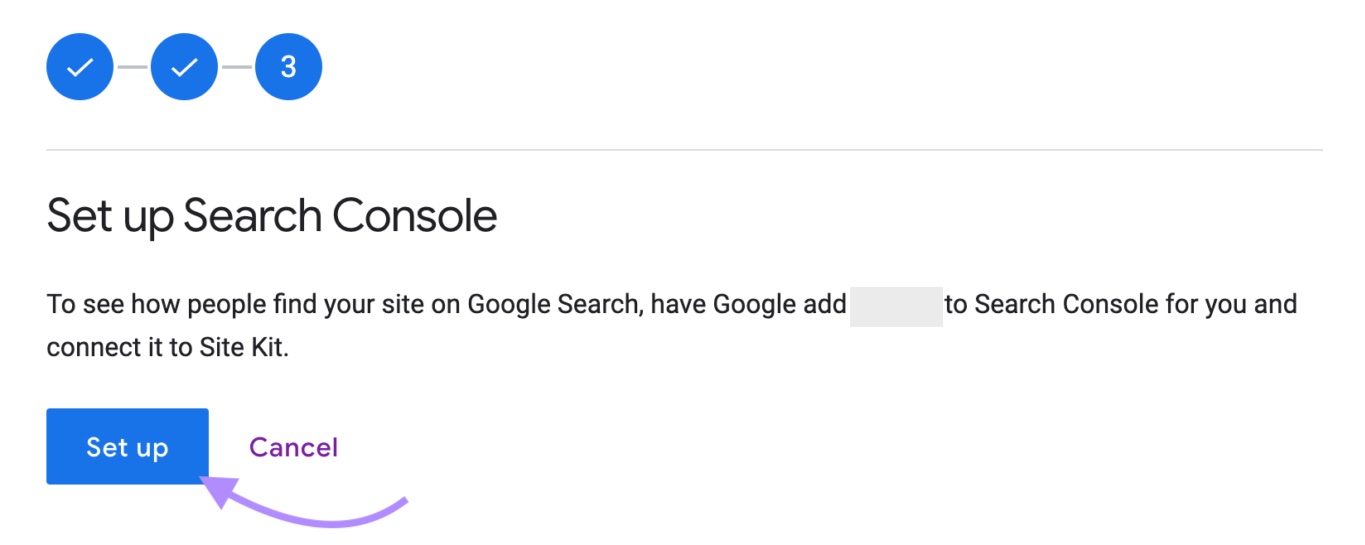
And add Search Console by clicking “Set up.”
Click “Next” to add Google Analytics.
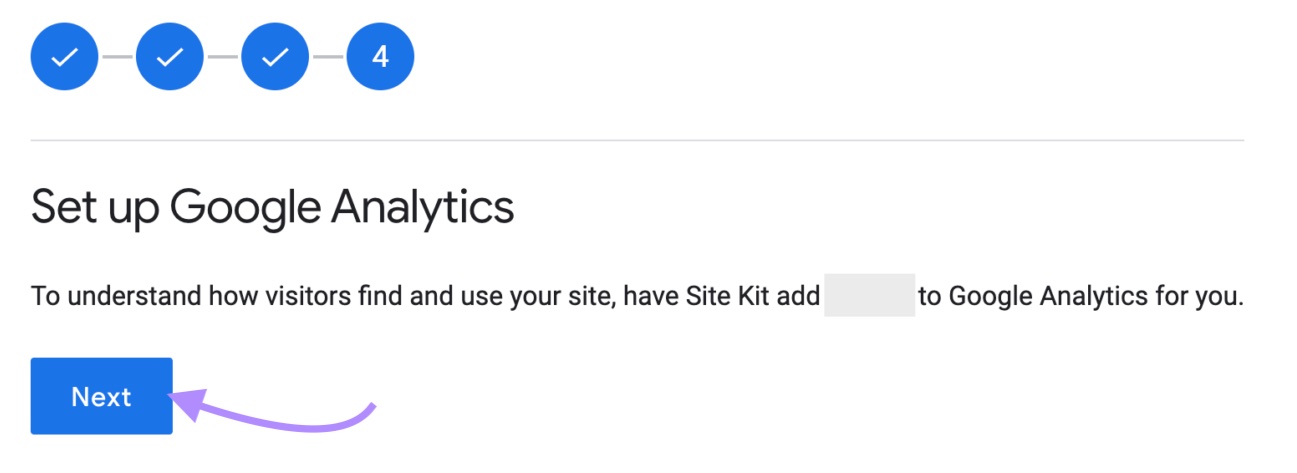
Next, select the Google Analytics property you created earlier from the drop-down menu. Then, click “Configure Analytics.”
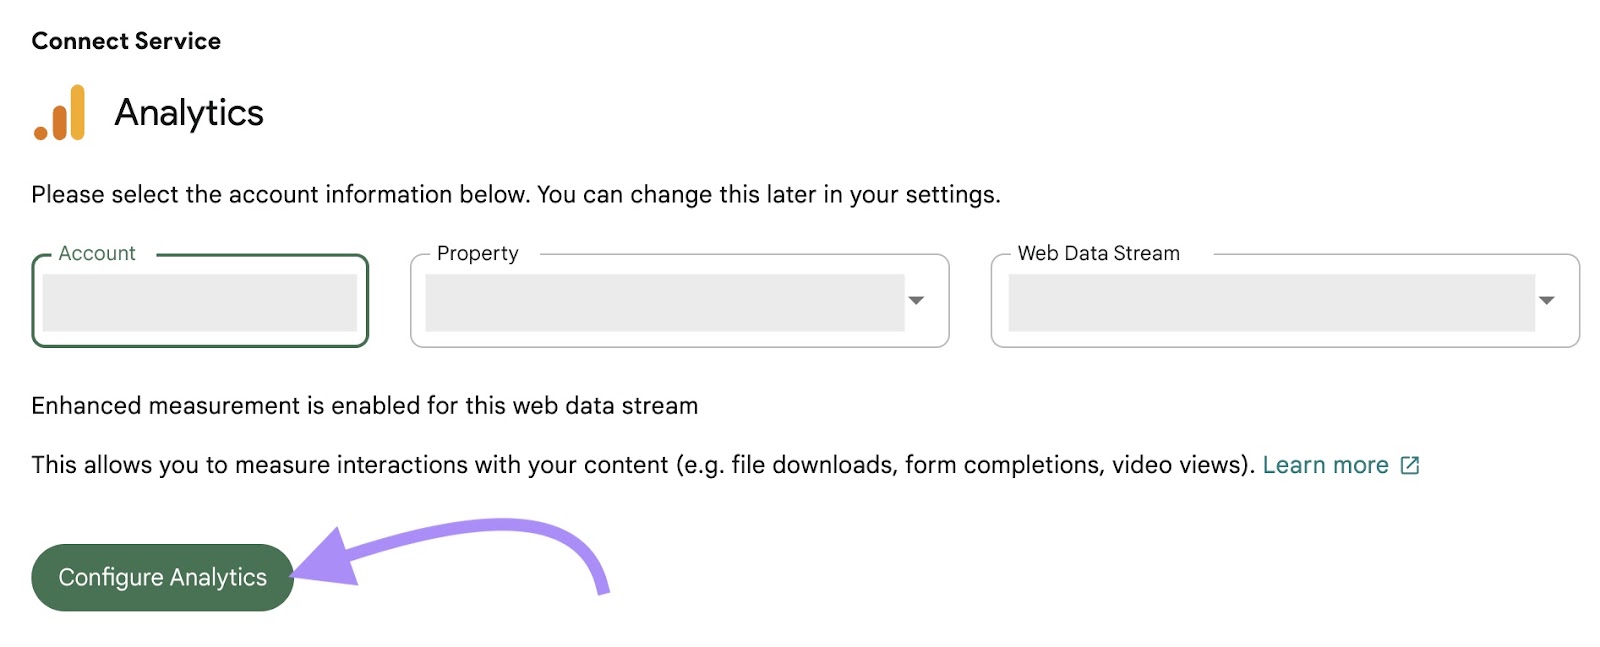
Your plugin is now configured!
Option 3: Manually Add Tracking Code to Your Website’s Code
The third option is to copy-paste your Google tag code into your website’s code. You’ll add the code to every page’s header.
This is your best option for installing Google Analytics if you’re on the Free or Starter WordPress plans, which don’t support plugins.
If you do go the manual route, we recommend using a child theme. This way, updates to your WordPress theme won’t mess with your tracking code.
It’s also always a good idea to make a backup of your site before you make any changes to your theme or code.
If you’re not tech-savvy, don’t be alarmed. Just follow these steps:
Let’s return to the “Installation Instructions” page. Copy the JavaScript code snippet provided on the “Install Manually” tab.
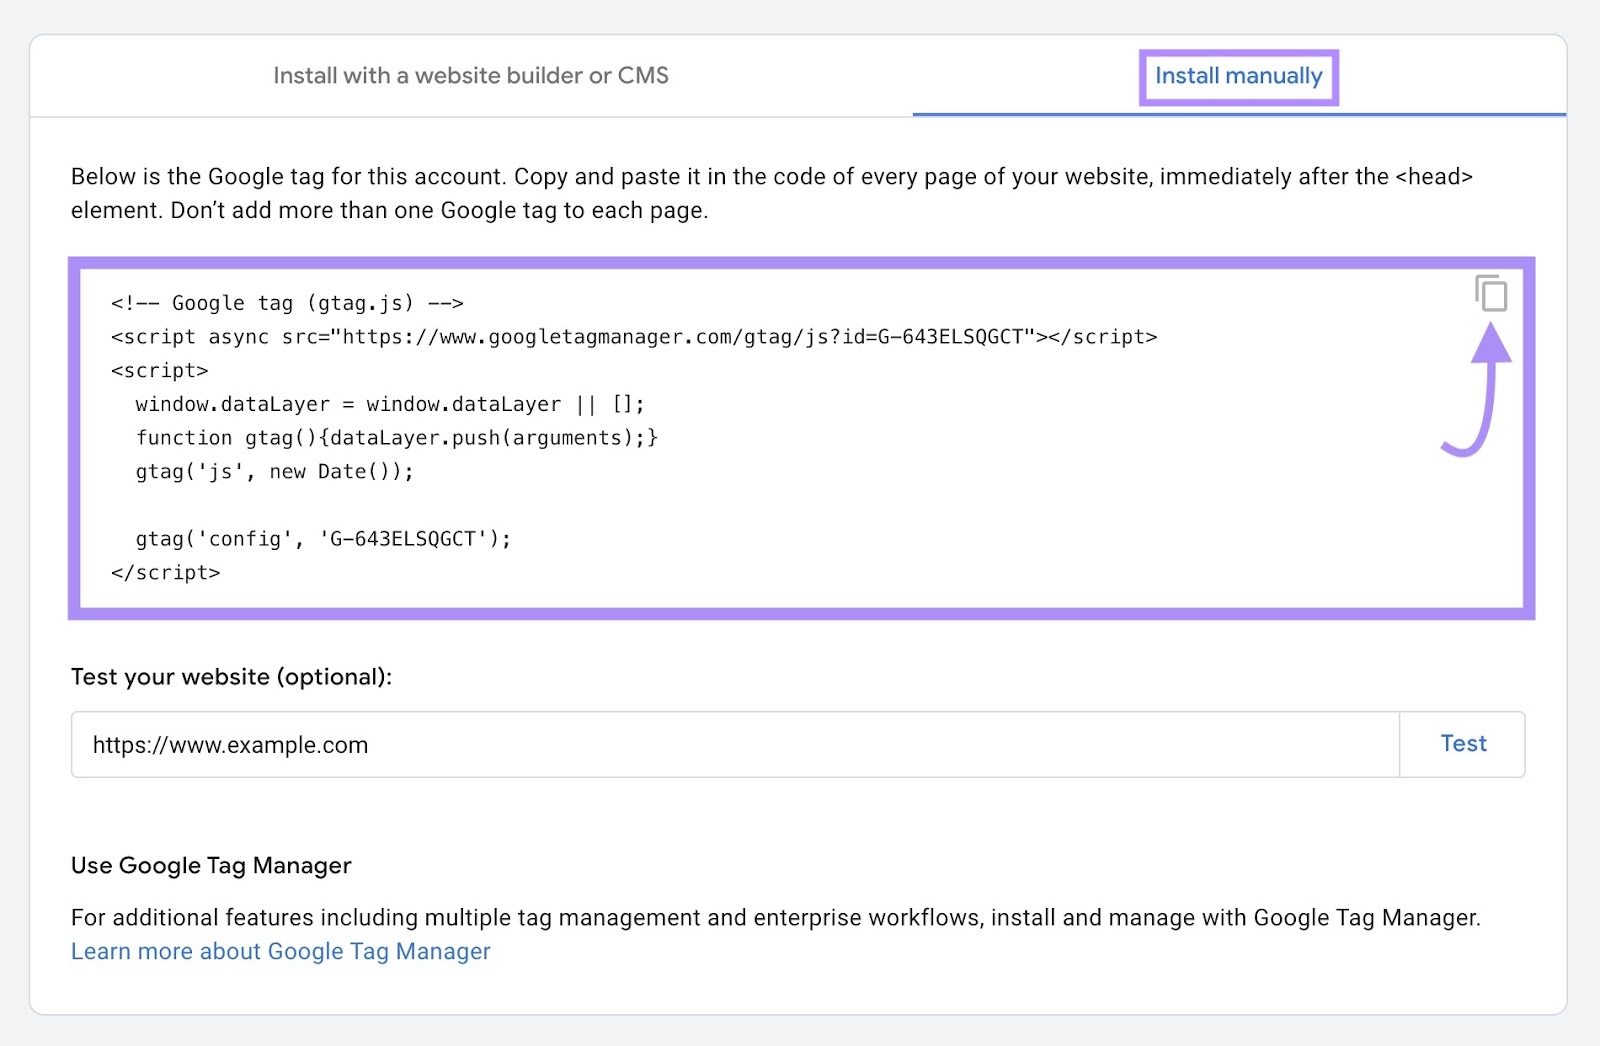
Next, paste the code into the header of your WordPress site. Here’s how:
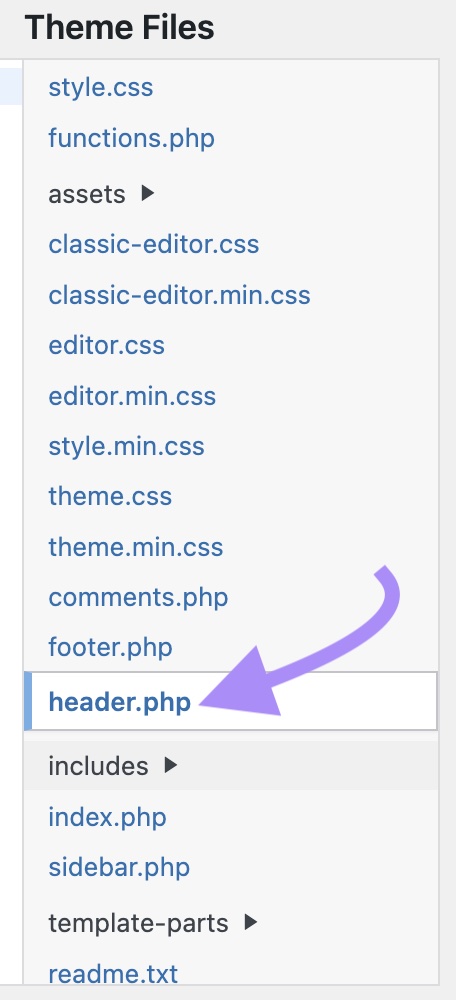
In your WordPress dashboard, click “Appearance” then “Theme File Editor.”
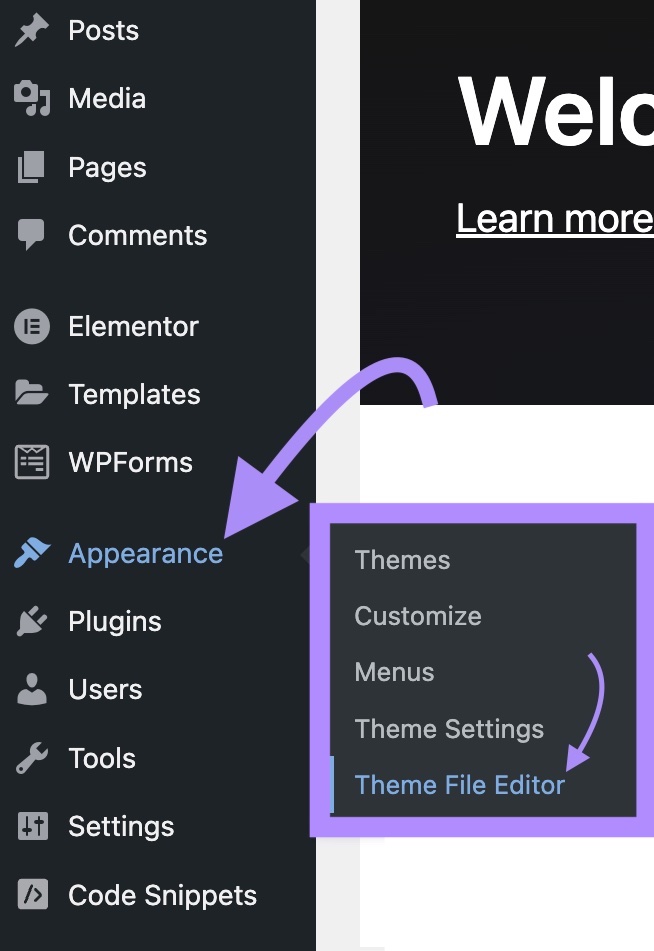
Click on the “header.php” file to edit the code.
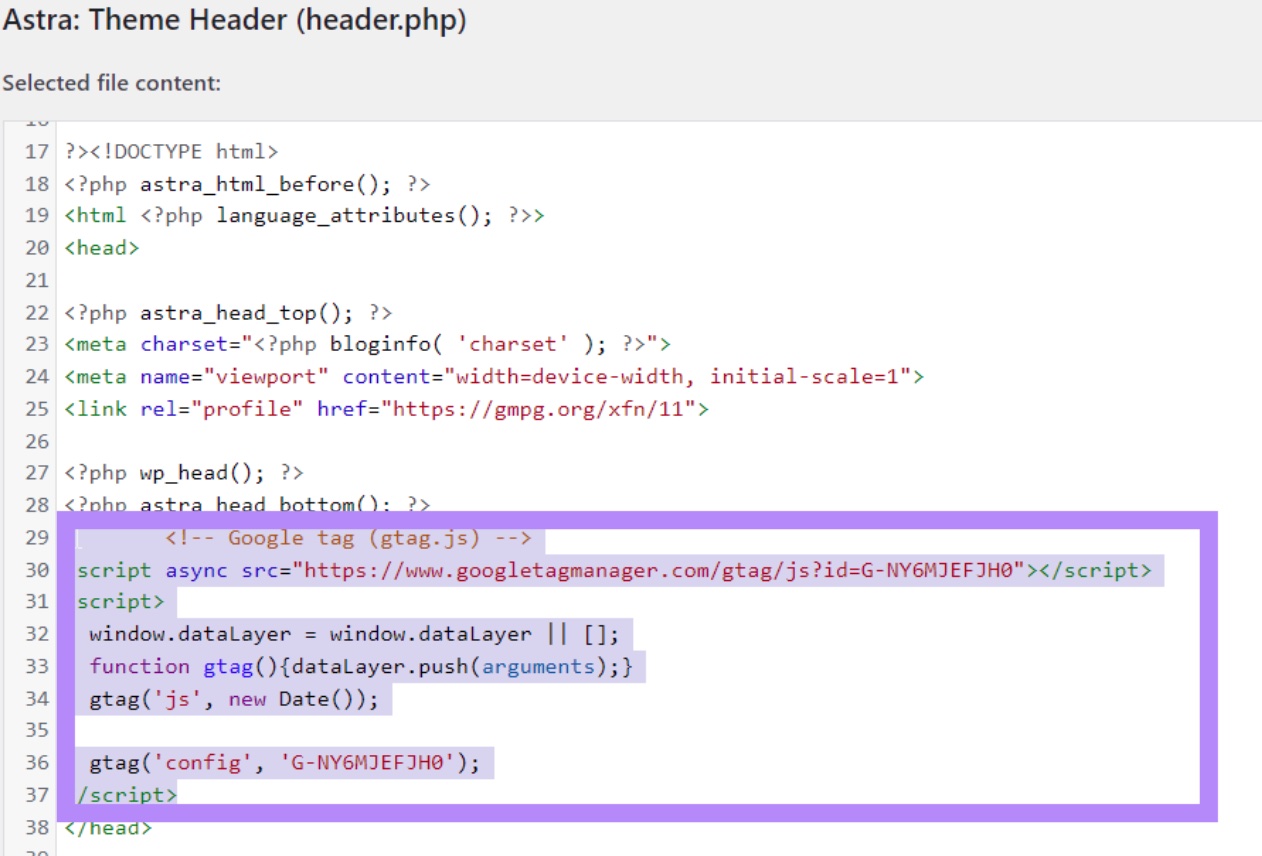
Locate the header element, which starts with “<head>” and ends with “</head>.”
Paste the Google Analytics tracking code either directly after the “<head>” tag or directly before the closing “</head>” tag.
Now, repeat this on each page of your site, adding your tracking code to the header HTML of every page. Make sure you don’t add more than one Google Tag code per page.
Option 4: Using Google Tag Manager to Add GA4 to Your WordPress Site
Another option is to use Google Tag Manager (GTM) to add Google Analytics tracking to your website.
Google Tag Manager is a web interface that lets you deploy and update marketing tags on your website or mobile app quickly and easily. In addition to the Google tag, it lets you deploy and manage third-party and custom tags.
In this method, the first steps are the same—creating a Google Analytics account, setting up your property and data stream, and locating your Measurement ID (or Google tag).
The next step is to set up your Google Tag Manager account. To do that, follow the steps in our guide to setting up Google Tag Manager.
Next, configure your Google Analytics tag in Google Tag Manager.
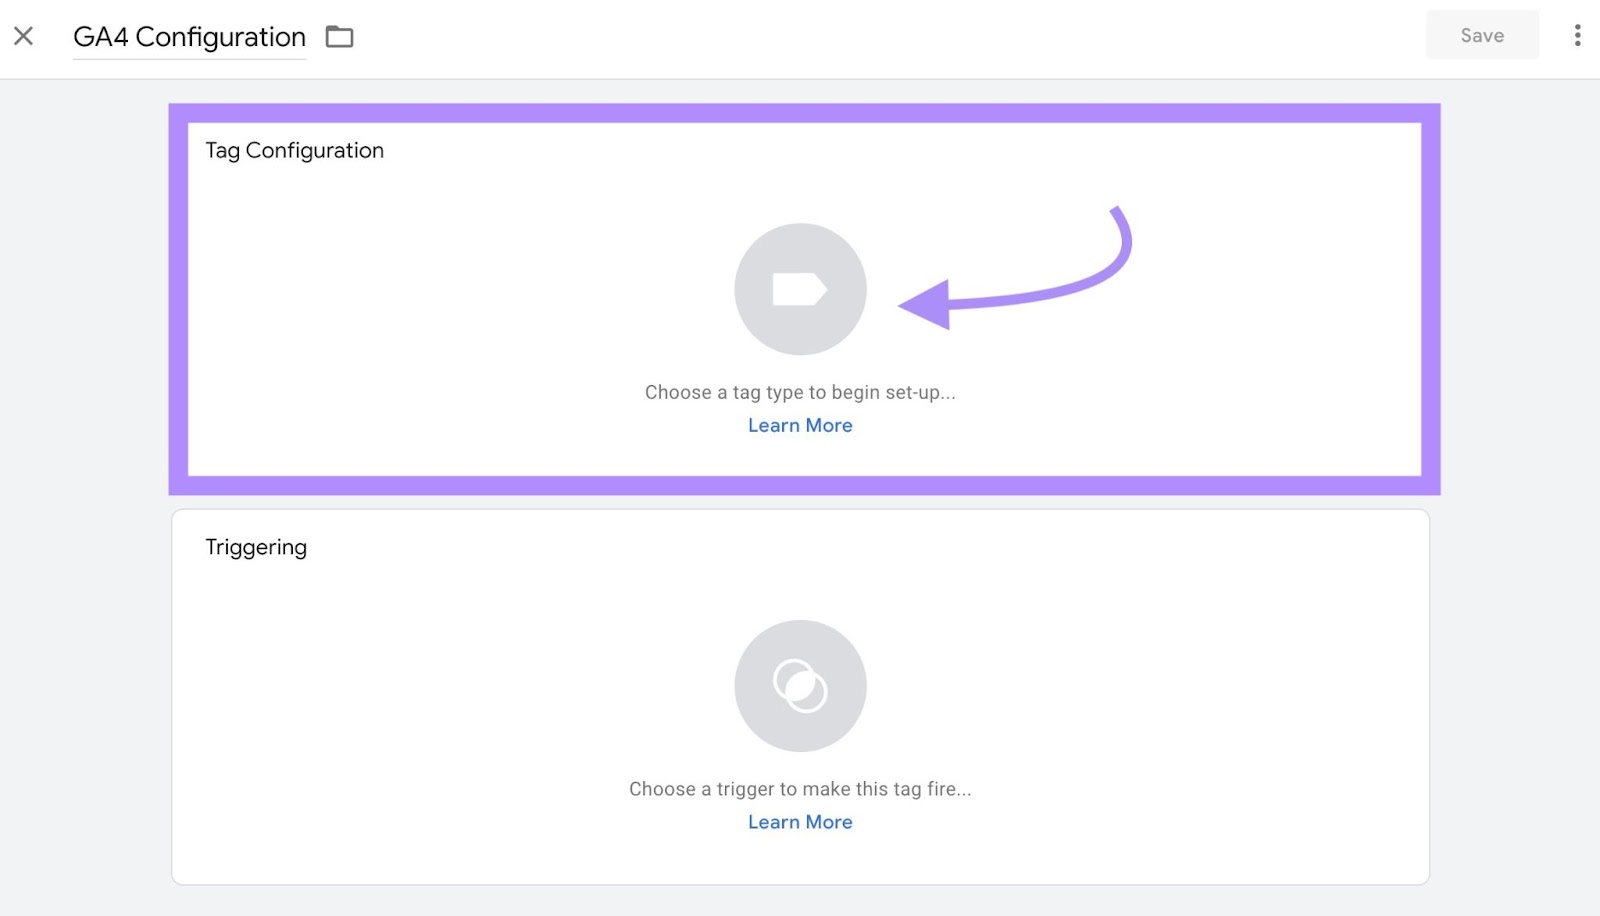
Create a new tag by clicking “Add a new tag” or “New Tag.”
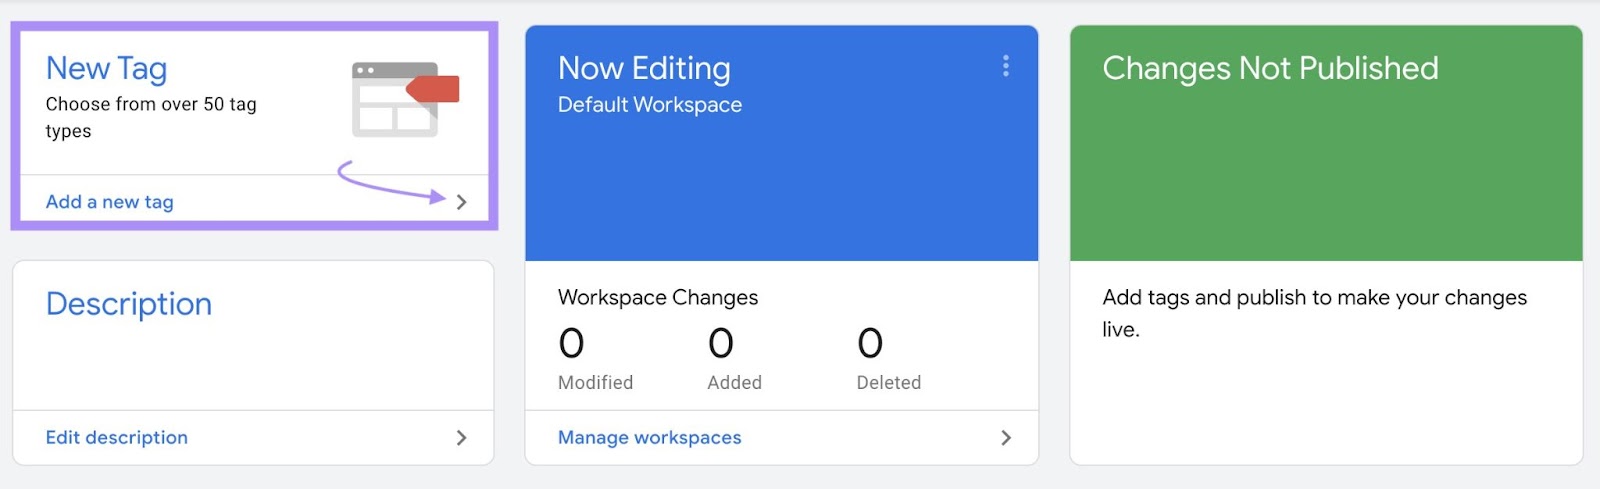
Give your tag a name (e.g., “GA4 Configuration”).
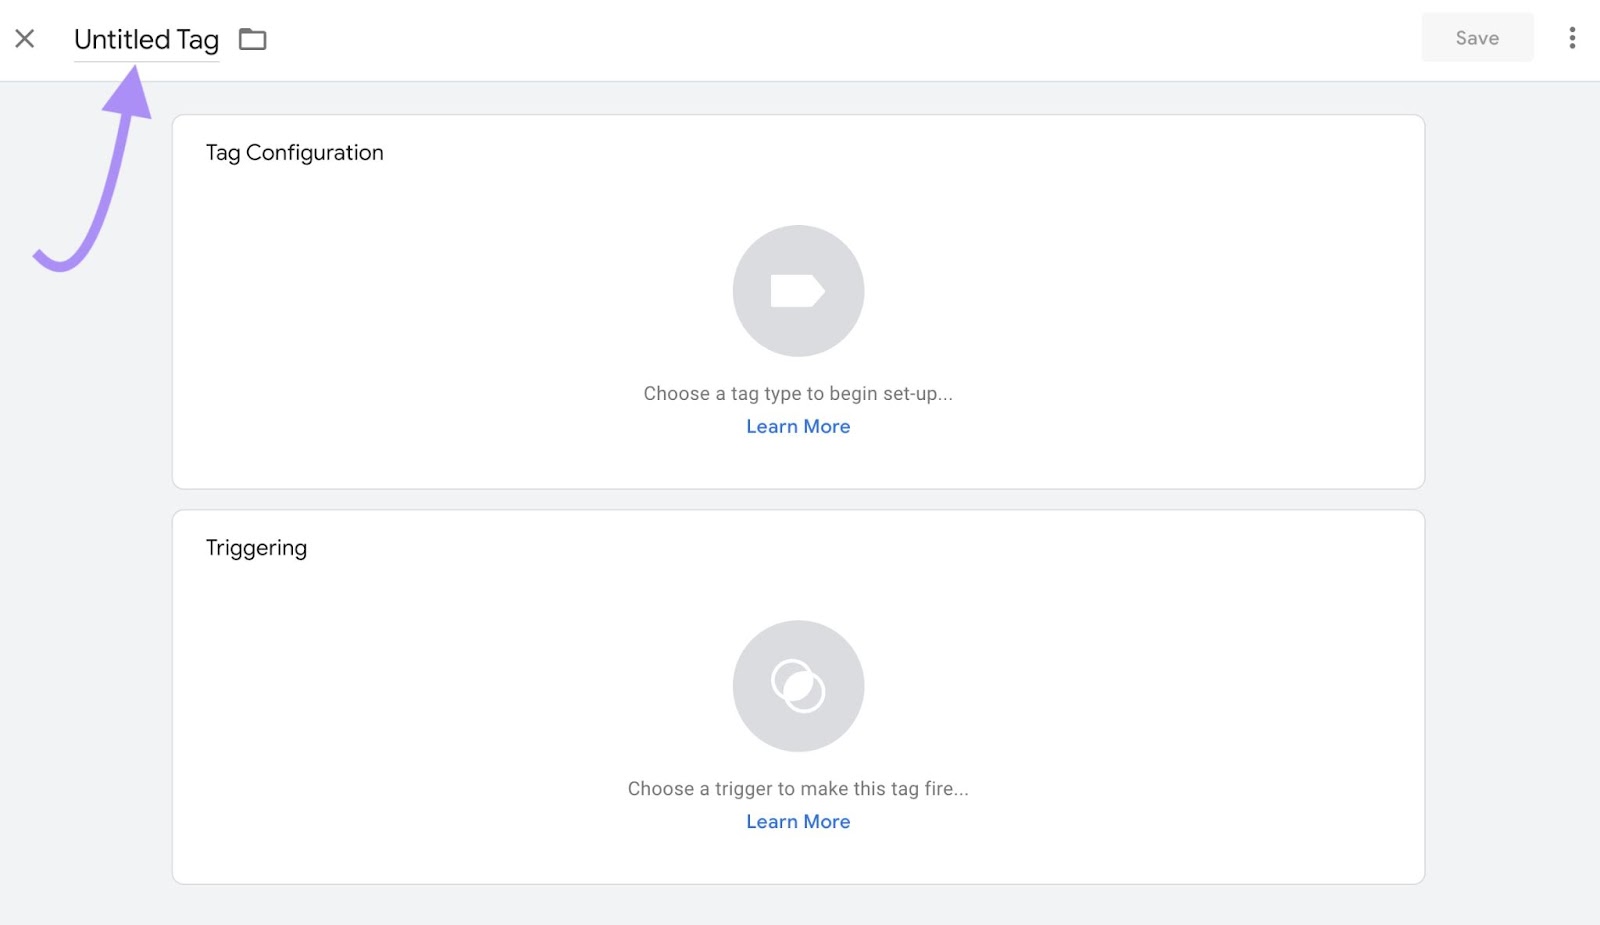
Then, click “Tag Configuration.”
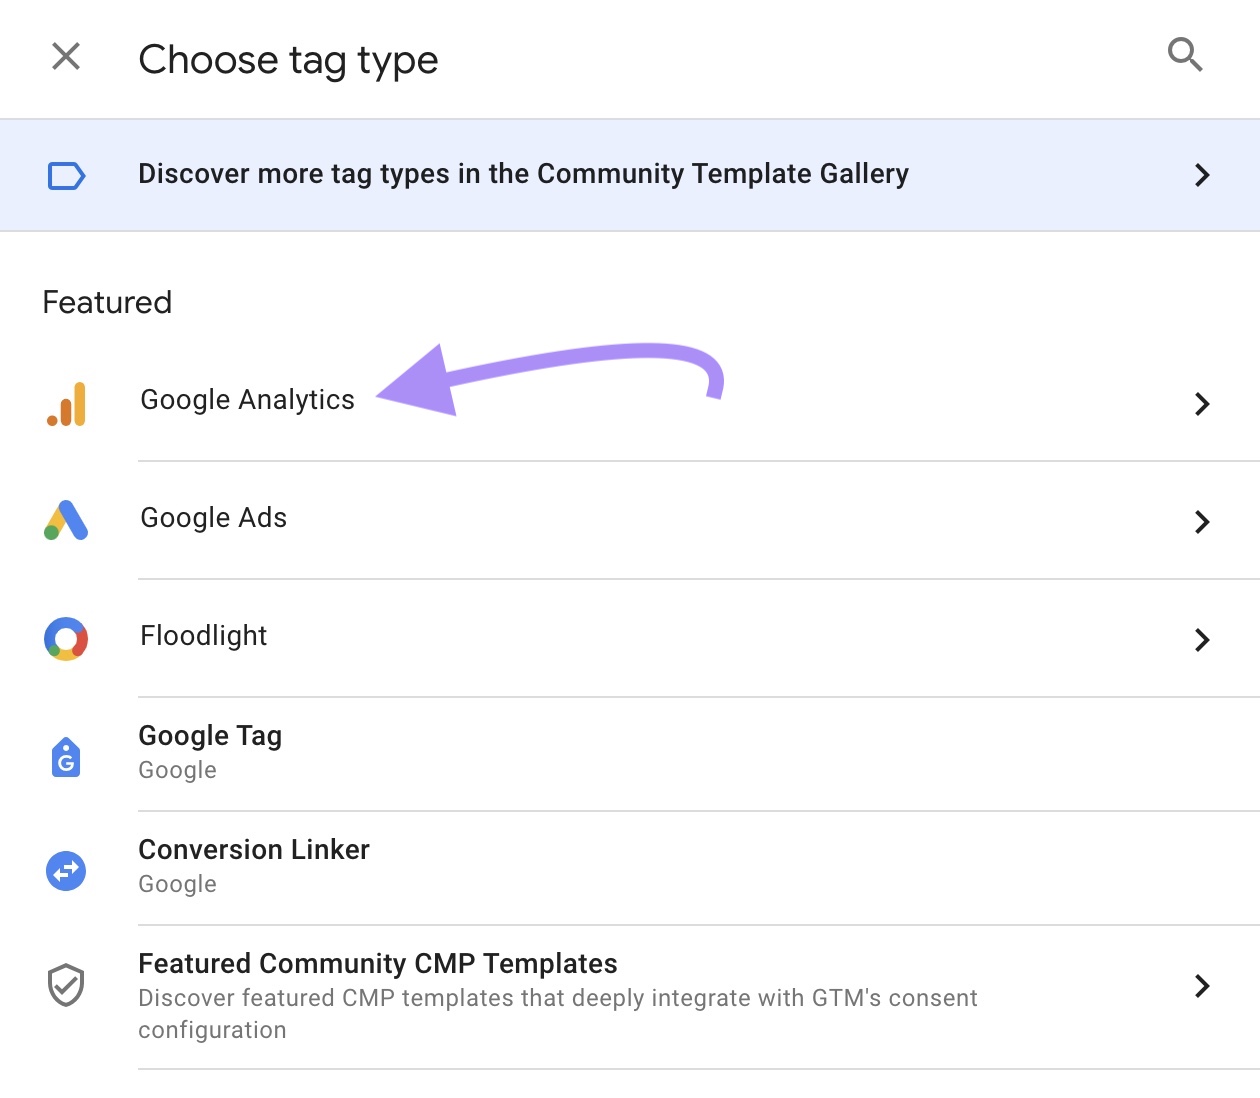
Select “Google Analytics.”
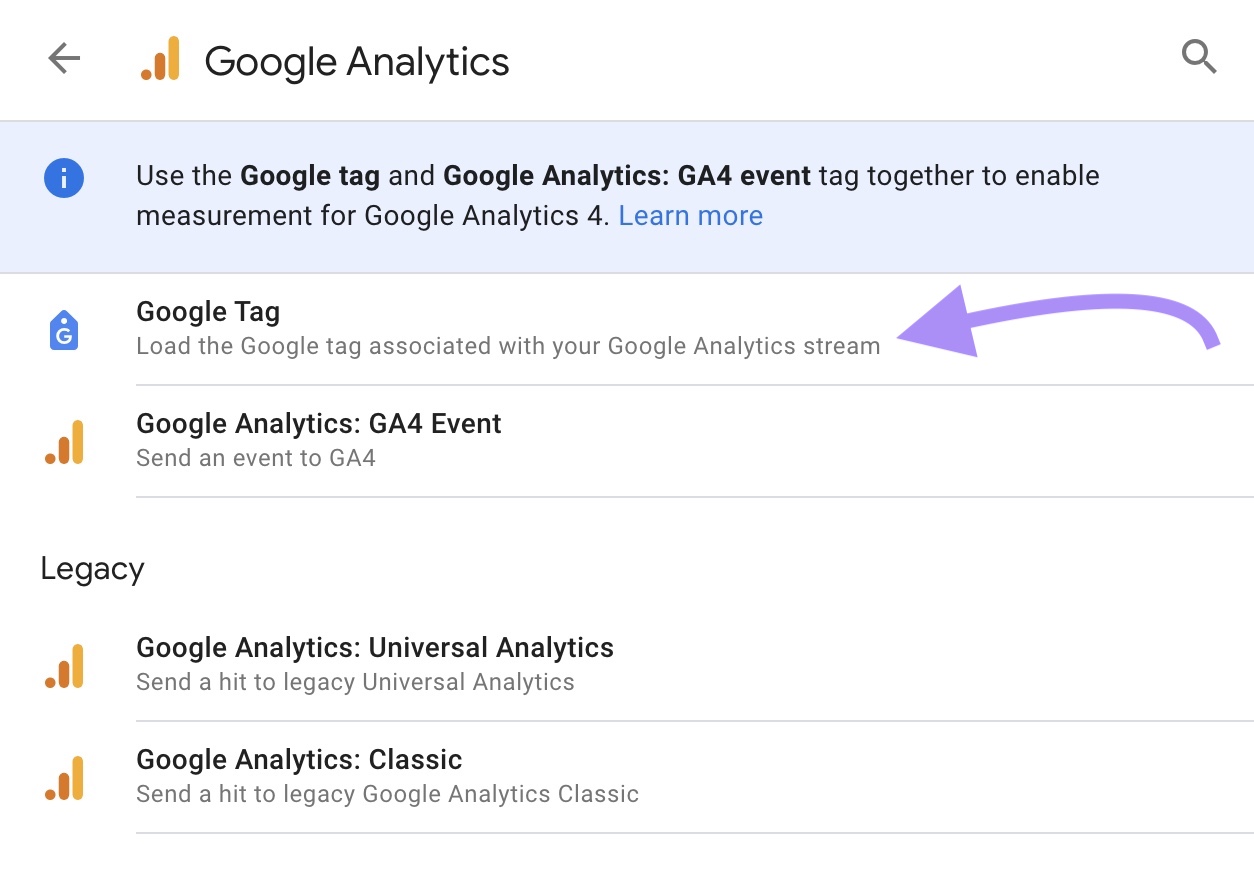
Next, click “Google Tag.”
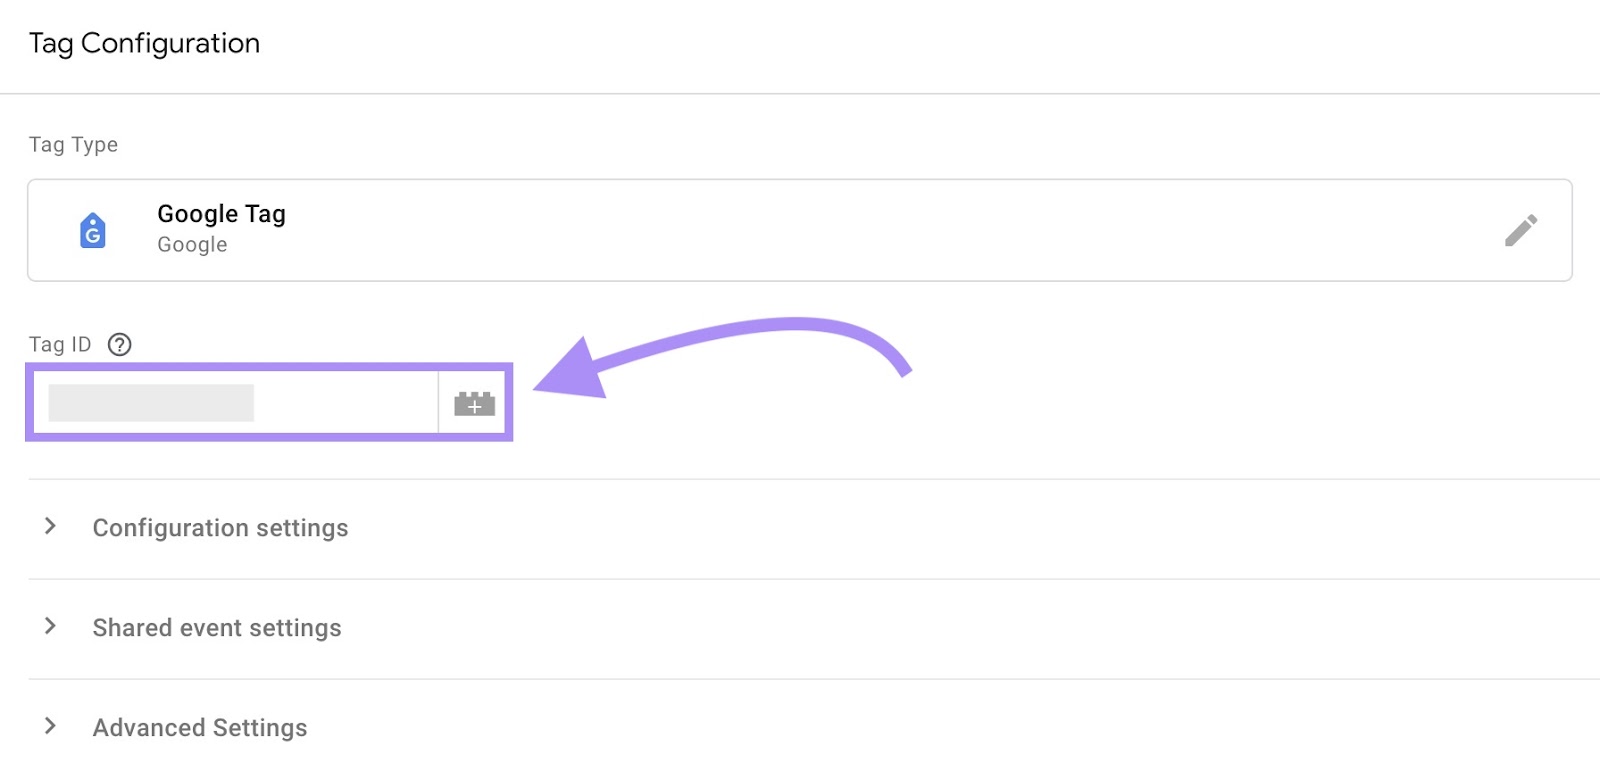
Next, paste your Measurement ID into the “Tag ID” field.
Install GTM in WordPress by adding the code snippets to your header and body text, just like in the “Manually Install Tracking Code to Your Website’s Code” section.
If you run into any trouble, here’s a handy walkthrough to help you add GTM to your WordPress website, published by WordPress.
Step 3: Test Whether Google Analytics Is Collecting Data
To test if Google Analytics is active and collecting data from your WordPress site, log in to your Analytics account again. Navigate to your Google Analytics dashboard. If you see data, it means your installation was a success.
It can take up to 48 hours for a new data stream to become active in GA4. In other words, don’t panic if you don’t see any data in your analytics dashboard yet.
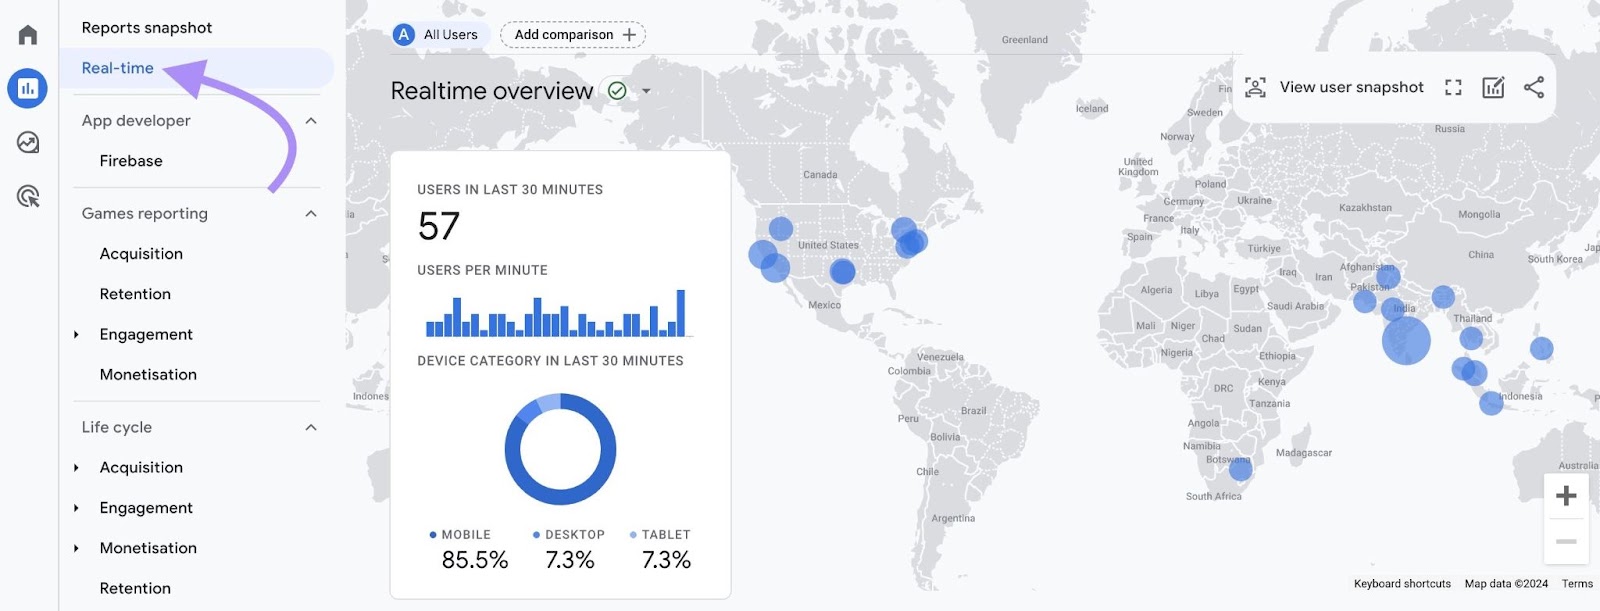
Once your data stream is active, view the data in the “Realtime” report in your Google Analytics dashboard.
If your data stream doesn’t become active within 48 hours, use Google’s Analytics Support resource to troubleshoot your tag setup.
Customizing Google Analytics 4 for Your WordPress Site
You’ll gain a lot of insights from Google Analytics 4 right out of the box. But using customizations can make this powerful tool even more useful.
Customizing your data collection and reporting ensures you’re gathering and measuring all the data you need to help your business succeed.
The first step is to set up conversions for your WordPress site. A conversion can be any user action that’s important to your business. For instance, making a purchase, submitting a contact form, downloading a free resource, or joining your mailing list.
Configure Conversions in GA4
The main way to track conversions in Google Analytics is to create or mark specific events as conversions. GA4 allows you to mark up to 30 different events as conversions.
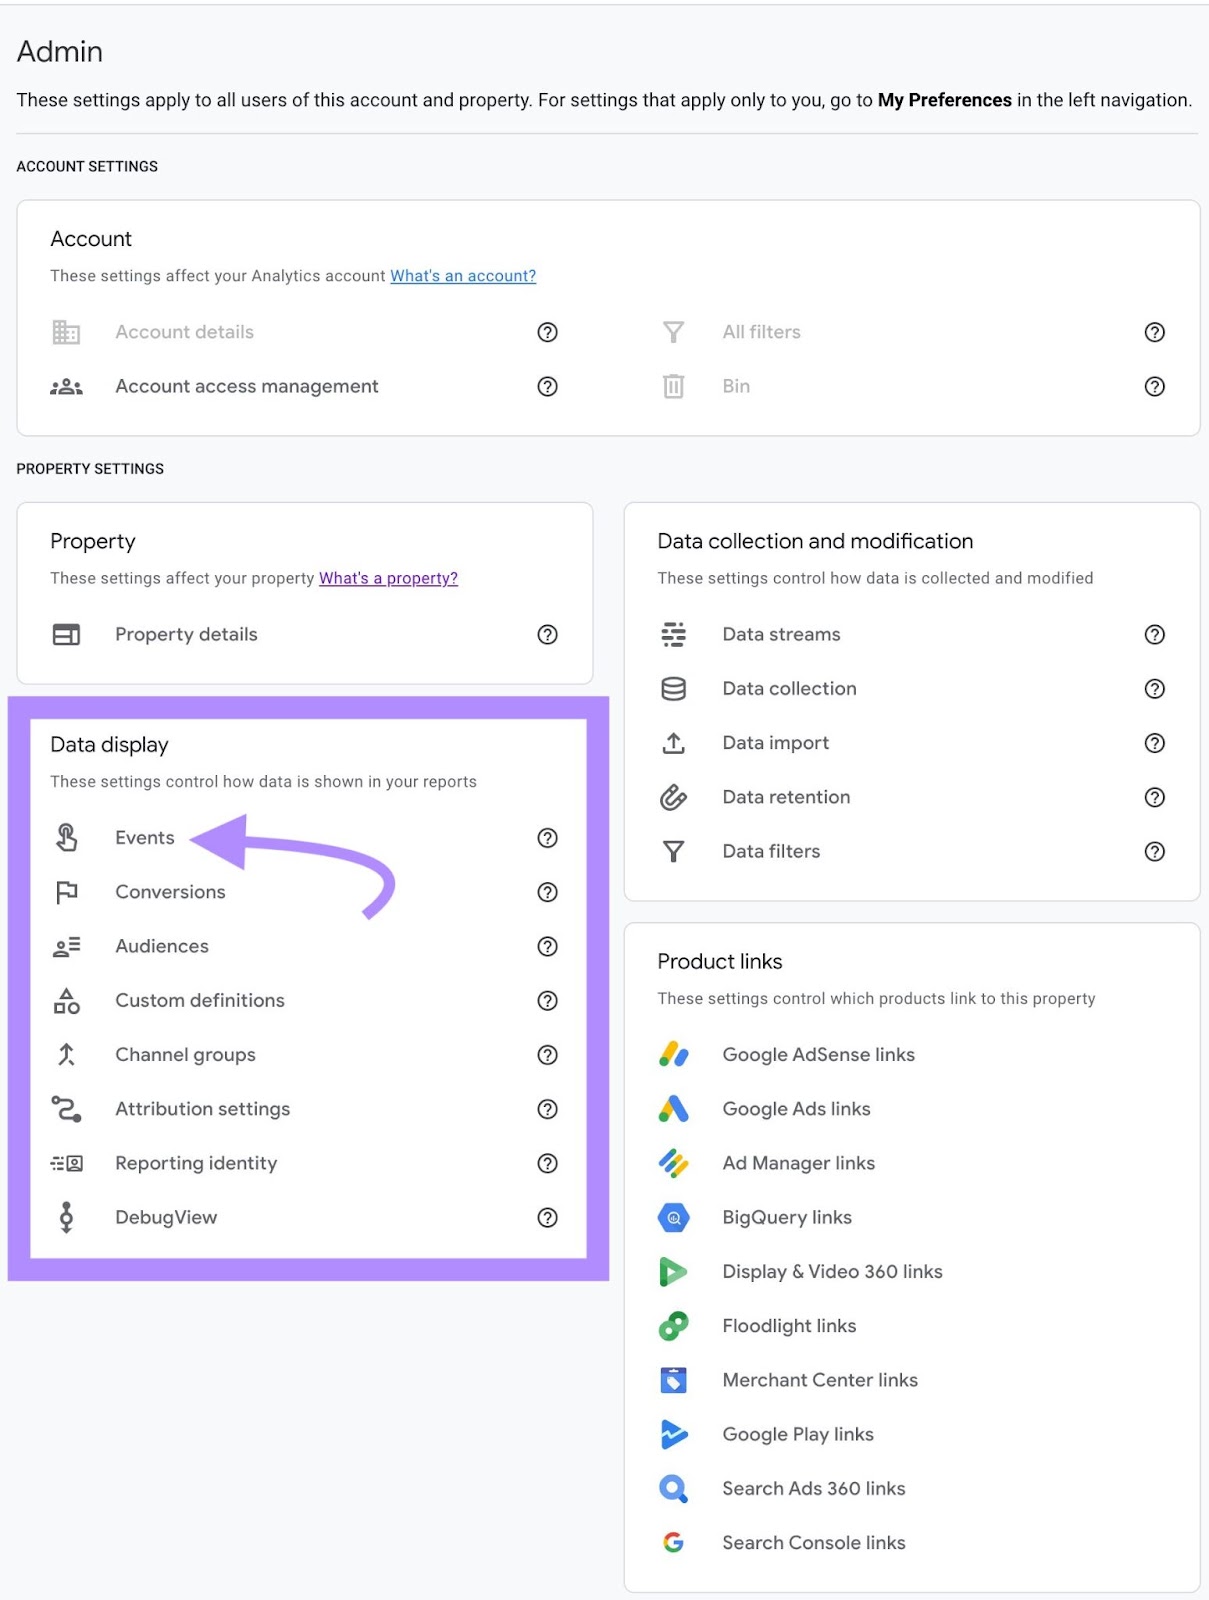
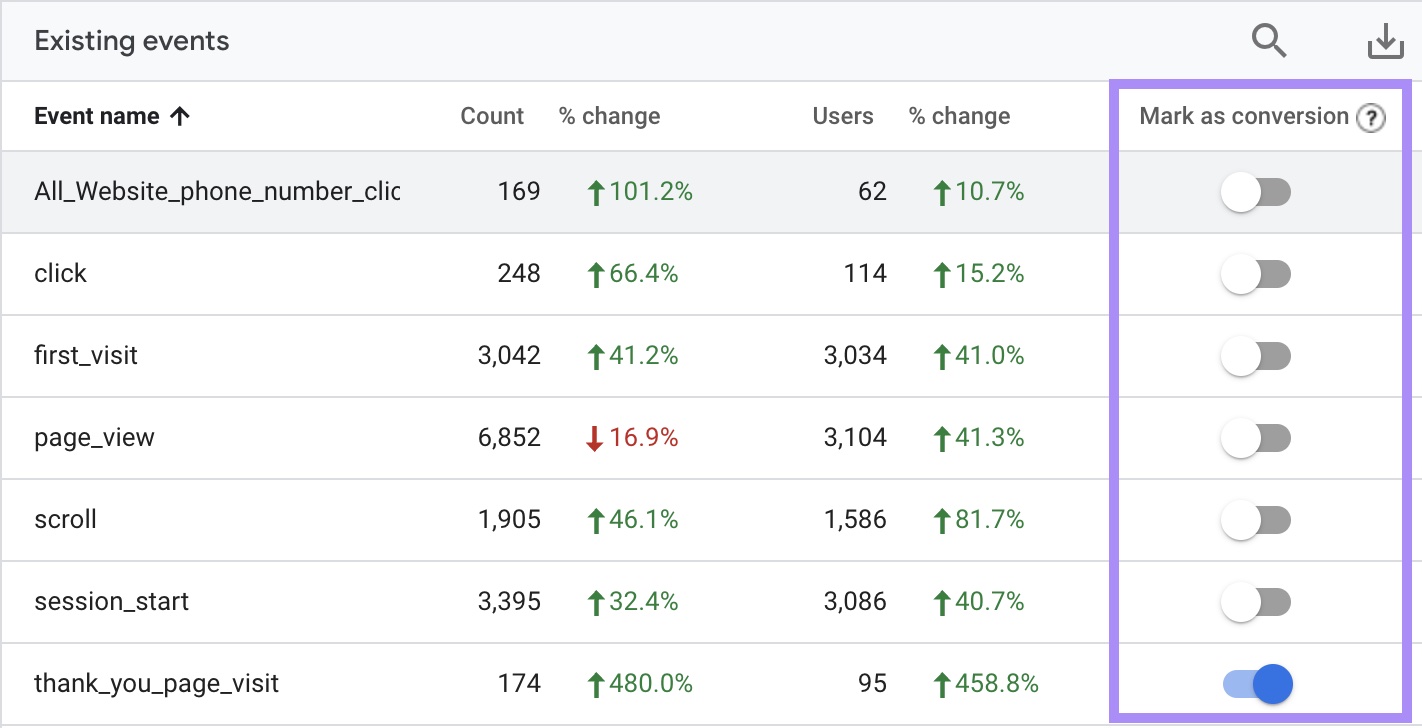
To mark an existing event as a conversion, open the Admin menu in your Analytics account. Then, under “Data Display,” click “Events.”
You’ll see a table showing all your “Existing Events.” To the right of the table, there’s a toggle switch to mark individual events as conversions.
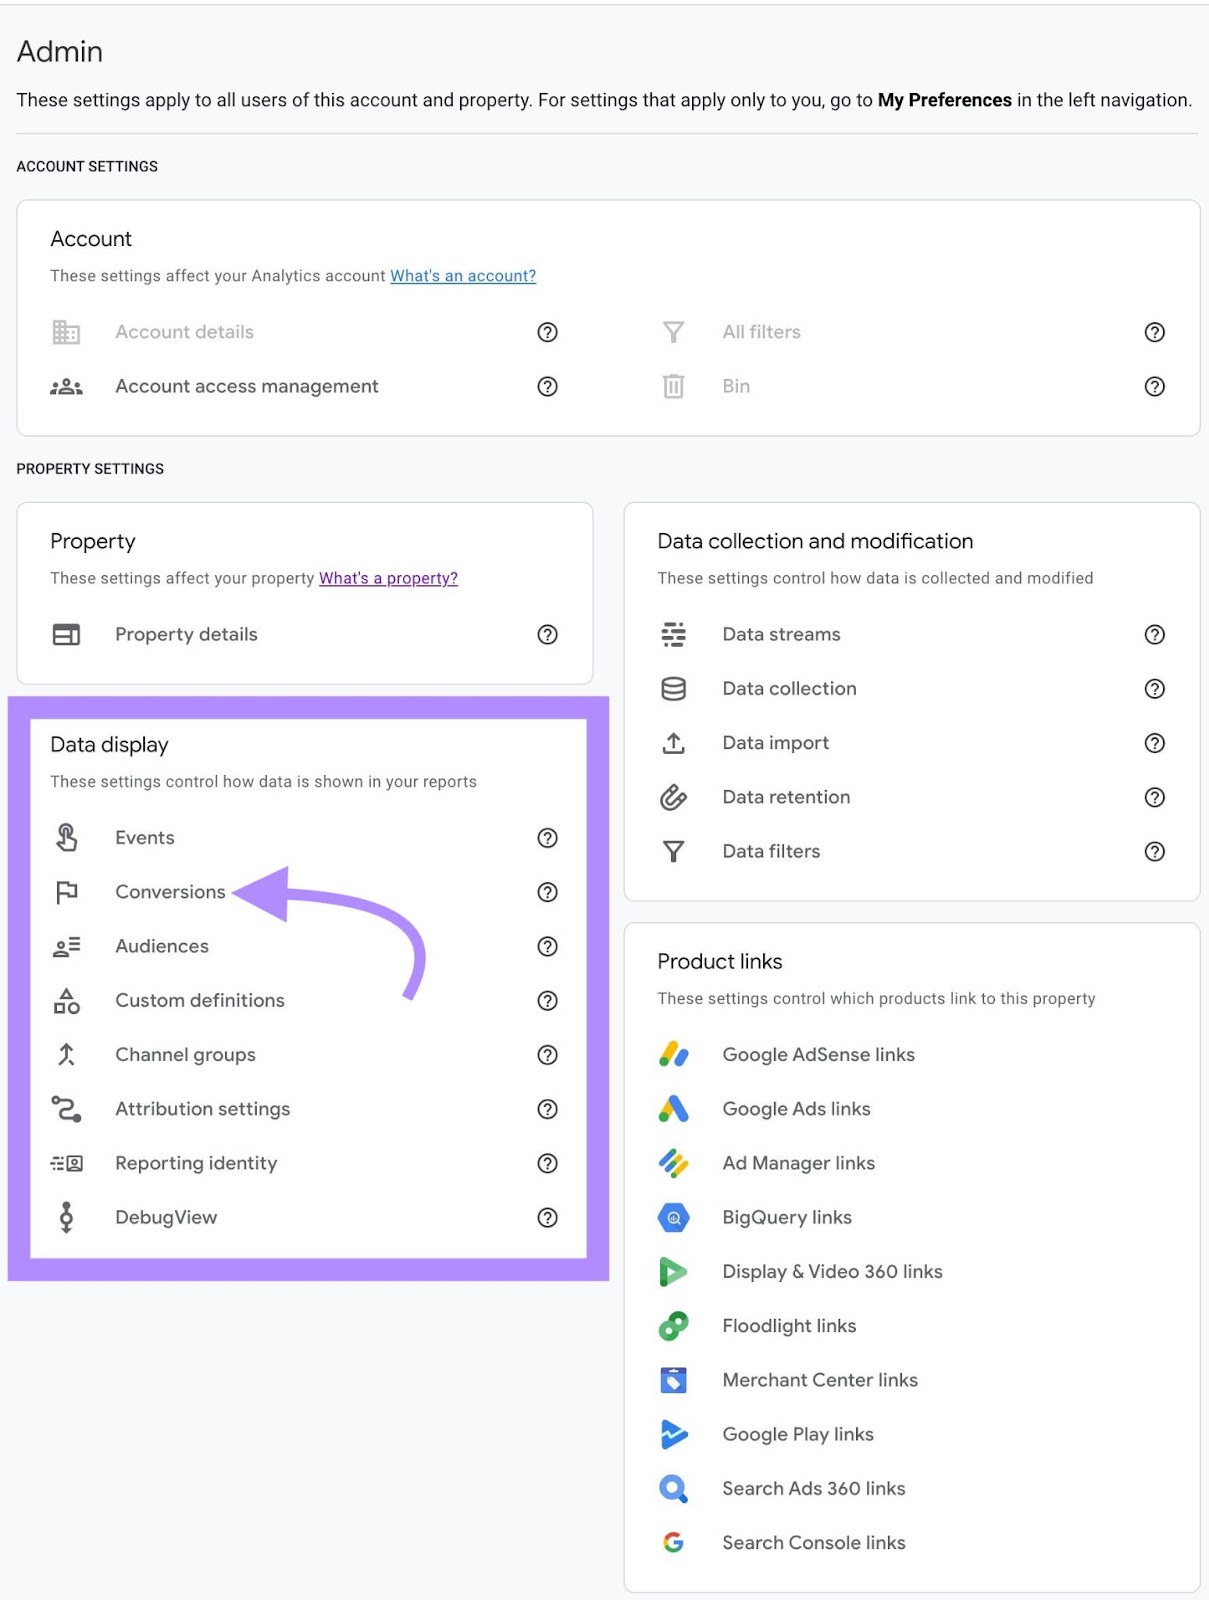
To mark a new event as a conversion, navigate to “Data Display” from the Admin menu and click “Conversions.”
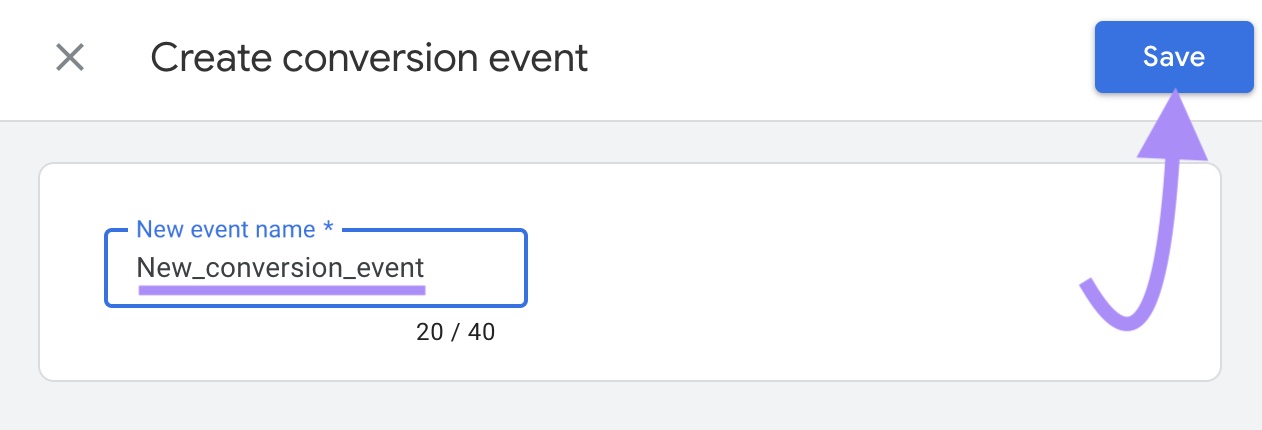
Click the blue “New conversion event” button.
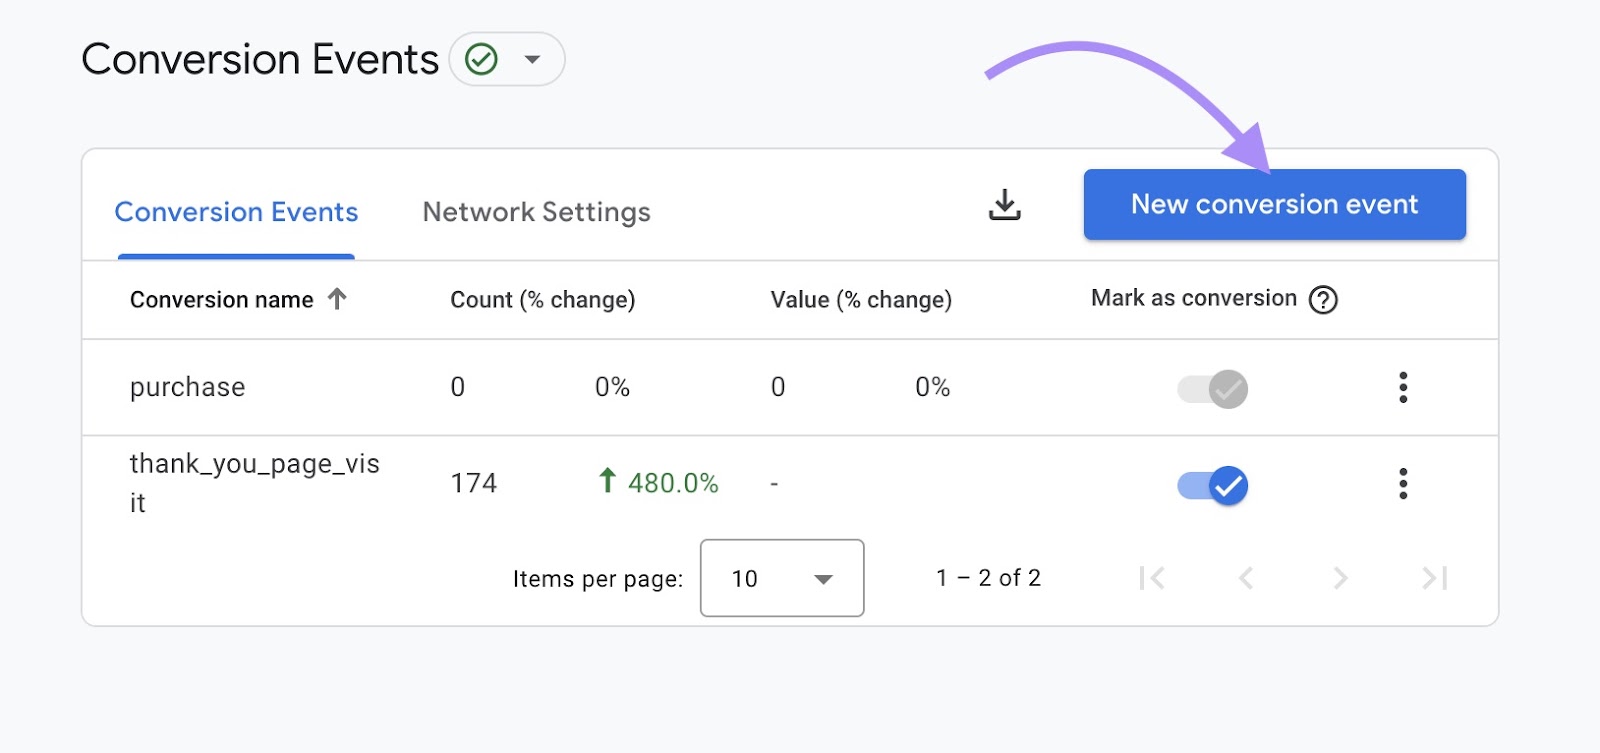
Type a name for the event to mark as a conversion and click “Save.”
Event Tracking in GA4
In Google Analytics, an “event” is a user interaction with your website or app. Events span a wide range of actions, including button clicks, form submissions, video plays, file downloads, social media shares, and more.
In other words, an event is any user action you define as significant and want to track and measure. Events give you insight into user behavior.
Google Analytics can track many different events, but not all are active by default.
- Automatically collected events: Events you don’t need to set up as GA4 tracks these user interactions by default
- Enhanced measurement events: Events you can choose to track (or not track) by enabling or disabling “Enhanced measurement” in your data stream settings.
- Recommended events: Events that are useful to track that aren’t collected by default. You’ll need to configure these events if you want GA4 to collect this data.
The table below shows the events Google recommends for all properties. Google offers separate event recommendations for online sales and games.
Create custom events to track user interactions. Custom events are not included in GA4’s automatic or recommended events. Follow our guide to GA4 custom events to set these up.
Further reading: 7 Advanced Tips for Google Analytics 4: Get More From Your Data
Using Custom Dimensions in GA4
In Google Analytics 4, the term “dimensions” is used to describequalitative data attributes. In other words, dimensions are data characteristics that provide additional contextual information about the type(s) of data in a particular dataset.
Examples of dimensions include country or geographic location, browser or device language, traffic source or medium, page location, device category, browser used, and campaign identity.
In addition to default dimensions, create custom dimensions to track specific information about user behavior that is useful to you or your business.
It’s worth noting that the standard dimensions in GA4 are already quite robust and provide more than enough value for most Google Analytics users.
However, if you find that there isn’t an existing dimension to describe the data you need reporting on, take a look at our in-depth guide to Google Analytics 4 dimensions, which includes detailed instructions on how to set up custom dimensions.
Optimize Your Site with a Site Audit
Google Analytics reports can help you understand how users engage with your website.
It provides metrics like page rank, impressions, CTR, average engagement time, conversion rate, and bounce rate. Use these metrics to discover what is working on your site and what needs improvement.
Armed with this information, you can optimize your website to perform even better.
Want to quickly identify which website fixes to prioritize? Run a site audit.
Semrush’s Site Audit tool will identify critical issues that could impact your site’s Google rankings. It will also provide specific recommendations to improve your site health in order of priority.
This tool checks for more than 140 on-page and technical SEO issues. They range from indexing and crawlability and user experience issues (broken links and Core Web Vitals problems) to content issues (duplication and markup errors).
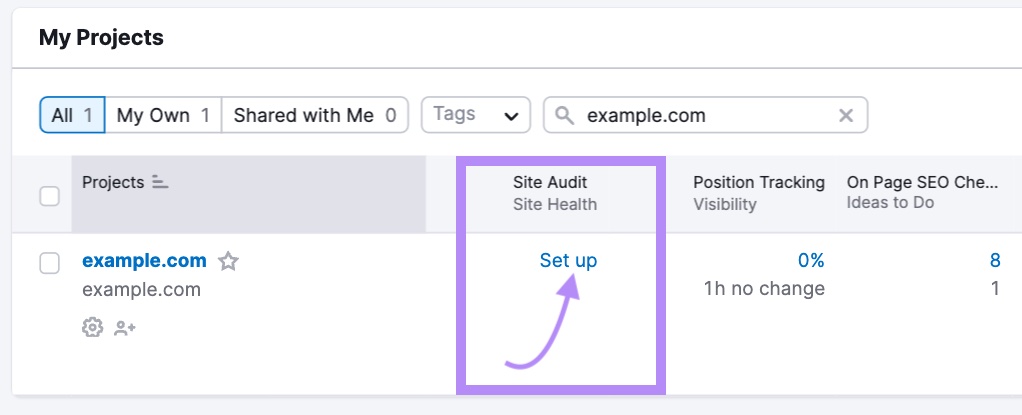
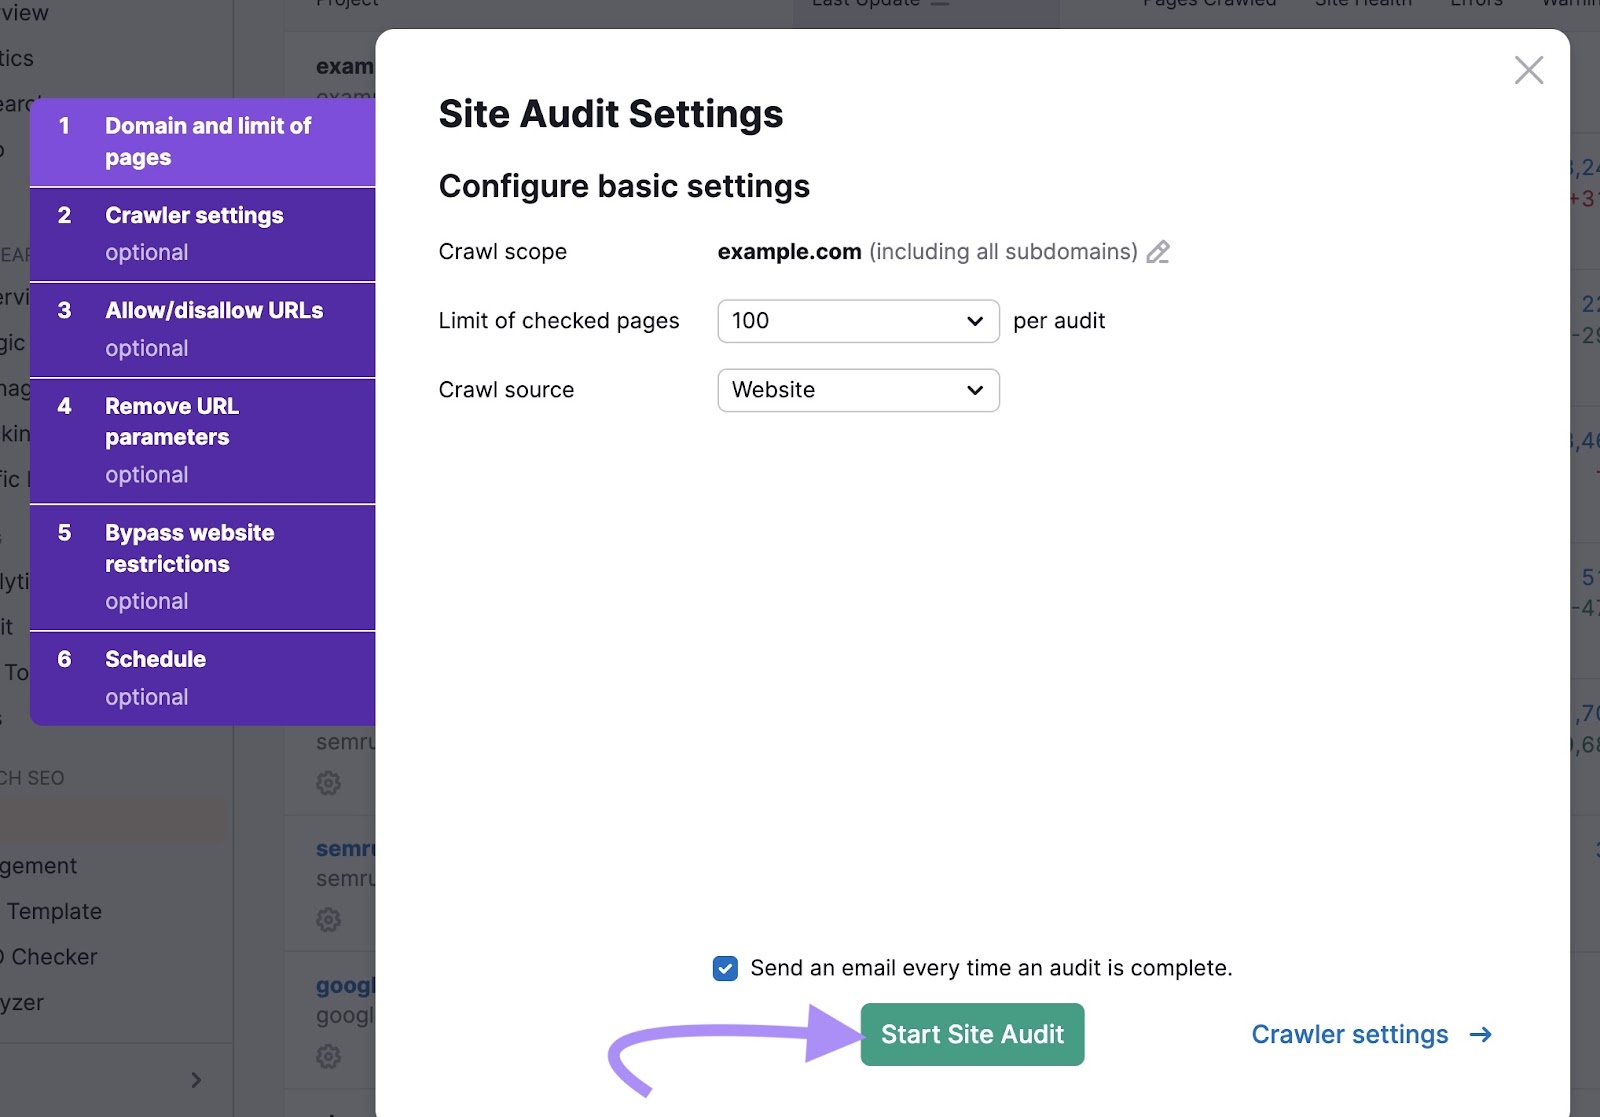
Start by creating a Project for your domain. Under “My Projects,” look for the “Site Audit” column, and click “Set up.”
You’ll be asked to configure several settings. Check out this guide if you need help defining the parameters for your site audit.
Once you’ve configured the settings, click the “Start Site Audit” button.
If you have a large site with many pages to crawl, this could take some time.
Once the crawl is complete, you’ll be notified by email.
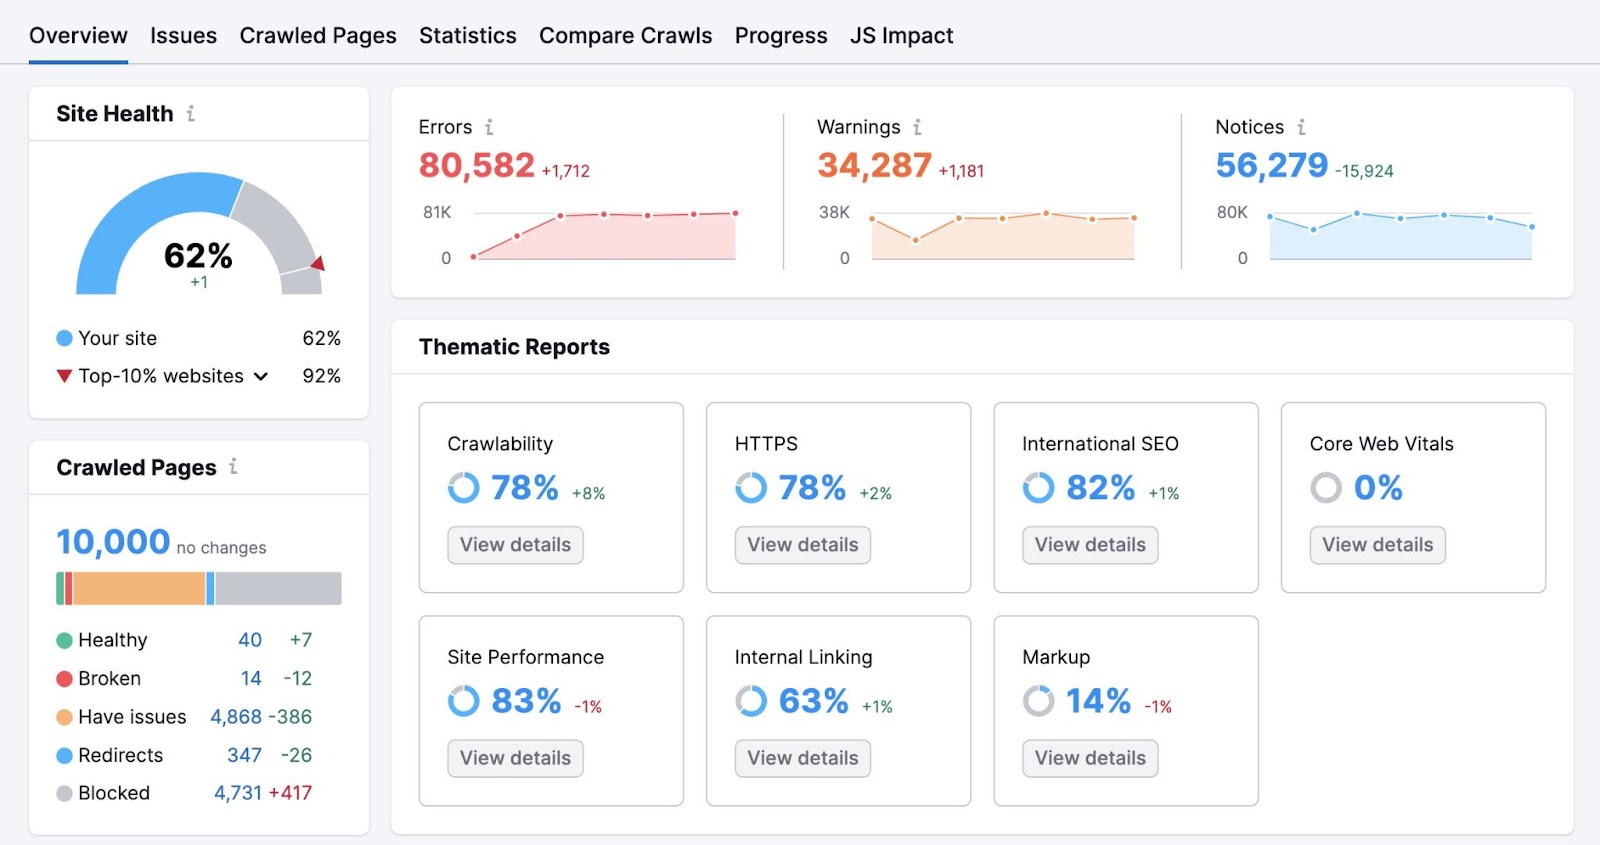
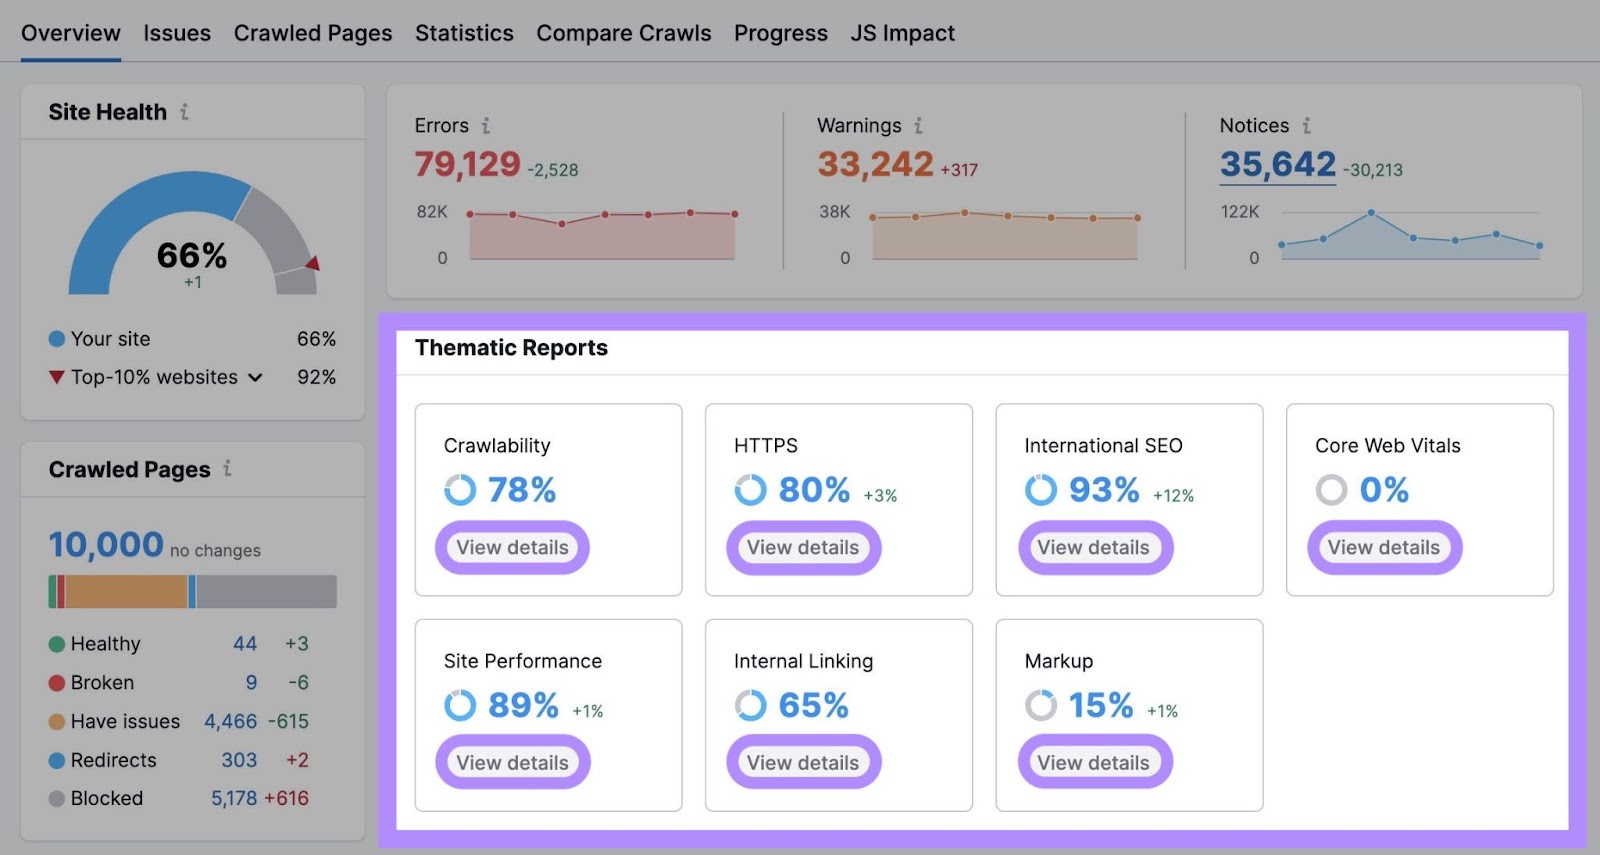
When you open the Site Audit dashboard, it will look like this:
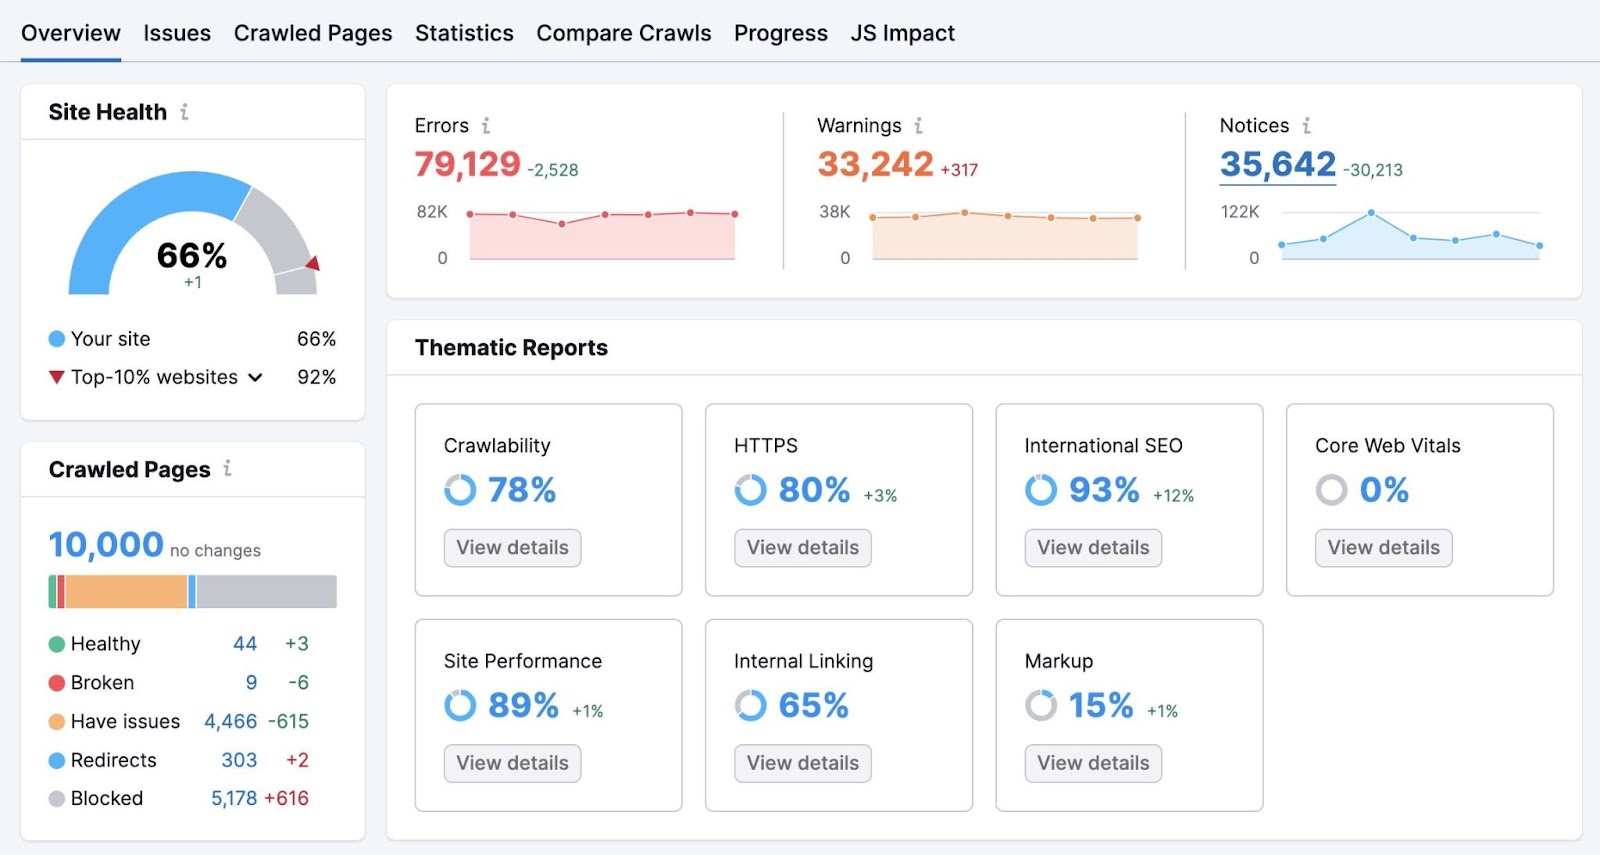
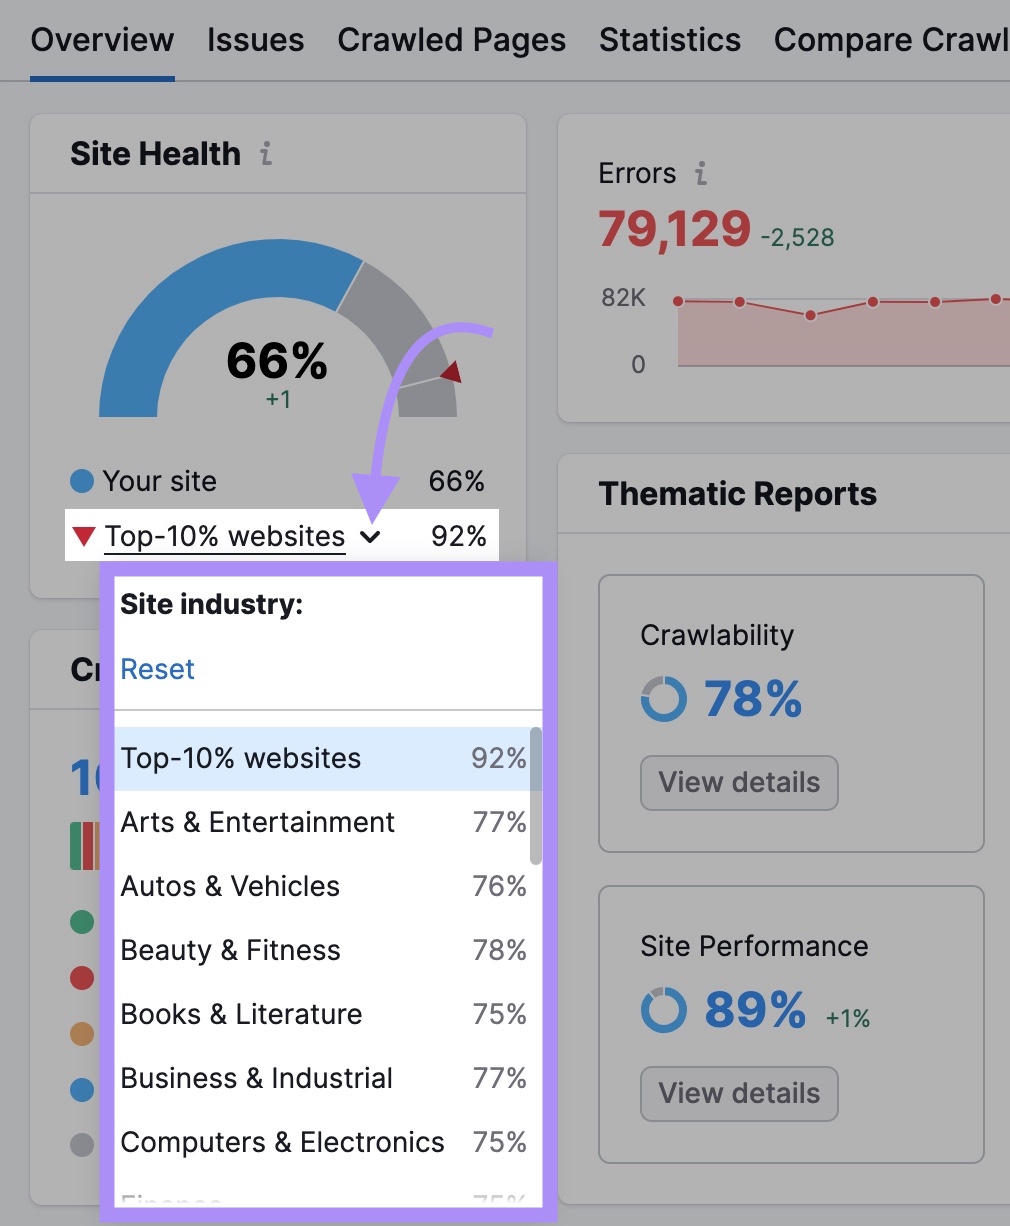
Your “Site Health” score reveals how optimized your website is for search engines and how critical these issues are.
Compare your domain’s site health to the average site health of your industry or the top 10% of websites.
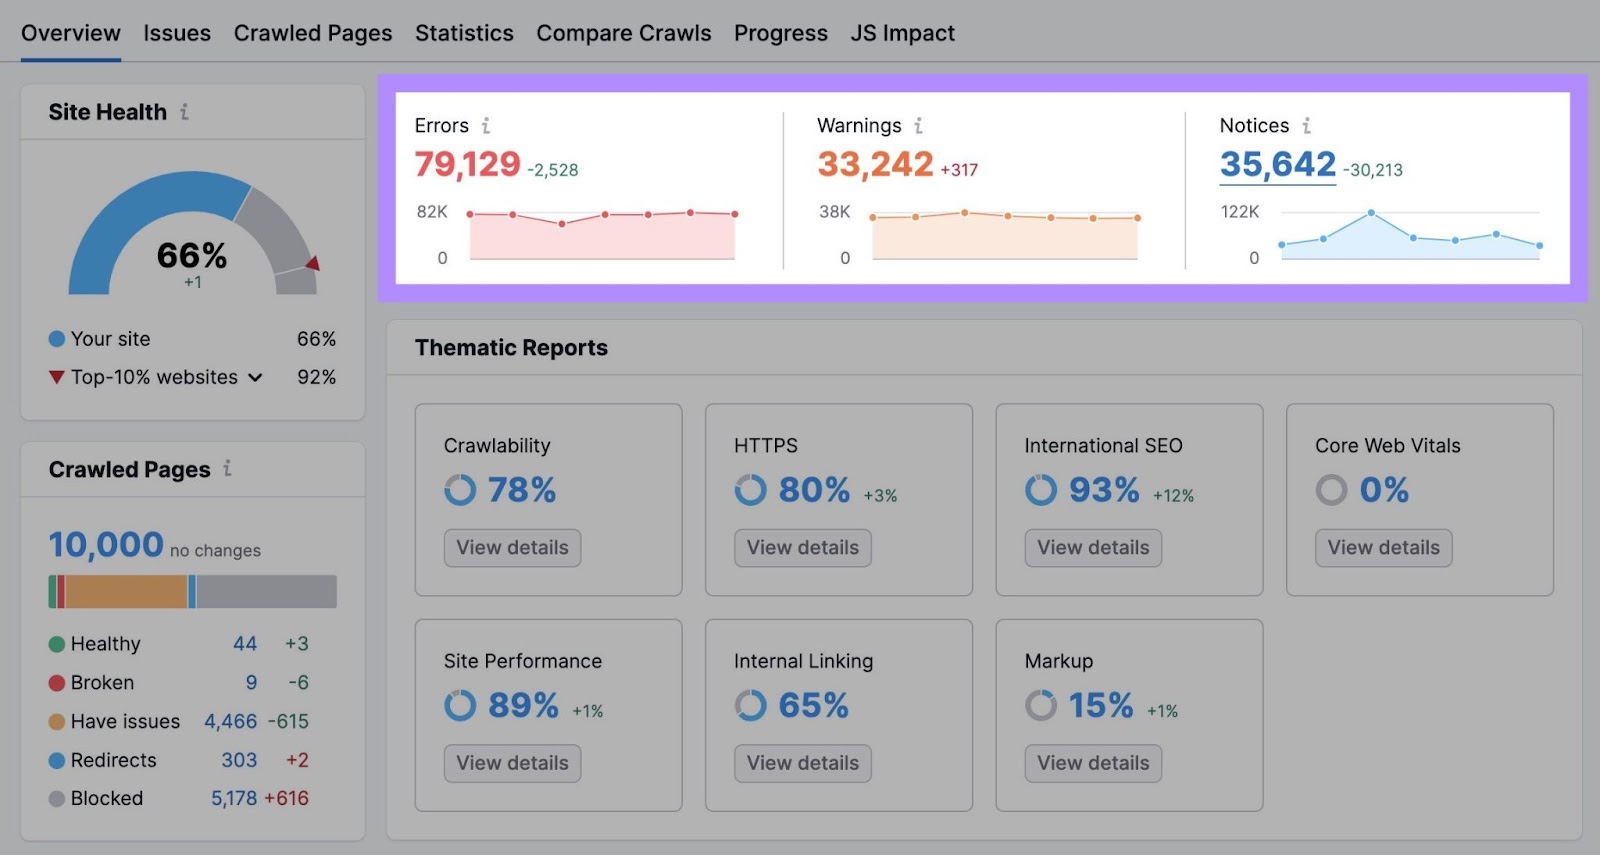
Review the issues identified by Site Audit. The issues are sorted into “Errors,” “Warnings,” and “Notices.” View trends over time as you implement changes.
Take a closer look at specific issues by clicking “View Details” under the relevant report in the “Thematic Reports” section of your dashboard.
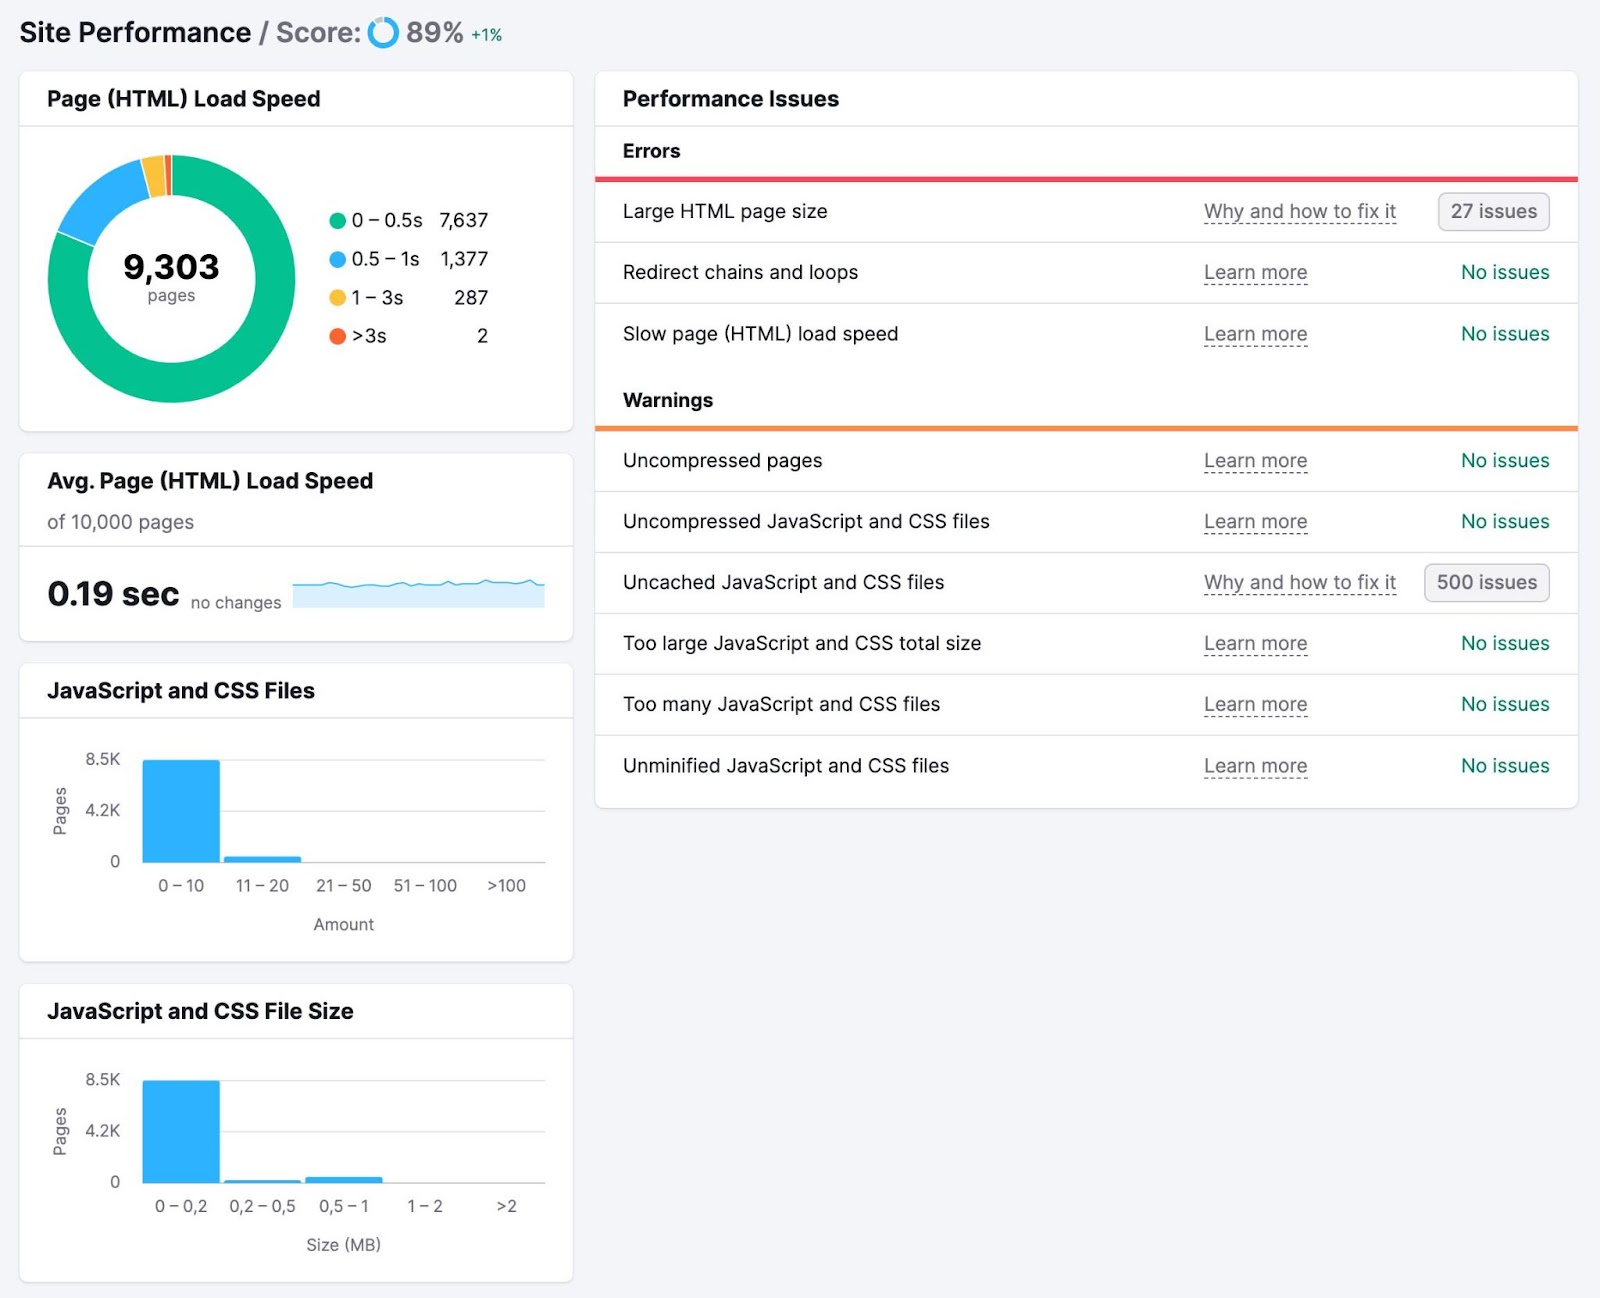
For instance, click “Site Performance” for a more detailed report detailing issues affecting page load speeds.
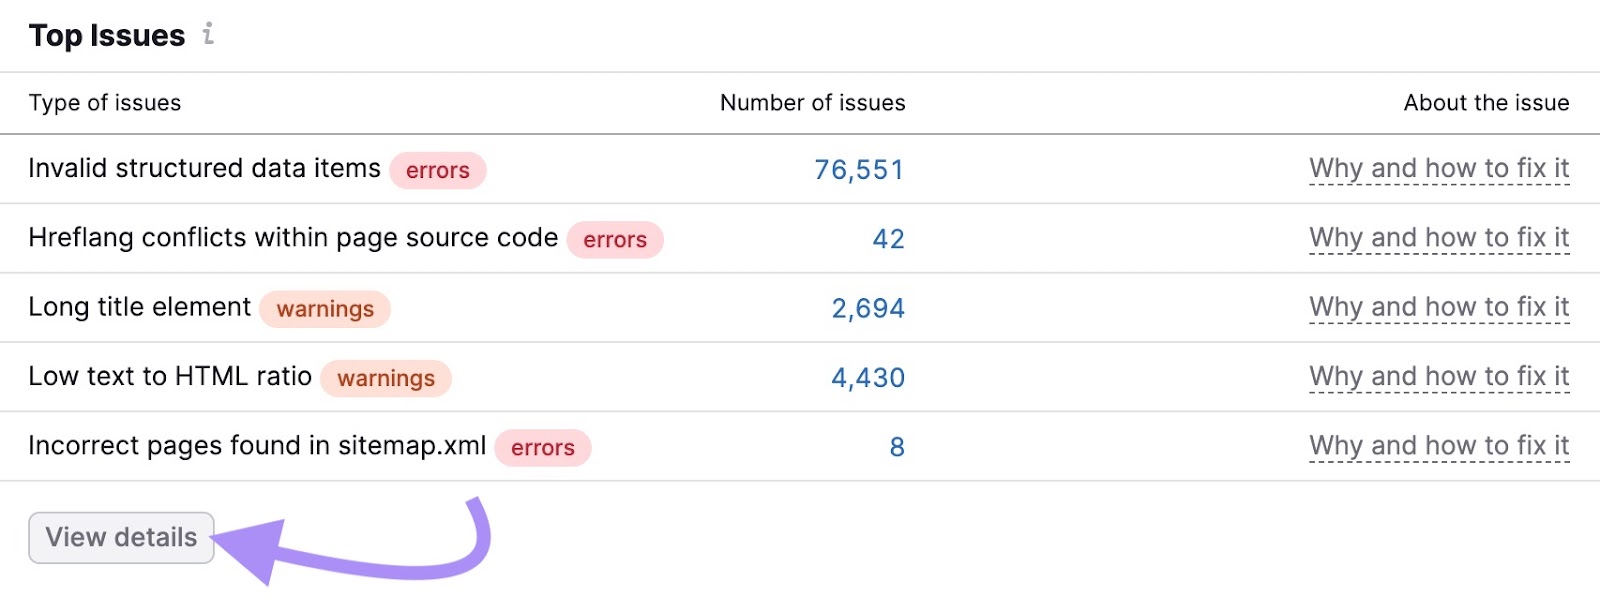
Back on the Site Audit report overview, scroll down to the “Top Issues” section at the bottom of the page and click on “View details.”
This lets you view your website’s issues in one place. Toggle between “All,” “Errors,” “Warnings,” and “Notices.”
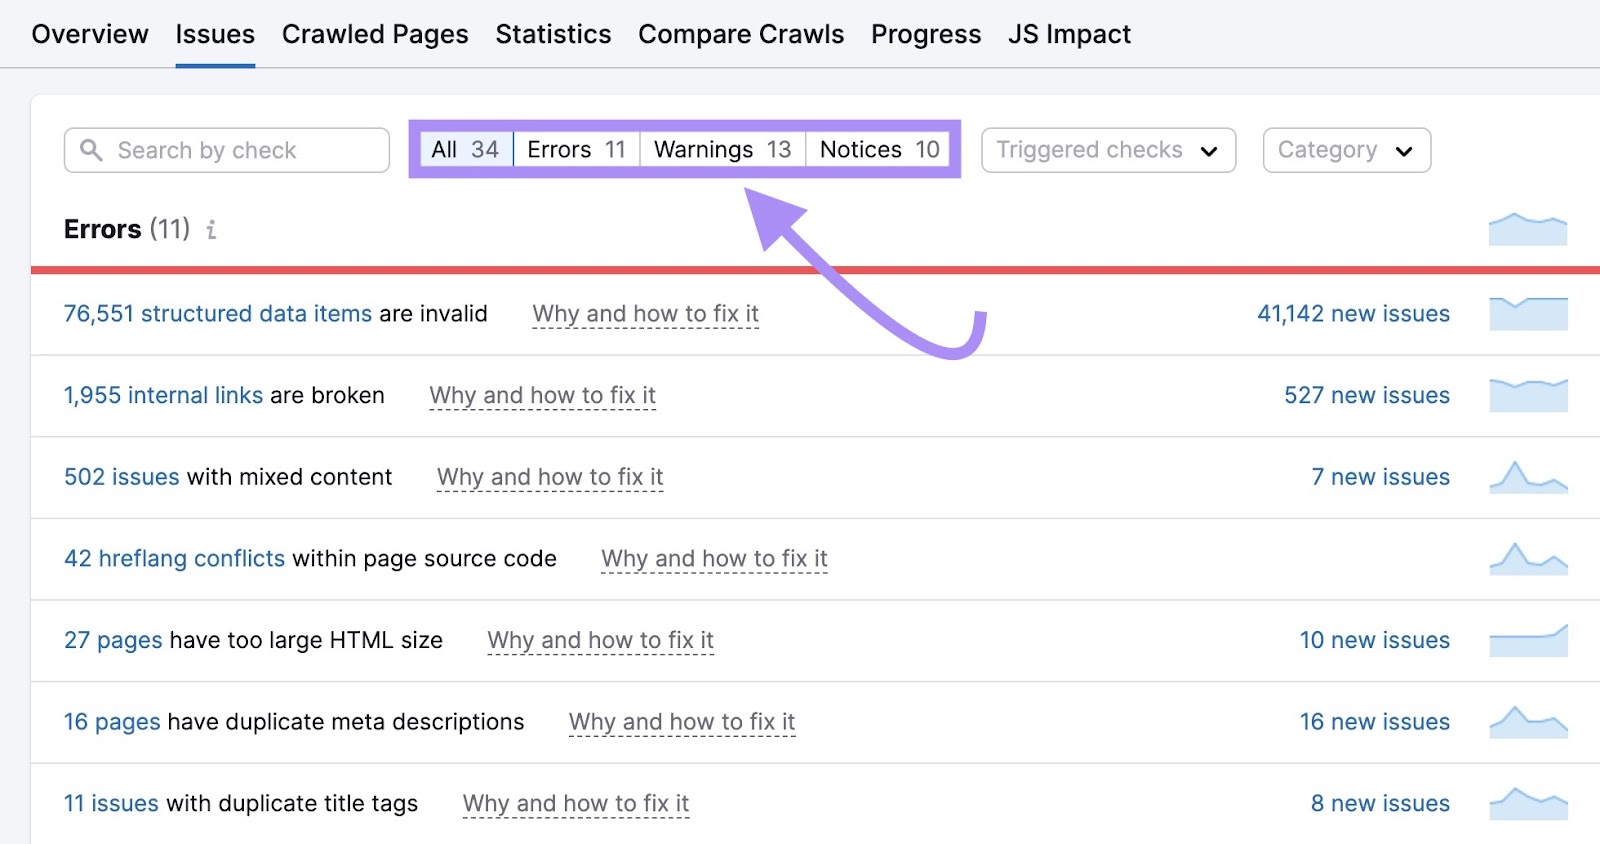
Work your way through the list and address the issues in order of priority. Start with “Errors,” then “Warnings”—these two affect your site health score—before addressing “Notices.”
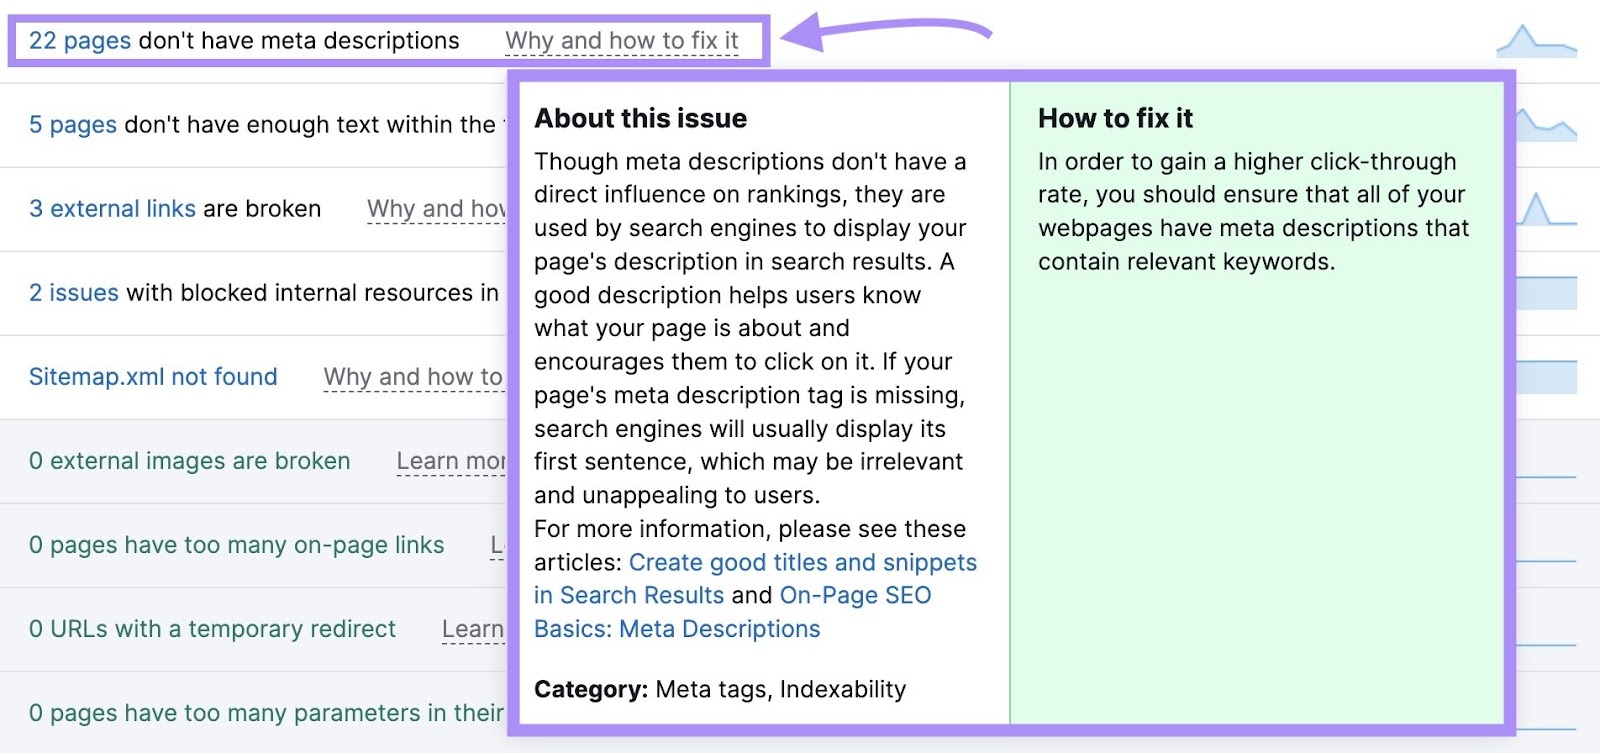
Click “Why and how to fix it” to learn more about the issue and how it affects your site’s health.
To dive deeper, click on the blue text in each listed issue (e.g., “22 pages”).
Now, the tool will list the URLs of the affected pages.
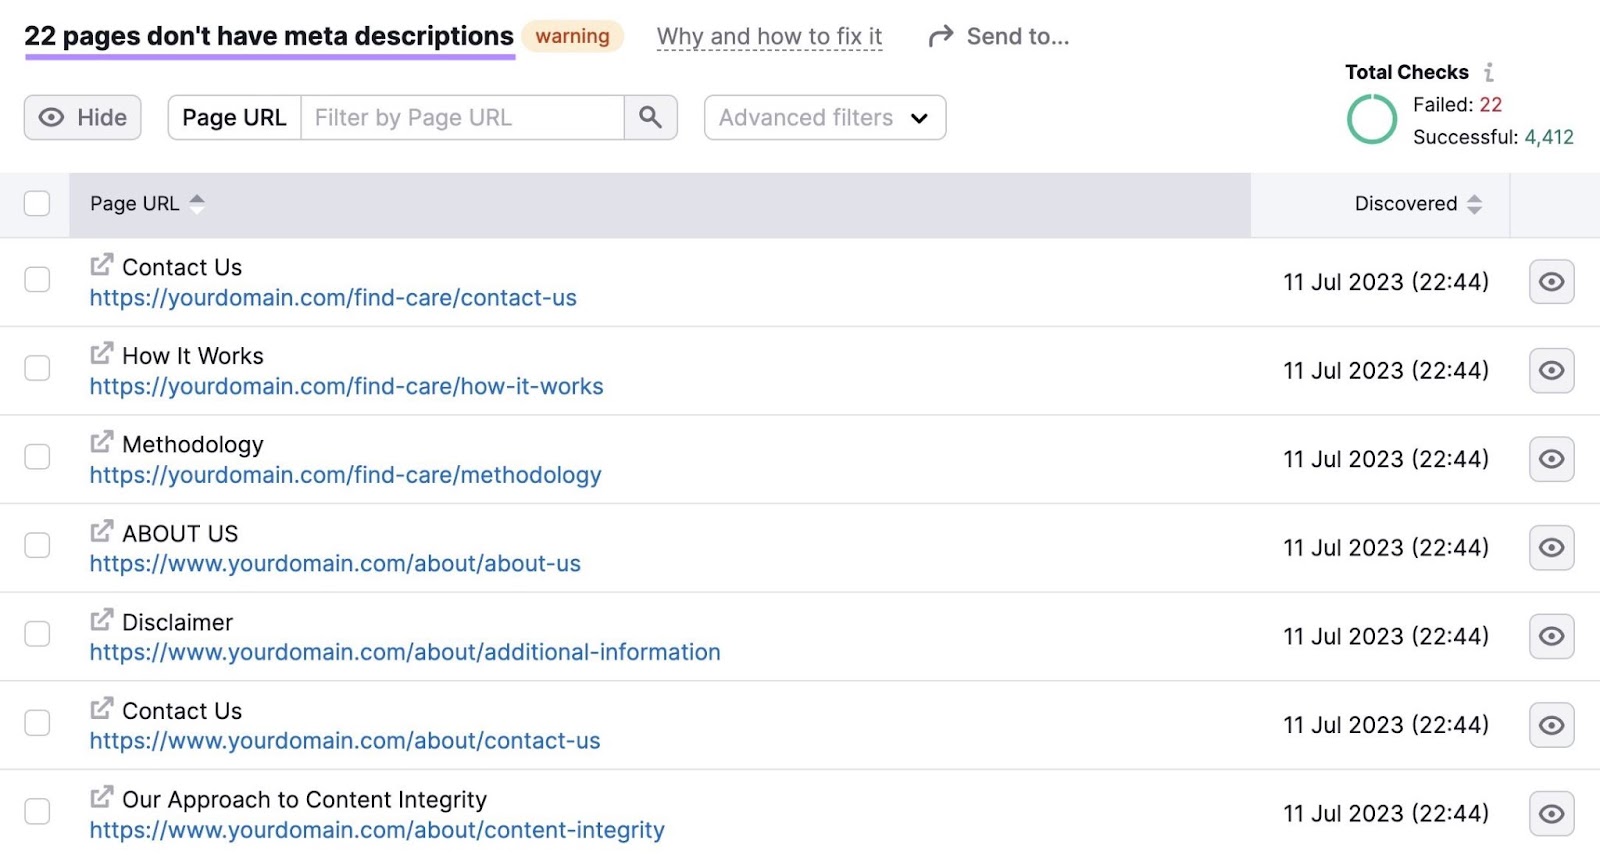
The next step is to fix the issues. Open each affected page in WordPress and make the necessary improvements.
Combined with the power of Google Analytics data, Semrush’s suite of tools helps you make informed decisions that grow your business.
Running a Site Audit and fixing your site’s issues is only the first step. To rank in search results and grow your organic traffic, you’ll need to publish relevant, quality content that adds value for users.
For that, you’ll need a content strategy. That means understanding your market and audience, researching your competitors, and finding the right keywords to target.
You can do all of this and more with Semrush tools.
Sign up for a free trial and unlock your site’s full potential.
Source link : Semrush.com