
Historically, it was quite challenging to add custom languages to the sitecore, as it was dependent on the cultures registered in the .net framework on the OS level. Of course, there were a few workarounds like registering the custom culture on Windows, but it only added other challenges for scenarios such as having more than one Content Delivery Server.
Luckily, both XM Cloud and SXA changed the way we deal with it, not to mention retiring CD servers. I am going to show the entire walkthrough, in action – everything you need to do on the CM side of things and your Next.js head application, on an example of a custom component. So, here we go!
In the beginning, I only had a basic website running in a multi-site SXA-based environment. Because of that it benefits from a responsive Header component with navigation items. It will be a good place to locate a language dropdown selector, as that’s where users traditionally expect it to be. But first, let’s add languages into the system as English is the default and the only one I have so far. Since I live in North America, I am going to add two most popular languages – French and Spanish, as commonly spoken in Quebec and Mexico correspondingly.
Adding Languages
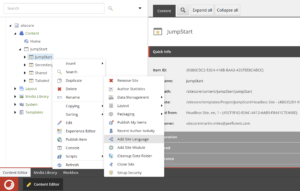
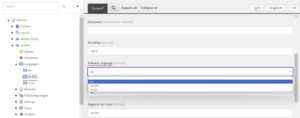
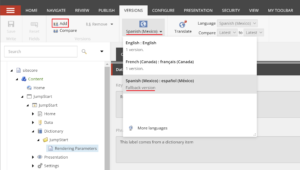
In XM Cloud, languages are located under /sitecore/system/Languages folder. If a language is not present there, you won’t be able to use it, which is my case. I really like the functional language selector dialog provided by the system:

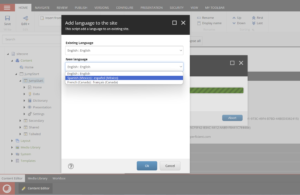
After the language lands into a system, we can add it to a specific website. I really enjoy plenty of scaffolding in SXA is based on SPE scripts and here’s a case. To add the site language, choose Scripts from a context menu, then select Add Site Language:
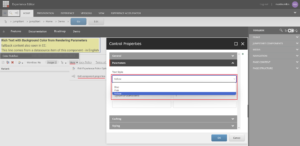
Then specify the language of choice, as well as some parameters, including the language fallback option to the defaults.
In XM Cloud you can find a new Custom Culture section on the language item, which has two important fields:
Base ISO Culture Code: the base language you want to use, for example:enFallback Region Display Name: display name that can be used in the content editor or in the Sitecore pages.
Now both the system and website have these new languages. The next step would be introducing a drop-down language selector, at the top right corner of a header.
Unlike the traditional non-headless versions of XP/XM platforms, XM Cloud is fully headless and serves the entire layout of a page item with all the components via Experience Edge, or a local GraphQL endpoint running on a local CM container with the same schema. Here’s what it looks like in GraphQL IDE Playground:
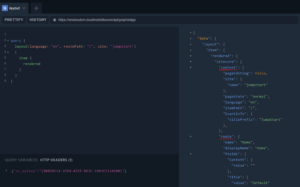
There are two parts to it: context which contains Sitecore-context useful information, such as path, site, editing mode, current language, and route with the entire layout of placeholders, components, and field values. Since the language selector is a part of the header and is shown on every single page, that would be really great (and logical) to provide the list of available languages to feed this this component with a context. How can we achieve that?
The good news is pretty doable through Platform customization by extending getLayoutServiceContextpipeline and adding ContextExtension processor:
<?xml version="1.0"?>
<configuration xmlns:patch=" xmlns:set=" xmlns:role="
    <sitecore>
        <pipelines>
            <group groupName="layoutService">
                <pipelines>
                    <getLayoutServiceContext>
                        <processor type="JumpStart.Pipelines.ContextExtension, JumpStart" resolve="true" />
                    </getLayoutServiceContext>
                </pipelines>
            </group>
        </pipelines>
    </sitecore>
</configuration>
and the implementation:
using System.Collections.Generic;
using Sitecore.Data.Items;
using Sitecore.Diagnostics;
using Sitecore.Globalization;
using Sitecore.JavaScriptServices.Configuration;
using Sitecore.LayoutService.ItemRendering.Pipelines.GetLayoutServiceContext;

namespace JumpStart.Pipelines
{
    public class ContextExtension : Sitecore.JavaScriptServices.ViewEngine.LayoutService.Pipelines.
        GetLayoutServiceContext.JssGetLayoutServiceContextProcessor
    {
        public ContextExtension(IConfigurationResolver configurationResolver) : base(configurationResolver)
        {
        }

        protected override void DoProcess(GetLayoutServiceContextArgs args, AppConfiguration application)
        {
            Assert.ArgumentNotNull(args, "args");

            var langVersions = new List<Language>();
            Item tempItem = Sitecore.Context.Item;
            foreach (var itemLanguage in tempItem.Languages)
            {
                var item = tempItem.Database.GetItem(tempItem.ID, itemLanguage);
                if (item.Versions.Count > 0 || item.IsFallback)
                {
                    langVersions.Add(itemLanguage);
                }
            }

            args.ContextData.Add("Languages", langVersions);
        }
    }
}
To make this code work we need to reference Sitecore.JavaScriptServices package. There was an issue that occurred after adding a package: the compiler errored out demanding to specify the exact version number of this package. It should be done at packages.props at the root of a mono repository as below:
<PackageReference Update="Sitecore.JavaScriptServices.ViewEngine" Version="21.0.583" />
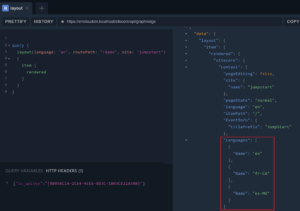
After deploying, I am receiving site languages as a part of Sitecore context object for every single page:
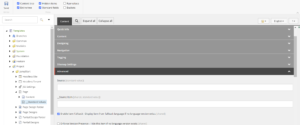
If for some reason you do not see language in the graphQL output, but the one exists in both system and your site – make sure it has language fallback specified:
You also need to configure language fallback on a system, as per the official documentation. I ended up with this config patch:
<?xml version="1.0"?>
<configuration xmlns:patch=" xmlns:set=" xmlns:role="
  <sitecore>
    <settings>
      <setting name="ExperienceEdge.EnableItemLanguageFallback" value="true"/>
      <setting name="ExperienceEdge.EnableFieldLanguageFallback" value="true"/>
    </settings>
    <sites>
      <site name="shell">
        <patch:attribute name="contentStartItem">/Jumpstart/Jumpstart/Home</patch:attribute>
        <patch:attribute name="enableItemLanguageFallback">true</patch:attribute>
        <patch:attribute name="enableFieldLanguageFallback">true</patch:attribute>
      </site>
      <site name="website">
        <patch:attribute name="enableItemLanguageFallback">true</patch:attribute>
        <patch:attribute name="enableFieldLanguageFallback">true</patch:attribute>
      </site>
    </sites>
  </sitecore>
</configuration>
I also followed the documentation and configured language fallback on a page item level at the template’s standard values:
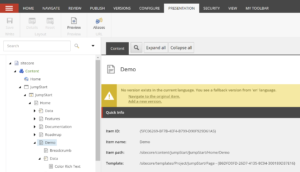
Now when I try to navigate to my page by typing browser shows me 404. Why so?
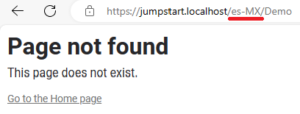
This happens because despite we added languages in XM Cloud CM and even specified the fallback, the next.js head application knows nothing about these languages and cannot serve the corresponding routes. The good news is that the framework easily supports that by just adding served languages into next.config.js of a relevant JSS application:
i18n: {
  locales: [
    'en',
    'fr-CA',
    'es-MX',
  ],
  defaultLocale: jssConfig.defaultLanguage,
  localeDetection: false,
}
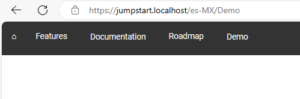
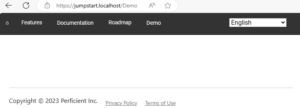
After the JSS app restarts and upon refreshing a page, there’s no more 404 error. If done right, you might already see a header.
But in my case the page was blank: no error, but no header. The reason for this is pretty obvious – since I benefit from reusable components by a truly multisite architecture of SXA, my header component belongs to a Partial Layout, which in turn belongs to a Shared website. Guess what? It does not have installed languages, so need to repeat language installation for the Shared site as well. Once done – all works as expected and you see the header from a shared site’s partial layout:
Dropdown Language Selector
Now, I decided to implement a dropdown Language Selector component at the top right corner of a header that picks up all the available languages from the context and allows switching. This will look as something like the below:
import { SitecoreContextValue } from '@sitecore-jss/sitecore-jss-nextjs';
import { useRouter } from 'next/router';
import { ParsedUrlQueryInput } from 'querystring';
import { useEffect, useState } from 'react';
import { ComponentProps } from 'lib/component-props';
import styles from './LanguageSelector.module.css';

export type HeaderContentProps = ComponentProps & {
  pathname?: string;
  asPath?: string;
  query?: string | ParsedUrlQueryInput;
  sitecoreContext: SitecoreContextValue;
};

const LanguageSelector = (props: HeaderContentProps): JSX.Element => {
  const router = useRouter();
  const [languageLabels, setLanguageLabels] = useState([]);

  const sxaStyles = `${props.params?.styles || ''}`;

  const languageNames = new Intl.DisplayNames(['en'], { type: 'language' });

  const languageList = props.sitecoreContext['Languages'] as NodeJS.Dict<string | string>[];

  useEffect(() => {
    const labels = languageList.map((language) => languageNames.of(language['Name']));

    setLanguageLabels(labels);
  }, []);

  const changeLanguage = (lang: string) => {
    if (props.pathname && props.asPath && props.query) {
      router.push(
        {
          pathname: props.pathname,
          query: props.query,
        },
        props.asPath,
        {
          locale: lang,
          shallow: false,
        }
      );
    }
  };

  const languageSelector = languageList && languageLabels.length > 0 && (
    <select
      onChange={(e) => changeLanguage(e.currentTarget.value)}
      className="languagePicker"
      value={props.sitecoreContext.language}
    >
      {languageList.map((language, index) => (
        <option
          key={index}
          value={language['Name']}
          label={languageLabels[index]}
          className="languageItem"
        >
          {languageNames.of(language['Name'])}
        </option>
      ))}
    </select>
  );

  return (
    <>
      <div className={`${styles.selector} ${sxaStyles}`}>{languageSelector}</div>
    </>
  );
};

export default LanguageSelector;
Since I made the header responsive with a “hamburger” menu seen on mobiles, I am also referencing responsive styles for this component:
.selector {
    float: right;
    position: relative;
    top: 13px;
    right: 40px;
}

@media screen and (max-width: 600px) {
    .selector {
        right: 0px;
    }
}
Now it can be used from the header as:
<LanguageSelector pathname={pathname} asPath={asPath} query={query} sitecoreContext={sitecoreContext} {...props} />
and it indeed looks and works well:

switching to Spanish correctly leverages next.js for switching the language context and changing the URL:

Now, let’s progress with a multi-language website by adding a demo component and playing it over.
Adding a Component
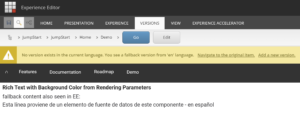
For the sake of the experiment, I decided to gith something basic – an extended Rich Text component that in addition to a datasource also receives background color from Rendering Parameters. There are 3 lines with it:
- the top line in bold is always static and is just a hardcoded name of the component, should not be translated
- the middle line is internal to the component rendering, therefore I cannot take it from the datasource, so use Dictionary instead
- the bottom one is the only line editable in Pages/EE and comes from the datasource item, the same as with the original RichText
Here’s what it looks like on a page:
And here’s its code (ColorRichText.tsx):
import React from 'react';
import { Field, RichText as JssRichText } from '@sitecore-jss/sitecore-jss-nextjs';
import { useI18n } from 'next-localization';

interface Fields {
  Text: Field<string>;
}

export type RichTextProps = {
  params: { [key: string]: string };
  fields: Fields;
};

export const Default = (props: RichTextProps): JSX.Element => {
  const text = props.fields ? (
    <JssRichText field={props.fields.Text} />
  ) : (
    <span className="is-empty-hint">Rich text</span>
  );
  const id = props.params.RenderingIdentifier;

  const { t } = useI18n();

  return (
    <div
      className={`component rich-text ${props.params.styles?.trimEnd()}`}
      id={id ? id : undefined}
    >
      <div className="component-content">
        <h4>Rich Text with Background Color from Rendering Parameters</h4>
        <span>{t('Rendering Parameters') || 'fallback content also seen in EE'}: </span>
        {text}
        <style jsx>{`
          .component-content {
            background-color: ${props.params.textColor
              ? props.params.textColor?.trimEnd()
              : '#FFF'};
          }
        `}</style>
      </div>
    </div>
  );
};
What is also special about this component, I am using I18n for reaching out to Dictionary items, see these lines:
import { useI18n } from 'next-localization';
const { t } = useI18n();
<span>{t('Rendering Parameters') || 'fallback content, it is also seen in EE when defaults not configured'}: </span>
Next, create a version of each language for the datasource item and provide the localized content. You have to create at least one version per language to avoid falling back to the default language – English. The same also applies to the dictionary item:
The result looks as below:


Rendering Parameters
Now, you’ve probably noticed that the English version of the component has a yellow background. That comes from rendering parameters in action configured per component so that editors can choose a desired background color from a dropdown (of course, it is a very oversimplified example for demo purposes).
What is interesting in localization is that you can also customize Rendering Parameters per language (or keep them shared by the language fallback).
Rendering Parameters are a bit tricky, as they are stored in the __Renderings and __Final Renderings fields of a page item (for Shared and Versioned layouts correspondingly), derived from Standard template (/sitecore/Templates/System/Templates/Standard template). That means when you come to a page with a language fallback, you cannot specify Rendering Parameters for that language unless you create a version of the entire page. Both Content Editor and EE will prevent you from doing that while there is a language fallback for the page item:
Creating a new language version can be very excessive effort as by default it will make you set up the entire page layout add components (again) and re-assigning all the datasources for that version. It could be simplified by copying the desired layout from the versioned __Final Renderings field to the shared __Renderings field, so that each time you create a new language version for a page item, you “inherit” from that shared design and not create it from scratch, however, that approach also has some caveats – you may find some discussions around that (here and there).
In any case, we’ve got the desired result:

English version

French version

Spanish version
Hope you find this article helpful!