A cryptic “400 Bad Request” error appearing on your site can be frustrating.
What does it mean? And how do you fix it?
Let’s take a look.
What Does a 400 Bad Request Mean?
A 400 bad request error occurs when a browser sends a request to a web server that the server cannot understand or process correctly.
This is an HTTP response status code in the 4XX range. HTTP status codes starting with 4XX typically indicate an error on the client side—meaning the issue is on your end.
Think of a 400 error like going to a restaurant and ordering something not on the menu. The kitchen doesn’t know how to make your request and has to send back a message saying, “We can’t understand or process this order.”
In Google Chrome, a 400 error code page looks like this:

In Safari it looks like this:

Similar to the way it looks in Firefox:

There are many different messages servers use to indicate a 400 error code, including:
- 400 Bad Request
- HTTP 400 Bad Request
- HTTP Status 400—Bad Request
- 400 Bad Request Error
- HTTP Error 400
- Bad Request: Error 400
- HTTP Error 400—Bad Request
Let’s explore the common causes of 400 bad request errors and how to fix them.
HTTP 400 Error Causes
1. Typos in the URL String
One common mistake that leads to a 400 error is mistyping the website address in the search bar in your browser.
Typos like extra spaces or using “@” or “%” symbols can create a malformed URL that the server sees as having incorrect syntax (structure of the URL), leading to a 400 error.
For example, entering “https://www.semrush.com/%blog/” instead of “https://www.semrush.com/blog/” will result in a 400 error due to the typo creating a syntax error in the URL format.

Why does this happen?
Because “https://www.semrush.com/%blog/” doesn’t exist. So, the server can’t find this address.
How to Fix Typos in the URL String
Double-check the URL for typos or incorrect symbols. Then try again.
The browser can send the request successfully once the address bar shows the exact website address without typos.
2. File Size Is Too Large
A common reason for getting a 400 error is if you try to upload a file that’s too big for your website.
For example, uploading an image, video, or document file over the size limit to a site like WordPress can lead to a 400 error.
In WordPress, you can check your file size limit by clicking on “Media” followed by “Library” and then “Add New” in the left-hand column.
You should then see something that looks like this:

The maximum file size a website can handle depends on the website’s specific settings.
If your file is bigger than the site can accept, the website’s server won’t be able to process your request.
How to Fix File Size Errors
To fix this 400 error, you need to reduce the file size below the website’s size restriction before trying to upload it again. This allows the server to handle the file and complete your request.
Host your videos on YouTube or Vimeo, upload your audio files to SoundCloud, and post your photos on image hosting sites if your file sizes are too large.
3. Corrupted or Invalid Cookies
Cookies are small data files that websites store on your computer, mobile, or any other device to remember useful information—like login details or site preferences.
When you revisit a website, the cookies load faster because they already have saved data about you.
But sometimes, cookies can get corrupted or damaged. If a website’s server tries to access a corrupted cookie from your browser, it may fail and return a 400 bad request error.
How to Fix Corrupted or Invalid Cookies
Clearing your cookies is the easiest way to remove corrupted or invalid ones causing 400 errors.
How you clear your cookies will depend on what browser you’re using.
Here’s how you’d do it in Google Chrome:
Click on the three dots in the top right hand corner of the browser and click “Settings”:

Then click “Privacy and security” on the left-hand side:

Click “Clear browsing data” and you’ll see this prompt to clear your cookies:
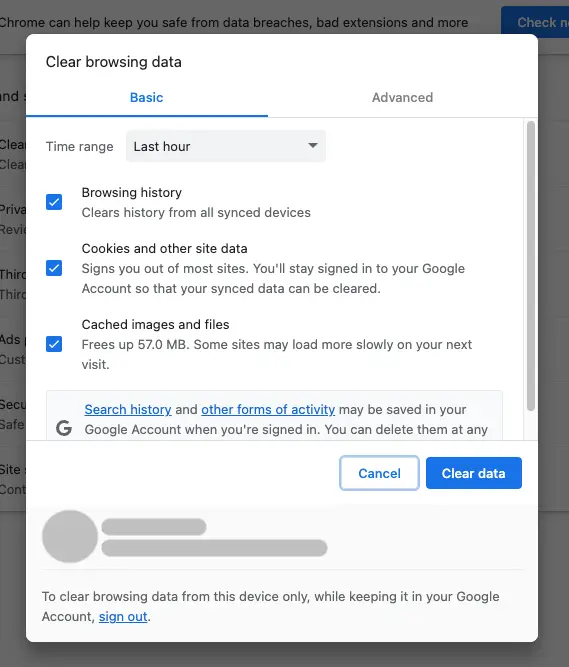
Deselect “Browsing history” and “Cached images and files” and then click “Clear data.”

Check out the articles below to clear cookie data for different browsers:
After clearing cookies, revisit any pages giving 400 bad request errors to generate new valid cookie files.
4. Outdated DNS Cache
DNS stands for Domain Name System. It’s a naming system for websites and other internet resources that translates domain names into IP addresses (like a phonebook).
Your operating system stores these records in its DNS cache. Sometimes, these records become outdated if a site’s IP address changes.
When you visit that site, your computer sends the request to the old IP address from the DNS cache instead of the new one.
This can result in a 400 error since the old IP no longer exists.
How to Fix an Outdated DNS Cache
Flushing your DNS cache removes any outdated name/IP records that could be causing 400 errors.
But your operating system stores the DNS “phonebook”—not your browser. So, you need to clear your system’s DNS cache.
However, an outdated IP address may not always cause a 400 error. It could also lead to timeout or “server not found” messages. This is because no request reaches the server if the IP is wrong.
So flushing your DNS cache can help fix some 400 errors. But other connection problems can happen too if your DNS records are outdated.
How to Flush the DNS Cache on Windows
Open the “Start” menu and type “cmd” in the search bar.
Select “Run as Administrator.”

In the Command Prompt window that opens, enter the following command and click “Enter”:
ipconfig /flushdns
After running the command, the Command Prompt will display a message confirming that the DNS Resolver Cache has been successfully flushed.

Now, try reaccessing the website to see if the problem has been resolved.
How to Flush the DNS Cache on Mac
To flush the DNS cache on macOS, you’ll need to run a Terminal command.
However, please note that the command varies depending on your macOS version.
Here’s how to do it:
First, open Spotlight by pressing “Command + Space.”
In the Spotlight search bar, type “Terminal” and click on “Terminal.app” to launch the Terminal program.

For macOS Catalina and later versions, you can use the following command:
sudo dscacheutil -flushcache;sudo killall -HUP mDNSResponder
Enter it in the Terminal and press “Enter”:

If the website still doesn’t load, it could be down, or you might be experiencing Wi-Fi issues.
In some cases, you may need to investigate further to identify and address any underlying network problems on your end.
5. Server Issue
Usually, 400 errors happen because of a mistake in the client request. But sometimes, the server is configured wrong—and this can cause 400 errors, too.
For example, the server might be waiting for extra information from the client that the client doesn’t send. The client didn’t do anything wrong, but the server still returned a 400 error since the request wasn’t what it expected.
How to Check for Server Configuration Issues
Your best option is to load the website in a different browser (Chrome, Safari, Firefox). If you’re still getting a 400 bad request error, the issue is server-side and out of your control.
You could also try a different device to rule out any device-specific issues.
If you get the error across browsers and devices, it confirms the root cause is a server configuration problem that needs to be fixed by the website owner.
While troubleshooting individual 400 errors is important, auditing your overall site health is critical to catch issues before impacting users.
How to Audit Your Site for 4XX Status Code Errors
Regularly auditing sites for HTTP status codes like 400 and 404 errors can uncover technical problems before they affect site visitors.
For example, another common 4XX code you may be familiar with is the 404 Not Found error.
A 404 Not Found error page appears when a requested page doesn’t exist on the server, often due to broken links or invalid URLs.
For example, clicking a broken link on eBay’s site would display this 404 error page:

Semrush’s Site Audit tool can show if web crawlers and users will likely encounter 4XX status codes.
How?
By crawling all pages on your website to check response codes, analyze external links, identify issues with speed and security, and more.
First, select “Site Audit” from the left-hand menu and click “+ Create project”

Enter your domain and a project name in the “Create project” window, then click “Create project”

Configure the audit’s settings with the tool’s setting panels. You can set the audit’s crawl scope and include any disallowed pages.
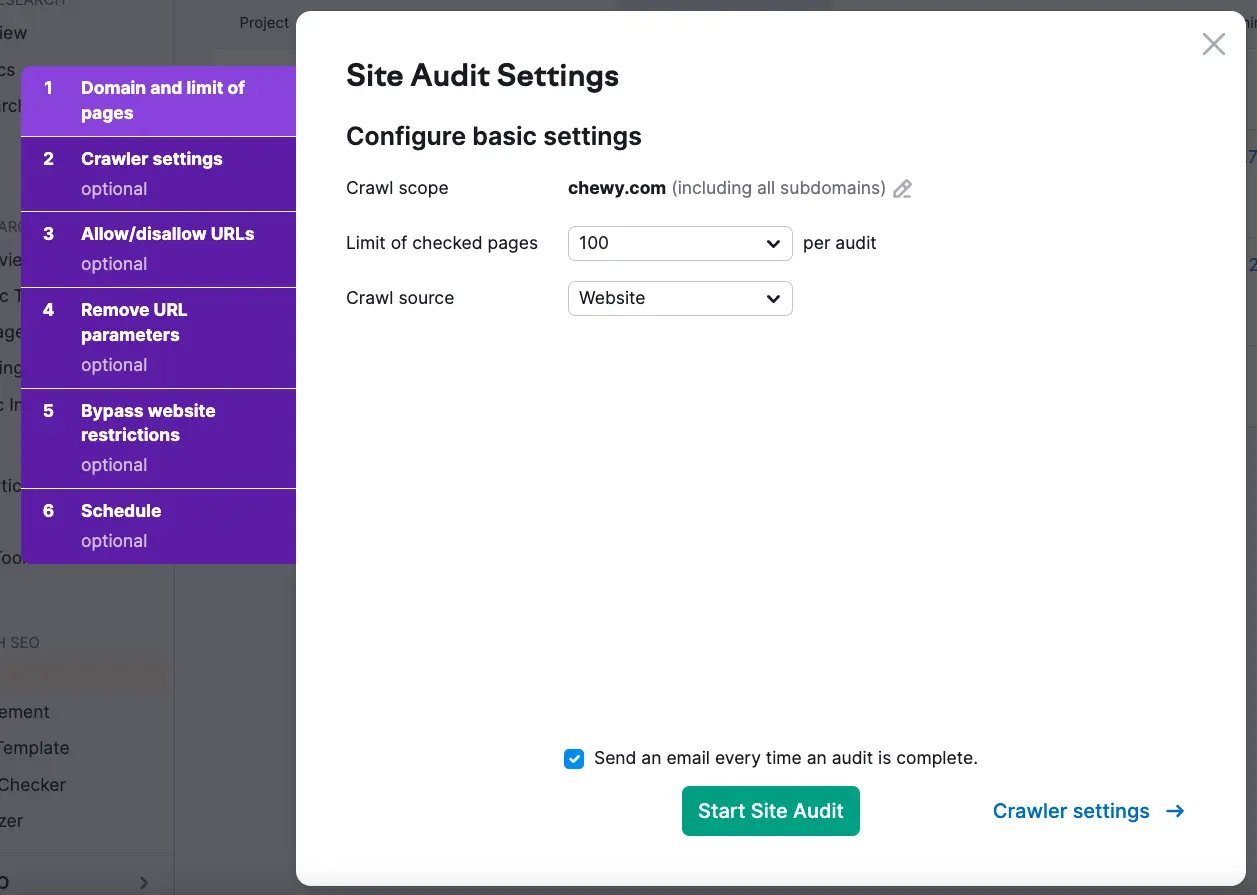
Schedule Site Audit to regularly crawl your website to automatically catch and report errors on your website. To do this, click “Schedule” and select the crawl frequency for your website.
Then, hit “Start Site Audit.”

When the audit is complete, click on the “Issues” tab:

If you have any 4XX errors, you’ll find them under the “Errors” section:

Site Audit will show you any 4XX errors, including 404 Page Not Found errors.
Clicking “Why and how to fix it” next to the error in the audit report gives a breakdown of the issue and fix recommendations. This simplifies troubleshooting any 4XX codes found.

Automate 4XX Error Checks with Site Audit
While 4XX errors may seem like random glitches at first, they usually have straightforward explanations and fixes.
Knowing how to troubleshoot and fix 4XX error messages will give users a better browsing experience.
Your first step?
Use Semrush’s Site Audit tool to find and fix 4XX error messages as soon as you can.
Then, schedule a Site Audit to run recurring crawls on your site daily or weekly. Staying on top of 4XX errors before they impact users is critical for optimal site performance.
Source link : Semrush.com